
FastForward - 10-21-2010 at 10:19 AM
Hi,
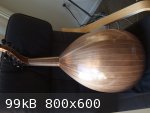
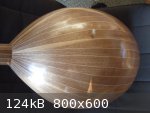
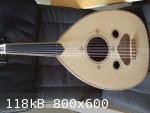
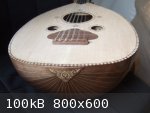
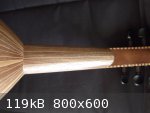
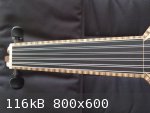
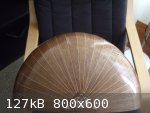
On 9/18/2010 I completed the oud and strung it.
Here are some photos, I will try and post a sound file soon. On that, what is the best way to record the oud, when I use my computer's microphone the
sound comes out different.
It is very resonant and sounds well. But I would love to hear the opinion of other experienced people. If you are in LA and want to try it and give me
your opinion please let me know.
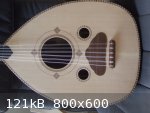
Here are the pictures.
Disclaimer: I am not an oud maker and I don't want to be. I did this out of curiosity and will most likely be my first and only oud.
FastForward - 10-21-2010 at 10:24 AM
Here are some more pictures.
paulO - 10-21-2010 at 10:28 AM
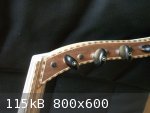
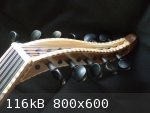
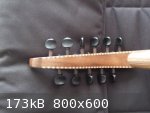
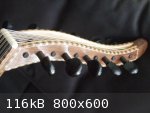
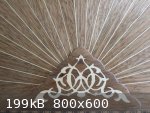
Cool work FF; The body's really elegant looking, love the detail on the pegbox, can't wait to hear it.
Regards..Paul
BaniYazid - 10-21-2010 at 11:06 AM
beautiful 
SamirCanada - 10-21-2010 at 12:14 PM
Wow amazing work man.
Chapeau 
FastForward - 10-21-2010 at 12:45 PM
Paul: Thanks, I will definitely post a sound sample soon. I just need to figure the best way to record it.
BaniYazid: Thanks,
Samir: Thanks for the compliment. I am following your oud come to life and admiring your work.
Mehran - 10-21-2010 at 04:01 PM
fantastic work...is this the first oud you've made?
FastForward - 10-21-2010 at 10:56 PM
Thanks Mehran. Yes, this is first and most probably the last. I also have had no wood working experience prior to building the oud. But there is
plenty of information on the net for the curious to read and learn.
Mehran - 10-22-2010 at 04:36 AM
Your first with no experience, definitely a brilliant result.
Im thinking of building one at some point. I was wondering what tools (& how many) you needed in the end to build it?
Im trying to figure out a list of tools I will require to build a similar kind of oud, preferably keeping the amount to a minimum.
Mehran
Brian Prunka - 10-22-2010 at 12:13 PM
Beautiful work, I would be impressed if this was your 10th oud . . . as your first, I am astounded.
You have some talent. 
Astounding !
spyrosc - 10-22-2010 at 03:32 PM
If this is your first, DON'T STOP !
God gave you a talent my friend, so don't bury it.
What an amazing piece of work, especially when you say you had no prior wood working experience !
What line of work are you in anyway? You certainly demonstrated a whole series of skills there, not to mention amazing style, class, and good
taste.
I'm going to have to drive down to LA just to see it from up close.
You are an inspiration to the rest of us.
Spyros C.
FastForward - 10-22-2010 at 08:36 PM
Mehran: If you are serious about it and determined go for it. Remember to be patient and persistent as there will be many times during the building
process that you will question your sanity and the decision you made to build one.
As for tools here is a list of things I bought not all of which are necessary and I didn't buy them in one shot.
- Chisels (1/4,1/2,3/4,1") I bought a basic set from Harbor Freight for about $5
- Files (different kinds) didn't use them that much but can be useful, again from Harbor Freight for about $7.
- A wood rasp ($8) was useful for many things.
- Clamps (various F, C, and bar clamps) a must have (I bought mine from harbor freight on sale some for as little as $1)
- A square ($10)
- A vernier caliper ($15)
- Diamond needle file set ($8)
- A rotary tool (Black and Decker RTX) $25 for cutting circles and routing pockets, I made my own circle cutting jig (see some of my other threads for
photos of that jig)
- Saws: Japanese Dozuki saw $30, a fret saw $15(needed only if you want to do certain inlays), a miter box and saw $13. you can get more saws and they
will make your life easier.
- Bosch Colt hand held router ($75 don't ask me how I got I got it for this price, and yes it was brand new in box)
- A rabbeting bit set (with 1/8" depth, only needed if you want to inlay your peg box and your hand skills are as bad as mine  )
)
- A hammer
- A straight edge ($3)
- French curve set ($10) used this to make the profile of the oud and the beard (Mihrab).
- Make your own bending iron, check the tutorials online, mine was made from an aluminum tube and an electric charcoal lighter. Definitely not a good
bender. If I ever decide to make another oud, I would build a different one.
- A rival hot pot (as a hide glue pot) $13.
- A thermometer ($10) to monitor the glue temperature.
- Make your own custom miter box for the inlays.
- Glue brushes. For hide glue, and for wide areas, use a foam brush, its the best thing you can use. For small areas, just use a natural hair brush
from an art store. I bought a cheap set of 20 brushes for about $5.
- hand planes: I bought a 14" Jack plane ( Footprint for $35). Make sure you tune it well, instructions can be found online. I also bought a small 3"
trim plane for $8 from HomeDepot. This was very useful for trimming the braces and the edge tiles.
- A wood working vise ($30)
- A hand drill (may not be necessary)
- A peg reamer ($20) from a local violin shop, make your own peg shaper based on this reamer. You will get a perfect match between the pegs and the
holes.
- Sand paper, various grits. I also bought a set of super fine micromesh sandpaper and used it to make my own sharpening jig on a piece of glass. With
this setup I got my tools to be very sharp.
- Scrapers ($15)
These are the tools that I remember I used. If I remember more I will post them. Of course, I had the wood strips for the back cut at the wood
supplier. Having access to a band saw will also make your life easier, especially if you decide to make a mould.
FastForward - 10-22-2010 at 08:45 PM
Brian: Thank you for your compliments, it must be beginners luck and I decided to retire at my peak  It took a good amount of work and patience.
Spyros: You are very kind, I am grateful for these kind words.
I think the biggest part of making the oud was being patient and a lot of reading and planning. The information on this forum and on the net have been
very helpful and have made my life much easier. I think that made up for my lack of wood working experience.
I am an engineer but I don't do any applied work, mainly theoretical work.
If you ever decide to come to LA let me know and I would be happy to show it to you and let you try it.
Ibrahim...
Mehran - 10-23-2010 at 05:14 AM
Thanks for the comprehensive list of tools. I appreciate the effort you went to.
Fortunately I own some of the tools on the list, but its easy for someone like me with little experience to overlook some of the smaller ones like the
router bits. Its also positive to see that a great result can be achieved with fairly modestly priced tools.
Looking forward to hearing how your oud sounds.
Many thanks
Mehran
ExtreamTarab - 10-23-2010 at 03:04 PM
Hey Ibrahim...congratulations, this is absolutely beautiful
I always think about building an oud...seeing this is an a big encouragement. Even though I think when building the first oud people try to keep it
simple because it's too difficult and complicated, you have changed this idea in my mind with your beautiful work...
Can't wait to hear it 
Regards,
Ibrahim
Jonathan - 10-23-2010 at 04:13 PM
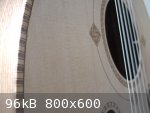
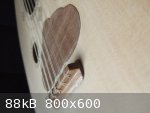
Wow. At first glance, the oud looks great. And then, on closer inspection, it looks even better. I really love the details--restrained and yet
powerful.
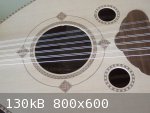
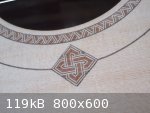
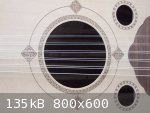
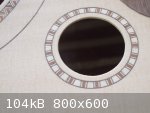
The purfling pattern for the inner circle of the central rosette--that heringbone-like pattern, is just sublime. I wish you posted pictures of the
process.
Just beautiful--I hope you make more.
FastForward - 10-24-2010 at 07:05 PM
Mehran: No problem, I will update the list with the miniature router bits that I bought.
ExtremeTarab (Ibrahim): Thank you and as I said earlier if you are serious about building one go ahead and do it. But be patient and read as much as
you can. Keeping it simple was not challenging enough for me so I opted with a bit more ornate oud and given that I wanted to make a single oud only I
told my self why not.
Jonathan: I am glad you like the inlays. I will post the procedure soon. I just need to organize my thoughts and put some photos. Unfortunately, not
having a camera during the building process meant that I couldn't take too many photos with my phone and computer.
You and other guys on this forum who built ouds before me were a great source of encouragement and the information posted by you were of tremendous
help.
I will post a sound sample tonight.
FastForward - 10-24-2010 at 07:22 PM
Here is a sound sample recorded with my computer microphone. Sorry for the bad quality.
Also, try for a moment to ignore my poor playing and lack of discipline in keeping up with the beat.
http://www.4shared.com/audio/MJM0oNKT/n1_online.html
Some info about the oud:
Scale length 58.5cm
Bowl length 50cm
Width: 38.3cm ( the original goal was 37cm)
Bowl depth: 20.8cm ( the goal was 20cm)
Strings: Labella Turkish set tuned one step lower CFAdgc. I will try to install a different set to see how the oud sounds.
bulerias1981 - 11-12-2010 at 06:45 PM
what a wonder job you did. great