
jdowning - 4-28-2011 at 04:12 PM
The earliest surviving lutes are those made by the German luthiers Laux Maler and Hans Frei in the early 16th C.
In 1979 I made a reconstruction of a Laux Maler lute - as a research project - based on the M.1.54 sound board by Maler. The lute was made to test the
latest 'roped' historical gut basses then coming on to the market. The instrument was made with a neck of sufficient length to accommodate 8 frets
giving a string length of 73 cm.
More recent research recently reported on this forum (see 'Old Oud compared to Old Lute Geometry') suggests that the Maler lutes may originally have
been a development of a 14th C oud described by Ibn al-Tahhan with a shorter neck carrying 7 frets and string length of 67.5 cm. (For a more detailed
analysis see my FoMRHI Comms 1935 and 1936 ' Ancient Metrology, Ibn al Tahhan and the Maler and Frei Lutes - available for free download from the
FoMRHI website - or Google search).
It has, therefore, been decided to rebuild the experimental lute - to represent and test this new line of thought - with a shorter neck length (7
frets), string length 67.5 cm and with all silk stringing.
The shorter string length means that the pitch of the lute with silk stringing will be increased by about a tone - from about C sharp pitch (at A440)
to E flat - so it will be interesting to see how this might affect the acoustic performance.
The basses will be octave tuned as was the custom for gut strung lutes in the first part of the 16th C.
jdowning - 4-29-2011 at 12:18 PM
The objective is to undertake conversion work with the minimum of alteration/repair.
The instrument is now over 30 years old and is showing signs of wear but is still in good playable condition.
After the initial trials with all gut stringing in 1979, the bridge and action was modified to accommodate modern - smaller diameter - Pyramid lute
strings and used as a 'D tuned' bass lute with six courses.
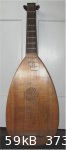
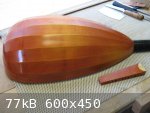
The bowl is made from lightly figured maple with 11 ribs about 1.5 mm thick and finished with a dark red oil varnish - a characteristic of the Maler
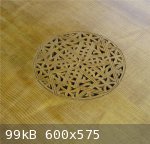
lutes. The sound board is made from Sitka Spruce. The rosette is 'cut in' - the design again being characteristic of the surviving Maler lutes. The
sound board thickness around the rosette is about 1 mm graduating to about 2 mm around the edge of the soundboard.
Bracing is copied from the original M.1.54 sound board as is the original bridge location and dimensions derived from marks on the sound board.
The bridge is made from soft maple, stained black, with a thin Ebony cap.
The neck is made from soft Maple stained black with a fingerboard of Indian Rosewood, 2 mm thick.
The work to be undertaken in this project is as follows:
1) Remove peg box and shorten the neck by 5.5 cm. Refit peg box.
2) Re-drill the bridge string holes (in situ) to accept larger diameter silk strings and re-stain.
3) Remove the wooden frets on the sound board. Repair and clean sound board.
4) Reduce width of neck at the nut and re-stain the neck.
5) Extend fingerboard onto the neck block as far as the 8th fret position.
6) Plane and level the finger board to minimise string action.
7) Repair/touch up small areas of varnish as required. The varnish is worn but the bowl will not be refinished
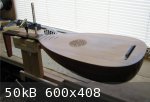
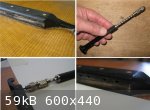
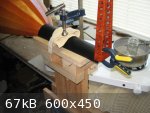
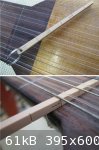
In order to carry out this work conveniently and with the necessary precision the instrument must be firmly clamped in an easily made holder as shown
in the attached image.
jdowning - 5-1-2011 at 05:48 AM
The 1970's saw a revival of the lute in Europe. The lute making traditions of the 16th and 17th C having long since been forgotten, it was a period of
research and discovery - a 'hands on' self teaching/learning process for those wishing to construct lutes that were lightly built replicas of
surviving instruments.
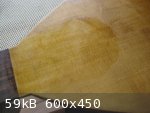
In those days it was common practice to seal lute sound boards with a thin shellac wash coat. The old lute sound boards have a uniform, oxidised
patina - so it was assumed that they originally had some kind of invisible sealer applied. However, examination of this sound board after 30 years
indicates that - if sealers were ever applied to lute sound boards (and there is some doubt about that possibility) - dilute shellac was not among
them as it does not prevent non-uniform localised wear and staining over time.
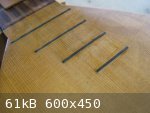
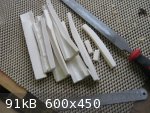
The first task is to remove the 'glued on' wooden frets on the sound board. Wooden frets on early lutes - while a popular convenience for modern lute
players - was not the norm in the 16th C the higher positions above the last fret on a fingerboard being played fretless as on an oud.
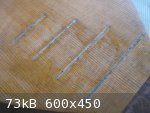
Removal of the frets was simple enough - the frets being covered with a damp cloth, heated with a hot iron and then lifted off with a thin artists
spatula. After drying, the marks left by the frets were carefully removed locally with a curved cabinet scraper. Removal of a small amount of sound
board material was inevitable in order to completely eliminate the marks but this is in an area over the neck block where the sound board is
thickest(about 2 mm) so should have no significant effect on either structural strength or acoustic performance.
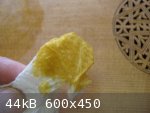
The task now is to 'blend in' the colour of the freshly exposed area with the rest of the sound board and to clean/repair the surface in other areas
like the eroded and discoloured patches under the strings.
jdowning - 5-1-2011 at 11:53 AM
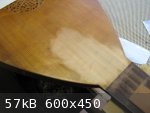
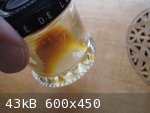
A concentrated stain has been made from a few flakes of orange shellac dissolved in a little alcohol. This has been wiped over the bare patches on the
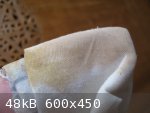
sound board in order to match the colour of the existing finish as closely as possible. The whole of the sound board will then be polished with very
fine abrasive papers (400 to 1500 grit) and wiped over with an alcohol soaked pad to remove as much of the old shellac surface finish as possible
without cutting through the thin finish into the sound board wood. This will take some time and repeated effort to complete so other work can proceed
in the meantime.
jdowning - 5-2-2011 at 11:58 AM
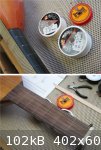
The bridge was originally made to accommodate all gut stringing with 'roped' gut basses. The new roped gut basses available in 1979 were relatively
large in diameter (compared to modern metal overspun basses) so the hole in the bridge for the 6th course was about 2.5 mm in diameter. After the
'all gut trials', the bridge was modified to accept nylon 'Pyramid' lute strings at a lower string height by planing down the top of the bridge (in
situ) and gluing on a thin ebony plate.
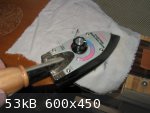
In order to accept all silk stringing the bridge must again be modified with larger hole diameters. This was easily done - 'in situ' - using a
jeweller's 'Archimedes' drill while protecting the sound board surface with a piece of card. All bridge holes have now been re-drilled to 1.6 mm
diameter.
In order to maintain the lowered string height at the bridge, the front of the bridge below the ebony top plate has been cut away with a gouge to form
an 'overhang' - a feature found on some surviving lutes of the 16th C.
The modified bridge has been re-stained using artist's "Indian" ink.

jdowning - 5-3-2011 at 11:30 AM
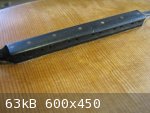
The peg box has been removed and 5.5 cm cut from the length of the neck - all done with a fine tooth razor saw.
The pegbox was originally set back at a slight angle of about 10 degrees to the vertical. On shorter string length lutes this provides some additional
clearance for the left hand when positioned close to the nut but is not necessary for this relatively long string length. The new setting is 90
degrees to the vertical - typical for the early 16th C lutes.
With the rebate for the pegbox cut and the pegbox fitted the sides of the fingerboard were trimmed back by planing to produce a narrower neck at the
nut. The neck then had to be reshaped - removing all of the old surface stain - with a scraper blade and finished smooth with fine sandpaper.
The neck has been re-stained black with Indian ink. This is a preliminary staining that will be 'touched up' later if required prior to finishing with
a protective coat of a hard oil varnish.
Mehran - 5-3-2011 at 12:29 PM
Cannot wait to hear what this sounds like. 
jdowning - 5-4-2011 at 04:43 AM
Me too Mehran - much is going to depend upon the success (or otherwise) of the all silk stringing - yet to be made and tested. The relatively long
string length should be of some help, however.
jdowning - 5-4-2011 at 04:56 AM
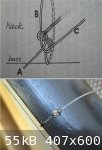
The lutes of the 16th/17th C had the neck joint reinforced by either the fingerboard or sound board overlapping the joint. This is probably a
characteristic feature of the early lutes that was not found in ouds of the period.
The project lute was originally built with the sound board overlapping the neck joint - a feature more usually found in lutes of the second part of
the 16th C and later.
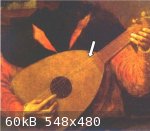
The attached images show three examples of fingerboard overlap from the 16th C iconography (there are many more).
This is the style that I will be using for this project - requiring modification of the finger board which is the next task in hand.


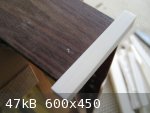
jdowning - 5-5-2011 at 04:50 AM
The original fingerboard is from Indian Rosewood about 2 mm thick. Indian Rosewood is an unlikely material for 16th C lutes. It is conveniently dark
in colour but is relatively soft and open grained so is not the best fingerboard material in any case. It should be replaced with hard, close grained
boxwood. However as the objective here is to keep modification work to a minimum the fingerboard will not be replaced but simply extended on to the
sound board.
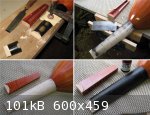
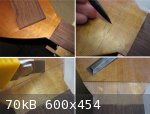
The 8th fret position is first calculated and marked on the sound board. The sound board was then cut through to the neck block at this point, the
surplus material cut away to the level of the neck block and the old glue cleaned off.
Two pieces of rosewood veneer (from the same log used for the original finger board) were cut on a band saw and planed/ scraped to the required
thickness. The two pieces were then planed to an exact fit using a small block plane to 'shoot' the edges straight and square.
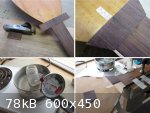
The pieces were glued in place using hot hide glue. Here a strong, fast setting hide glue (high bloom strength) is being used that will also be used
to re-glue the pegbox. A weaker, slower setting glue would be more convenient for gluing the veneer but I did not want to make up two separate batches
of glue.
With the joint surfaces coated with glue at the correct temperature the veneer pieces were pressed into place and then ironed over with a hot iron to
remelt the glue and ensure close contact of the glued surfaces. The veneers were then taped in place to dry.
The rosewood grain is quite irregular so a cabinet scraper was used to level and slightly 'crown' the finger board to ensure a close fit of the tied
frets. The finger board has also been tapered in thickness from 2mm at the sound board down to
1 mm at the nut to minimise string 'action'.

bulerias1981 - 5-5-2011 at 07:49 AM
jdowning,
As for drilling holes for the bridge, you might find this interesting if you didn't already know this method..
http://www.neallutes.com/
Please see the post for May 11, 2010
jdowning - 5-5-2011 at 12:07 PM
Thanks bulerias1981.
I did consider using a similar tool until realising that I had the jeweller's drill already to hand. The advantage of the jeweller's drill is that it
has a chuck that will accept standard (very low cost and disposable) machinist twist drills.
Also the task for this project is only to enlarge holes already in the bridge - a much simpler job than completely re-drilling a bridge blank. No
doubt this can be done but why go to the trouble of drilling a new bridge blank in situ when the task can be done more conveniently (and more
accurately?) prior to gluing the new bridge to the sound board?
Where can I find 'the post for May 11, 2010'?
bulerias1981 - 5-6-2011 at 09:38 AM
The post for May 11, 2010 is just that blog post about re-drilling the holes. I figure you could drill holes this way also if you didn't have a
jeweller's drill like me. I guess it would be a good investment.
Nice thread by the way, keep up the good work (as usual)
jdowning - 5-6-2011 at 12:05 PM
OK thanks again for the useful information.
Other holders for small diameter standard drill bits (that come in a very wide range of diameter increments) are inexpensive and readily available
obtainable from machinists supply houses (I think that they are called 'pin vices'). Just slip a flexible plastic tube over the handle as a convenient
'drive' to slowly rotate the drill using finger power.
Again this device would be used only for enlarging existing holes - not for re-drilling new holes in a bridge.
If I need to further slightly enlarge the hole size for the 6th course (a possibility) this is what I shall use as the jeweller's drill that I have
only accepts drill diameters up to 1/16 inch (1.6 mm).
I shall post images of the tool at a later date for information.
The peg box has now been glued to the neck with high strength hot hide glue. This is a straightforward joint to make so the fast setting glue can be
used to advantage. Nevertheless to increase the setting time in a cool workshop environment, the joint surfaces were first preheated with a hair drier
("borrowed" from my wife - in her absence) to give a few seconds extra time to get the peg box exactly in place before the glue 'gels' or starts to
set. After wiping away any glue squeezed out of the joint everything was left to dry and the glue fully harden - held in place with a spring clamp.
Hot hide glue shrinks on drying pulling the joint surfaces tightly together.
jdowning - 5-7-2011 at 12:31 PM
The new nut will be cut from a batch of cattle leg bone purchased from a local butcher last year. The raw bone has been cleaned and processed - boiled
to remove residual flesh and fat - and then soaked in purified gasoline for several days to remove any remaining fat deposits. Any fat remaining in
the bone can (and will) leach into the wood of an instrument so complete removal is important.
The bone has been cut into pieces by hand using a metal cutting hack saw (using a power saw would be unsafe and might overheat and burn the bone).
The selected piece of bone for the nut has been filed square, straight and flat using a file and fitted precisely to the rebate at the neck/pegbox
joint. The slightly oversize nut blank has been roughly hand filed to the required curved profile and immersed again in purified gasoline for a few
days for a final de-greasing - just to be sure.
An easier approach would have been to purchase prepared bone from a luthier supply house - a relatively inexpensive and good quality until shipping
and handling is taken into account. Nevertheless not only does this avoid all of the work involved in correctly preparing the bone but it is supplied
in pieces cut square, flat and straight so avoiding the need for hand filing.
Using a hand file with precision is a skill that takes time and practice to acquire. In the old European trade apprenticeship system, the first year
in a 4/5 year apprenticeship was spent learning to use a hand file. Some of the test pieces produced by the apprentices in the past are quite
astonishing in their accuracy - seemingly impossible to those of us less skilled in the art.

jdowning - 5-12-2011 at 04:54 PM
The bone nut has been finished to size, the string grooves cut with a needle file and the lute temporarily restrung with the old nylon strings in
order to assess what further adjustments may have to be made to the action and string spacing.
The three lower courses are octave strung - this method was used in the early 16th C - adding a treble string pitched an octave higher than the
bourdon - to brighten the sound of the thick/low tension gut (or silk) basses (unnecessary of course in this case for modern metal overspun strings).
It is not known if the old medieval ouds were also octave strung. If not then this might indicate that oud string making technology was superior to
that of the lute and/or silk strings had a better acoustical performance than gut strings at that time.
With this set up, string 'action' at the 7th fret position is about 3mm with the pitch at E (A415) - so it is anticipated that this will be a bit
lower when the thicker silk strings are eventually fitted.
No attempt has been made to re-finish the pegs that are showing some signs of wear after 30 years - all part of the aging process. New lutes for
old!
Next to tie on and adjust the frets.

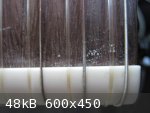
jdowning - 5-14-2011 at 03:31 PM
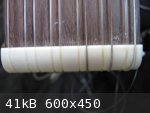
With the lute brought up to full string tension the frets can be fitted.
The action height at the neck joint is about 3 mm measured with a gauge easily made from a wedge shaped piece of boxwood and calibrated in 1/2 mm
steps. In order to maintain adequate string clearance over the frets - to prevent buzzing - the frets must be graduated in diameter - thickest at the
nut end. For a preliminary trial set up nylon frets are being used - nylon fishing line is good for this purpose being low cost, flexible and
available in a range of diameters. Here the fret diameters used range from 0.8 mm to 0.5 mm.
Once all adjustments have been made the nylon frets will be replaced with gut - easier to tie, less wear on the strings but quite costly.
I prefer a single rather than double fret arrangement. Nylon being quite slippery requires use of a special secure fret knot (familiar to most
fishermen). The fret is tied tightly about 5 cm above its final position on the neck before being slid into position - the taper of the neck
contributing to a fret that lies tight against the finger board. The loose ends of each knot are melted with a small soldering iron to finish the
knot.
The frets are initially positioned for 12 tone equal temperament but will be moved slightly later - as required - in order to bring the instrument
into correct intonation for the kind of strings used and sometimes depending upon the mode of the music being performed.
The finished weight of the lute fully strung and fretted is
680 grams.
jdowning - 5-16-2011 at 06:32 AM
The lute has been temporarily fitted with the old Pyramid nylon strings and is currently pitched at E (A 440). This is at the stress limit for a top
string in modern gut for a string length of 67.5 cm and frequency 330 Hz.
Also with using the old strings the reduction in string length from the original 73 cm results in a lowering of string tension - ranging from 1.6 Kg
(3rd course nylon) to 2.5 Kg for the remainder of the courses - tensions within the range expected for all gut or silk stringing. The top three
courses should be at a slightly higher tension but will be left at this tension for the time being.
The first impressions are that shortening the string length and raising the instrument pitch has resulted in improved resonance and loudness and
overall sound balance - even with the extreme, record breaking damp weather we are currently experiencing. High humidity tends to temporarily 'kill'
the resonances of a lute.
Lowering string tension also reduces sound board tension (stiffness) which, in turn, allows the sound board to vibrate more freely (favouring lower
frequencies).
As lutes and other plucked stringed instruments in the 16th C were always played with soft fingertips - not with fingernails like a modern guitar or
plectrum (risha/mizrab) - these relatively lower string tensions are usually necessary for most players.
A sound clip will be posted later once some further adjustments have been made and humidity returns to 'normal'.
The self prepared bone nut is working very smoothly without need for extra lubrication like soap or graphite. This may be because the bone has not
been bleached white with chemicals as may be the case with commercially prepared bone. Bleaching chemicals such as Hydrogen Peroxide can cause
brittleness in bone.
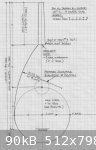
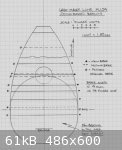
jdowning - 5-16-2011 at 07:12 AM
I still have the original mold used to make this lute in 1979 but cannot find my working drawing so I cannot be exactly sure about the bracing used at
the time. However, I do have a scaled up drawing made at the same time so can figure out the bracing arrangement without having to remove the sound
board.
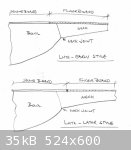
The attached image is a sketch (drawn to scale) of the original Maler M.1.54 sound board bracing. The original bracing has been modified - like the
other surviving Maler and Frei lutes - during the late 17th C to convert the lutes to 'Baroque' lutes with up to 13 courses with consequently higher
sound board tensions. However, it is now difficult to determine with certainty how the sound board was originally braced - especially as the upper
part of the sound board is now missing.
The sound board has 'fan bracing' in the area below the lowest brace. This is assumed to be a later addition so has not been shown for greater
clarity.
I have marked the positions of the braces used for the project lute. The marked positions are the centre-lines of the braces. The braces are around 4
mm wide which brings the average brace positions very close to distances measured in whole (or half) 'finger' units (equal to 1.85 cm.) measured from
the bottom of the sound board.
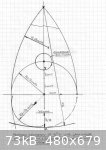
A recently discovered lute by Maler has a similar sound board bracing arrangement to that of M.1.54. This sound board also had been re-braced during
the late 17th C so again may not reflect the original bracing. Its current state is as a 'guitar-lute' - the fate of many historic lutes - so only the
bowl and sound board are original and of interest. Note also the characteristic red varnish of the bowl.
See:
http://sinierderidder.free.fr/restaurations/lauxmaler_eng.html
In retrospect I would probably now brace the sound board of the project lute differently - retaining the lowest brace and the one just below the
rosette with a single brace placed midway between i.e. with three braces between the bridge and rosette.
Although no ouds survive from this period this bracing arrangement - by a process of 'backward engineering' - may be indicative of the bracing used on
medieval ouds of this elongated profile?
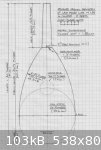
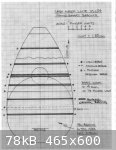
jdowning - 5-16-2011 at 11:47 AM
For completeness the attached image shows the proposed original barring of the Maler M.1.54 sound board.
This, in turn,may also be the bracing arrangement for the 14th C Ibn al Tahhan oud - or close to it.
jdowning - 5-19-2011 at 10:33 AM
After briefly trying out the lute with the old nylon strings the windings on the 4th bourdon string have separated at the second fret. This type of
premature string damage is fairly typical when nylon frets are used. There is a slight 'buzz' at the 8th fret position on the top two strings due to
the edge of the fingerboard being very slightly below the sound board wood. Also the string spacing at the nut needs adjustment.
So, the old strings will now be removed and replaced with silk strings and graduated gut frets fitted.
For those not familiar with the characteristic 'growling' sound of octave tuned basses, attached for information is an audio clip of all the strings
sounded 'open' in sequence as well as the top string sounded at the 7th fret. (The second course is slightly out of tune)
In the early 16th C the octave tuned basses were named 'der gross prummer', 'der mittler prummer' and 'der clain prummer' - (the great, middle and
small "rumbler" or "growler").
Although the lute has good resonance I do not like the sound of the plastic strings (too 'brassy' and metallic in sound for my ear) - although they
are, of course, widely preferred by most oudists and lute players today. The silk strings should give a more refined mellow sound.
Has anyone ever tried octave strung basses on an oud?
For information, the sound file is compressed using 'ogg vorbis' - open source software that gives superior results to MP3. The file can by played
back using the open source cross platform"VLC multimedia player" - free to download from the VLC web site.
Attachment: STE-004.ogg (676kB)
This file has been downloaded 279 times