
antekboodzik - 5-31-2012 at 01:46 PM
Hi,
Instead of all, I didn't give up with an idea to make renaissance lute at my own. Having been collecting pieces of information over the net and
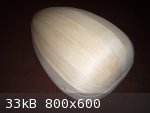
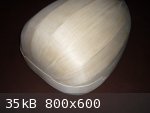
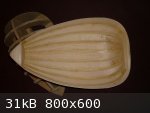
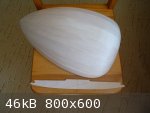
following your advices now I have another, not perfect but yet along better bowl, now in maple. Ribs are quite thin, about 1.35 mm, neckblock is made
out of basswood. I managed to have the "balloning" effect not to be more than 1 - 2 mm, and the final shape differs from the designed one only a very
little. But I still got some troubles when fitting the ribs together - some of the joints are tight and even hardly noticeable, but some of them have
a gap... And I won't show you what's happen under the endclasp  How to avoid it
in future? Is it really so hard job (or best kept secret of instrument making
)?
How to avoid it
in future? Is it really so hard job (or best kept secret of instrument making
)?
Anyway, I am going to finish this my very first instrument. I got mahogany block big enough for neck and some scraps of beech for a pegbox. Please,
help me to design them. Especially - how wide the neck should be at body joint and an the nut, I think, for a six course instrument, to have it
comfortable to play?
Best regards, Antek.
jdowning - 6-1-2012 at 05:25 AM
Pretty good for a first attempt. There are no secrets - achieving perfect rib joints is learned through making rib joints - like most manual skills it
cannot be taught but is inherent in the natural abilities of the craftsman. Your next lute (or oud) bowl will be more perfect than the last and less
of a fight now that you have made one.
The most difficult areas for making perfectly fitted joints is at the ends of the ribs - particularly at the bottom end of the bowl where the compound
curvatures are greatest. The end clasp or cap is there not only to reinforce the bowl in the 'below bridge' area but to cover up any gaps in the
joints and nail holes used to temporarily secure the ends of the ribs to the mold. Any gaps at the neck block end will likely be removed when the neck
joint is cut. However small joint gaps will not affect the integrity of the bowl due to the joint reinforcement strips inside the bowl. Slight gaps
are more visible on bowls made of light coloured woods but much less so if dark coloured woods or alternating dark and light woods or dark liner
strips set between the ribs are used (one secret I suppose!)
I note that you have used an oud like tail block inside the bowl. This will likely not affect anything but lute bowls of the renaissance period had
not only an exterior end clasp but also a thin, hot bent, softwood counter clasp glued inside the bowl. This is glued in place after the bowl has been
removed from the mold.
Also it is best to cut the neck joint before assembling the ribs and bowl to ensure accuracy.
How did you determine the geometry of the bowl - is it based upon an historical instrument (Maler or Frei perhaps from the appearance of the bowl)?
What are the completed dimensions?
It sounds as though you have not made a full sized drawing of the lute in order to determine critical details like string length, string spacing at
nut and bridge, bridge position, sound board bracing, sound hole diameter and position, neck length etc.? If not then this might be a good time to do
so - using a tracing of the bowl profile as a starting point.
Once the relative positions of the above have been established then the neck joint width can be accurately determined.
A six course instrument is fine for the extensive surviving early Renaissance lute repertoire but seven or more would be more appropriate for the late
Renaissance period. Note that the extra courses on a lute, beyond the six stopped courses on the fingerboard, are generally played open and not
stopped - an additional complication but not so difficult as might first appear.
antekboodzik - 6-1-2012 at 01:07 PM
Thanks a lot for your support
Yes, indeed, I am very fascinated in modest, but very elegant and "natural" lines of Maler's and Frei's renaissance lutes. I made some plan for
figuring some of my ideas. It is in the attachment. All dimensions there are in full-size, so if you open it with GIMP software (or print) and switch
measures to mili-metres you coud see real dimensions. But there are:
- 600 mm for string lenght (at least in the center line of instrument),
- 290 mm max width of the belly (approx.), the finished bowl is wider a little (1-2 mm),
- 50 mm width at the nut,
- 60 mm width at the neck-body joint,
- slightly less that 80 mm between first and last string at the bridge (it was very hard for me to be precise here, as I am not sure about strings and
courses spacings).
I am not sure if these dimensions make sense - I was trying to imagine how it could be, but from that time I was drawing it, I played a little on a
pretty strange XIX c. guitar, it just had nearly same width of nut and I found it not so comfortable. Also, for a now, I think the taper of the neck
(looking from the front) should be more pronounced. What do You think about it? ANyway, I think this is a very good idea to rewrite the plan and
revise it all.
Some more issues:
- I choose the way to make bowl with both blocks screwed to the mould just because, I have no idea what to do to have the ribs not to be glued up to
the mould Of course, I could put some thin plastic under ribs, but it hadn't
been my favorite thing to do.
- I was preparing the ribs only with very basic shape, wider and longer, and then, after bending, fitting the joining side by plane, and for final
touch I used sandpaper glued to flat surface. When it was at least fairly acceptable, I was determining the outline of another side comparing it to
bulk edges of my mould, and preparing it same way - is it a proper approach?
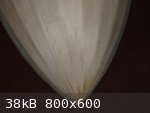
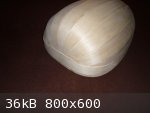
- With top ribs I did it another way - I realised what you said, that the "balooning" effect occurs where the curvature is the biggest. So I fitted
paper strips, and then marked slightly another shape of these two top ribs. It is on the picture (the second one). Fail or not?
Next time I will carefully consider your advices. ALso, I was thinking about spacers, but again, for me it somehow does not match with plain, 9-ribbed
body. For a bowl with greater number of ribs of course, but not now.
Edit: I forgot, I haven't seen any drawed plans, and saw only two lutes (both after baroque instruments) in my life That plan is just my imagination about how it can be.
Attachment: plan.xcf (396kB)
This file has been downloaded 260 times
jdowning - 6-2-2012 at 10:07 AM
If you go to the Guild of American Luthiers website and check out the images of the lute plans - plan #17 by the late Robert Lundberg is of a "6
course Renaissance Lute, H. Frei ca. 1530". String length is 62 cm and there are 11 ribs in the bowl otherwise your drawing - profile, bracing, neck
length etc appears to be pretty well identical when compared to the same scale. The Lundberg drawing is not an exact copy of a surviving instrument
but should be a good working model to follow.
None of the Maler or Frei lutes survive in their original state having been modified at a later date to 'Baroque' style lutes so trying to determine
how they were braced for example requires a bit of detective work and speculation. You can read about the Maler model on this forum. Check out page 2
of "Old Oud compared to Old Lute Geometry" and "A Rebuild Project - 14th C Oud to 16th C Lute" for details.
String spacing overall at the bridge on my reconstruction of a Maler lute (five double courses, with single treble - string length 67.5 cm) is 75 mm
and at the nut 38 mm. Nut width is 45 mm. Neck joint width is 62 mm (so 60 mm should be good in your case). String spacing depends upon personal
preference. In my case the distance between courses is about 5 mm at the nut and 10mm at the bridge with the strings of each course being separated by
2 to 3 mm at the nut and 4 to 5 mm at the bridge.
For information on the method I use to construct a bowl see pages 7/8 of "Old Oud - New Project" on this forum. To prevent the ribs sticking to the
mold I place strips of 'oven proof' (heat resistant, non stick) paper under the rib joints as they are assembled. The paper is removed as each joint
is completed and to be sure that nothing is stuck to the mold surface, I run a thin metal spatula under each joint as it is completed. Don't use
plastic under the joint if using the hot hide glue method as it may melt and stick to both rib and mold surfaces!
The outside ribs are usually made a bit wider than the rest.
For a bowl that is perfectly semicircular in profile finishing the rib joints with sandpaper glued to a flat surface works pretty well. Note however
that many historical lutes (Frei and Maler included as well as some old ouds) do not have perfectly semi circular sections but are deeper at the neck
block end. Also some of the larger lutes of a later period had significantly flattened bowl sections. For these, the ribs (often over 30 in number) -
after rough shaping - must be individually fitted with plane and file to obtain perfect joints. Rib spacers can be of some benefit here in disguising
any slight joint imperfections.
Rib widths should be checked for reasonable consistency as work proceeds on fitting and assembly of the bowl to make sure that the finished bowl looks
symmetrical.
Edited: My Maler lute reconstruction is a six course instrument with five double courses and single treble.
antekboodzik - 6-2-2012 at 10:35 AM
Thank you again for your reply, jdowning. I appreciate your sincere answer.
Well, I saw that website, and realized that some lines, indicating suond bars I suppose, are placed in some way of simple proportion by dividing
particular distance by two or three... and my bowl is a little more bulgy, but follows some body to neck proportions. But anyway, with your answer now
I feel more confident and I would stick to my dimensions. I don't make my mind abour course count yet, I'll decide soon.
But anyway, another thing exercise me strongly - "standard" guitar's necks are a lot wider... 50-55 mm at nut or so. Why? Is it much different for the
lute?
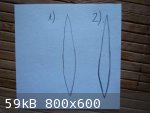
Edit: Ouch, and again I forgot something. With my top ribs I meant, that all but top ribs are quite symmetrical, and top ribs not. They have
significantly different sides to match other ribs, and thus, in some areas the angle between top ribs and precedent ribs is slightly different (less
angled).
jdowning - 6-3-2012 at 06:11 AM
GAL plan #17 does not specify which historical instrument the plan is based upon so it is not possible to determine how much of the bracing geometry
is original. My guess - judging from the small image of plan #17 - is that Robert Lundberg based his design on one of the Frei lutes in the
Kunstshistorisches Museum in Vienna (not # C34) as some of the bracing at least is visible through cracks in the sound board and proportionally they
seem to fit the drawing layout (more or less). The same applies to the bridge and sound hole position.
This being the case two bars running across the soundhole replace one central brace in the original, a brace has been added between the sound hole and
neck block as well as a partial brace below the bridge - all reasonable additions.
Hard to say if this bracing layout represents the original early 16th C configuration or that of a later date when the instrument was modified to an
11 course lute - probably the latter.
The early lute makers did work to proportions in designing their instrument geometry and bracing layout.
Modern classical guitar string spacing at the nut is generally a bit wider (41 mm?) than lute or early guitar spacing so the nut is made
proportionally wider. The choice of string spacing all depends upon hand size I suppose.
jdowning - 6-4-2012 at 05:31 AM
A bit more information on the Frei lutes after checking my files. I know of four surviving examples of lutes that are labelled 'Hans Frei' although
the example in Bologna Museo Civico #1755 may not be by Frei (?) - it has a bowl of 9 ribs. The other three lutes have all been converted to 11 course
lutes and all have bowls with 11 ribs. That is not to say, of course, that Frei never built bowls with 9 ribs.
According to English luthier Martin Shepherd, the sound board of the Frei example in the Warwick County Museum shows traces of a below bridge brace
placed across the full width at that location (not a partial brace as indicated in the GAL plan) as commonly found in oud bracing. I was not aware of
this when I wrote FoMRHI Comm. 1237 "Below Bridge Bars - a Missing Link" in January 1994 (see my topic of December 2007 on this forum with the same
title for a copy of the Comm.) so this 'new' information supports the substance of Comm. 1237 quite nicely.
jdowning - 6-4-2012 at 09:22 AM
Note my post of June 2nd has been edited to avoid any confusion.
My reconstruction of a Maler lute mentioned is a six course instrument with five double courses and a single treble course. Note that the string
spacings allow for all gut (or silk) stringing as well as modern nylon strings.
antekboodzik - 6-29-2012 at 04:20 AM
Dear Mr. JDownig,
Thank you a lot for your attention. It took me some time to carefully read all your posts you mentioned. But in all, it is marvellous, and I
appreciate a lot your contribution to this forum and all newbies in lutemaking
By the time, I made careful drawing and decided about all measurements. Also, I did some progress. Here are: mahogany neck and freshly prepared
pegbox. "Walls" of the pegbox are made out of ash (or beech, I am not 100% sure), the wood for it was taken from... very old broomstick  Two blocks are from basswood, also thin maple veener will close the back of it.
I am going to stain neck and pegbox black - with ordinary black ink from papery-store, and cover it with shellac, to not to have the neck leaving
black blushes on the hands. I realize it is maybe not the best option, and not historically appriopriate - but how can I do it more professionally?
Best regards,
antekboodzik.

jdowning - 6-29-2012 at 11:50 AM
Progressing well - good for you antekboodzik.
It is often difficult to stain hardwoods a dense uniform black using wood stains as they tend to show the wood grain and would likely not disguise the
different woods that you are using for the neck and pegbox (if that is your objective).
So - best to avoid staining woods if you can. Keep it simple - let the natural beauty of the wood shine through!
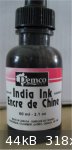
However, to stain the neck a dense black I would use not an ordinary black ink but so called 'India Ink' - once used by draughtsmen - still available
from office supply or art supply stores. This ink contains shellac and is water resistant. So you could use this without a protective coat but it
would soon wear through to the unstained wood of the neck.
I also use this ink to stain lute pegs.
To protect the stain on the neck from wear you should use a hard varnish such as modern polyurethane clear varnish - used to protect wooden floors.
Shellac is not durable enough for the neck (but is fine for the pegbox) and would soon wear through both the shellac and ink stain to the unstained
wood underneath.
The maple neck of a lute that I use daily has been treated in this way - India Ink and a hard Polyurethane varnish - and after several years use is
just starting to show signs of wear close to the pegbox.
The early Maler and Frei lutes do not survive in their original condition but it is quite likely that the necks may have been left unstained or even
unvarnished.
This is the simplest and best solution as far as future maintenance is concerned and one that I would recommend in your case - unless you really want
a black coloured neck that will inevitably show signs of wear later.
The lutes of a later period often had the back of the necks veneered with a dark hardwood like Ebony (to keep the weight down on these larger
instruments, the neck core would have been a soft, lighter wood such as basswood or lime-wood) - but most of the surviving lutes were high quality
presentation instruments (that is one reason that they have survived) rather than the lower cost variety of their day that didn't. The latter may well
have had plain hardwood stained necks to keep costs down but we will never know.
Keep up the good work.
antekboodzik - 6-29-2012 at 12:28 PM
Nice, thanks a lot! I have checked, here so-called Indian Ink and China ink are easy available. I will give a try.
And yes, my plan to stain the neck is to have same colour to the neck and pegbox. And also, my attempts to build an instrument is just a kind of
experimenting, as well I can not afford professional instrument for a now (by the way, what do you think about EMS and so called paki lutes?). I
understand some postulates about being historically correct, bu t at least if I were finished with playable instrument, I would be very happy. How did
you start making instruments, if I can know?
Final finish of surface of my instrument (if I will go so far) is another question. I am able to do french polish, but I think better, and
historically correct, would be to put some varnish. I did some trials, but it is still a problem to me to be solved. Another one is Pegs for my
instrument.
And also, I have purchased spruce wedge, it was prepared to make a viola top, but is wide enough to provide a soundboard for my lute
jdowning - 6-29-2012 at 03:41 PM
A brush applied oil varnish is good and authentic - however, use the 'quick' drying stuff formulated for violin makers - unless you want to spend
several months finishing your lute. Brush varnishing requires a bit of practice for best results but otherwise is not too difficult - unless using
colored varnish which is. Stick to clear oil varnish if you decide to use an oil varnish and use a soft good quality brush designed for oil
varnishing.
Note that the surviving Maler lute bowls were finished with a deep red varnish. Not sure about the Frei lutes.
I have been making plucked stringed instruments since 1963 - early guitars, lutes, vihuelas etc. + Irish harp and oud - all for my own use and
research purposes - so have never had to purchase instruments or components made by others (except for the strings - and I am currently working on
that). So I have no experience of dealing with EMS (Early Music Shop?) or with lutes made in Pakistan.
You should be able to purchase ready made lute pegs on line but I cannot make any recommendations because I have always made my own pegs.
fernandraynaud - 6-30-2012 at 04:28 AM
For what it's worth, Panie Antku, Dov Schmidt in the US sells a lot of pegs, including the more plain viola and oud pegs, for $1-$2 each. The viola
pegs are sold in kits of 4, the oud ones in kits of 12. You might find something on his site. They're light and don't cost much to ship. It seems hard
enough to fit good pre-made pegs, let alone making them!
http://www.dov-music.com/catalog.asp
jdowning - 6-30-2012 at 05:31 AM
Those pegs seem to be a good deal and with a shank length of 61 mm should be long enough for a 6 course early 16th C lute. However the head width on
oud pegs generally are quite a bit wider than found on lutes. So for the relatively short pegbox length of an early 16th C lute you will need to check
that there is sufficient space between the pegs to allow rotation of the pegs. The peg heads on my lutes for example measure anywhere between about 14
mm to 18 mm across (depending upon the style of lute) with a minimum gap between the peg heads of about 10mm to allow comfortable turning of the pegs
with the fingers.
Of course, if a peg head is too wide, they can always be cut down and reshaped to fit.
antekboodzik - 7-4-2012 at 01:06 AM
Dears,
thank You very much for yours help. I like the walnut pegs a lot, I have e-mailed them and I will go into it.
Panie Fernandzie, bardzo chętnie bym się z Panem skontaktował na privie
antekboodzik - 9-26-2012 at 08:50 AM
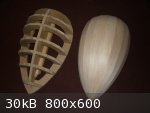
Hi, here's some progress I did recently. This is my setup for thicknessing halves of the top. I found a wood-carpenter, who did a resaw for me, but
unfortunately, with his very big bandsaw he was able to make 8-9 mm thick plates from a wedge only. I found, that thicknessing it by my small block
plane is possible, but a very hard job, even if the plane is really sharp. What I could do to make it easier and faster? Maybe this is the time to
join halves and rougly cut the layout of the top - there would be less wood, or I can use some gouges to remove some portions of waste wood?
By the time I prepared very basic calipers - even somehow fragile, it works, but anyway, I will make another one using aluminium bars/profiles.
[file]24209[/file]
Also, another consideration is the final thickness of my top. Any Your suggetions are welcome
Best regards, Antek.
antekboodzik - 10-6-2012 at 03:27 PM
Lute belly planed to thickness and the rose in progress.
I have decided to go with a little thicker top, following some suggestion I found over the net, and also some advice that the guy, who sells me
material for a top (actually a luthier) gave me. It vary from 2,6 mm under the bridge to 1,7 mm at the edges, and has something like a center-lined
tchickness more than areas nearer to the sides. That's just my idea of it, we will see if it would work or not.
And this is my very first time I work with a belly and a rose. I choose a somehow simplified version of a rose, that I found for free over the net,
just for better chance to succes. I must admit, as an unexpreienced one, I made some faults. At first, I was too shy when sanding the circle for a
rose - it was done to about 1,4 mm, and now I think I should spent more time with it, graduating it to 1 mm or so. Then, I cutted the edges of "voids"
exactly with the lines, which now I find it not the best idea. Cutting a very little off the lines (smaller voids) gives you better control over
entire process. However, I came over it, better or less, and I am very happy of it (only two times I need to use glue to put back some small pieces I
have chipped off - as far as I know the ordinary paper glue is made from natural, plant-origin ingredients). Next step would be to carve the rosette
to have a "3-dimentional" outfit
Please, keep fingers crossed for my work. I am in big distress that if my instrument will hold the strings tension, and not collapse or so. That's my
only, hereby wish...
[file]24333[/file] [file]24335[/file] [file]24337[/file] [file]24339[/file] [file]24341[/file] [file]24343[/file]
fernandraynaud - 10-7-2012 at 02:50 PM
I'm not sure, but I think "paper glue" could be many different things, from starch and water to fish glue to different kinds of plant or synthetic
resins.
jdowning - 10-7-2012 at 04:21 PM
Your lute sound board thickness as you report will not result in collapse under string tension if the sound board is properly braced.
The area of the rosette should be thinned to about 1 mm to make piercing the pattern easier. It also helps to harden and strengthen the outside area
of the rosette with a coat of shellac prior to cutting. I cut lute rosettes through this thickness with direct 'stabbing' cuts (using fine thin
chisels made from old hacksaw blades) on the lines from the pattern side with a hardboard backing as support. It is not unusual for small pieces to
break off in the process (although with care this can be avoided) and it is OK to glue these back in place with whatever glue is convenient to work
with - as the rosette is not a structural component of the sound board. In any case the underside of the the rosette will eventually be supported with
multiple thin bars glued across the underside of the rosette.
The carving of the outside face of the rosette can be done with a sharp scalpel blade or fine craft knife. I first mark the incised lines in pencil
(to avoid mistakes) and then cut a V groove on either side with the knife held at a 45° angle - cutting almost full depth. The original rosettes were
cut very boldly with double parallel incised lines. If you are not confident enough to cut two parallel incised cuts like the originals then just
stick with a single incised cut that will be satisfactory and make all the difference to the appearance of the rosette. The original Maler design that
you are following also has an interwoven foliage motif that should be lightly carved to remove some of the sharp edges - but err on the side of
caution as these are easily broken.
I seem to recall having posted some detailed information on how to cut lute rosettes on this forum some time ago. See 'Old Oud - New Project' topic
pages 6 and 7.
The image is a Maler style rosette on one of my lutes. Note that there is very little carving of the 'foliage' component- I did not want to risk
breaking it - but it would look better carved to almost nothing like the originals
[file]24347[/file]
antekboodzik - 10-8-2012 at 01:30 AM
Hi, thanks for Your replies
Here is the result. It's clumsy a little bit, but at my first try I am quite happy with it:
[file]24349[/file]
dkhoury35 - 10-8-2012 at 04:02 AM
looks great not clumsy
jdowning - 10-8-2012 at 04:44 AM
Nicely done antekboodzik.
Requires a sharp knife, a steady hand, good eyesight and lots of patience.
antekboodzik - 10-9-2012 at 05:27 PM
Hi, just two things more are unclear to me. Please, help me
Shall the ends of braces touch top ribs from inside of the bowl? Also, what with the inner linings, like on the guitar? I have never seen inner
linings over the net, and thus I think gluing braces to the bowl would even stabilise the bowl and enforce belly/bowl joint. But also I have observed
few guitars, where due to shrinkage braces punched trought sides, and even "pops" tables. Then also, with braces touching top ribs, the eventual later
top removal would be more complicated.
If brace's ends should be left free, would only a small egde of top ribs hold the top securely? Please, tell me how it should work.
Best regards, Antek.
jdowning - 10-10-2012 at 04:31 AM
Lutes are not fitted with interior liners around the top edge of the bowl but some of the later period lutes with 10 to 14 courses sometimes had
additional strips added to the outside of the top ribs. This may have been for additional stiffness under higher string tension loadings or a later
addition to repair top ribs damaged due to repeated sound board removal for repairs.
The ends of the braces must be a precise fit to the sides of the top ribs and the ends glued securely to the ribs - all necessary and important for
structural support of the sound board.
Removal of a sound board is not a problem as long as hot hide glue is used to glue the edges of the sound board and ends of the braces to the ribs.
The gluing surface of sound board to top ribs is usually about 1.5 mm wide (i.e. rib thickness) except at the bottom edge of the bowl where it is
reinforced with an exterior end clasp and matching interior reinforcing end plate - more to provide added stiffness to the sound board area below the
bridge.
antekboodzik - 10-15-2012 at 07:58 AM
Hi,
there are my "lazy" go-bar press, and all of braces in place and scalloped, but not trimmed to correct lenght yet.
How do You like it?
[file]24399[/file] [file]24401[/file] [file]24403[/file] [file]24405[/file]
jdowning - 10-16-2012 at 08:01 AM
The bracing supporting the rosette is very wide and appears to be blocking a significant part of the sound hole area (which in turn may affect the
acoustic response of the completed lute).
The bracing in this location should be narrow and glued over parts of the rosette where blocking of the open areas is minimal (the idea, of course,
being to support the fragile structure of the rosette design not the open areas).
The attached image is one of my old scrap sound boards from a 16th C Hieber lute copy. The rosette bracing here is only about 1.5 mm wide and about 3
mm deep.
antekboodzik - 10-21-2012 at 05:01 AM
Hi, I couldn't resist temptation to put all parts of my instrument together to get a glimpse how it would be Here is the neck only attached with a screw, soundboard, peghead and bridge not glued yet.
Dear jdowning, thank you a lot for your support. Of course, I can not disagree with you about the braces under the rose, and I will keep this advice
for future, but at now I think with my leves of workmanship I would did more harm ungluing these braces and gluing new ones, than to keep it as it
is...
antekboodzik - 10-21-2012 at 05:31 AM
The instrument has not fingerboard yet (and pegs). I am planning to make a "sandwich" from the same material I used for back and some nice birdseye
maple veener. It should produce a fingerboard with correct thickness (I can do more than two layers). It could be also a possibility to make some
decorative inlayed "panels" on the top of fretboard.
My another considerations are: to chosoe appriopriate strings and finish.
Which strings will be good ones for me? I can't afford real gut strings, but I think some specially designed nylon strings would be ok. Which
producer/brand are those with the lowest tension? Also, I suppose lute strings shall be thinner than e. g. guitar strings, but where can I see gauges
to check if holes in my bridge are not too small?
I can do french polish on my instrument... And also, I have heard that the top can be untreated. But here are some "recipes" and ideas. I would like
to discuss some of them here as follows:
1. Shellac + alcohol will make "french polish" (I can do it, I did it previously). However, I think just few coats of shellac should protect the
instrument well, without being harmful to sound. Also, I read somewhere that adding a little of acetone to dilluted shellac will make it drying faster
(and it should be good for sealing). And again - adding a little turpentine shall increase the time needed for hardening it. Is it true?
2. Also, on some website there is an idea to have the top covered only with egg white dilluted with water. Is it good idea? How to do this?
3. I have got some dammar resin. I will probably not cook a real oil varnish, it could be too difficult for me, or maybe it shouldn't? But also, I
found somewhere that dammar resin dilluted in turpentine will make a varnish too. Is it acceptable? I think it is rather painter's reciepe.
4. I haven't decided yet, if I would dye or ebonize the neck and pegbox. I found, that rubbing "China Ink" with a pad just like "French Polish" onto
wood, and then putting a few coats of shellac makes nice, warm-black semimatt finish. I did it on a neck of some old "romantic" guitar, and it was
great. Is it good idea to do this with my neck, but before attaching it to the body?
5. And for last, I want back of my lute rather in darker colour than pale wood. Except aniline stains the only one idea that came to my mind is to use
orange, or even ruby shellac flakes to produce "french polish". Is it good? What are another ways of having nice coloured (from yellow to dark-amber,
like on violins) finishes?
Ouch, much for once. But thank you in advance for any advice
jdowning - 10-21-2012 at 08:56 AM
For strings you might try Pyramid brand lute strings - nylon and wound strings specifically designed for the lower tensions needed for lute. Your
string length is 60 cm so you will be tuning the lute to Renaissance G unison tuning i.e G c f a d' g' For unison tuning you can try Pyramid #1116
(G), #1010 (c), #906 (f), 0.70 mm Nylon (a), 0.575 mm Nylon (d') and 0.450 mm Nylon (g'). For brighter sounding trebles you can substitute PVF 0.54 mm
(a), PVF 0.44 mm (d') and PVF 0.35 mm (g'). All of these strings are less than 1 mm in diameter.
Do not mess with putting egg white, turpentine, varnish or any other kind of 'goo' on the sound board. Many lute makers claim from experience that any
kind of finish - even a very dilute shellac sealing coat - will dampen the response of a lute sound board. Best to leave the sound board unfinished
(as you can always apply a sealing coat of shellac at a later date if you so wish).
Don't mess with trying to make your own oil varnish or - if you do - make sure that you do it outside due to the real danger of fire.
Coloured oil varnish is difficult to apply with a brush in order to obtain a uniform colour without a lot of practice. It makes a good durable finish
for a bowl so if you want to try your hand just purchase the same varnish and varnish brushes used by violin makers. Likewise staining wood most often
will result in uneven colour due to the wood absorbing dye non uniformly. Safer to apply a clear varnish and leave the natural colour of the wood if
this is your first attempt. Orange shellac is much like a coloured oil varnish but if you have experience with french polishing this might be an
alternative way to obtain a coloured bowl.
Clear varnishing will also darken the wood somewhat and 'bring out' the grain pattern.
The early Maler lutes were characterised by the deep dark red varnish of their bowls.
Staining the neck black with Indian ink is OK. Protect this with a hard varnish (polyurethane) not shellac which will soon wear through in use. You
might also consider staining the bridge black. Staining is best done before gluing these components in place. There is some evidence in paintings of
the period to suggest that the early 16th C lutes did not have stained necks.
You might consider undercutting the the front and back faces of the bridge so that the strings are pulled tightly against the bridge. I shall add a
sketch of what I mean later.
jdowning - 10-21-2012 at 09:41 AM
Here is a rough sketch of a lute bridge to show the undercutting of the front and back faces.
antekboodzik - 10-21-2012 at 03:13 PM
Thank you a lot. It cleared many things for me
But shall I stay with unison tuning? How about octave tuning on last three courses? Do it differs a lot? Is then instrument set up in different
way?
I have listened some recordings of renaissance music, and I think they use both types of tuning. Or maybe I am wrong?
And one more thing - what do You think about "La Bella" sets for 6-cs lute?
jdowning - 10-21-2012 at 03:42 PM
For octave tuning use the same size trebles as the octave strings - nylon 0.450 mm (f'), nylon 0.575 mm (c') and nylon 0.70 mm (g) or perhaps a bit
heavier nylon 0.75 mm.
The original purpose of octave tuning was to add 'brightness' to the otherwise relatively dull sounding gut basses so they are not really required
when wound basses are used. Nevertheless octave tuning - even with wound basses - can give some idea of the original tonal character of the early 16th
C lute compositions not otherwise represented with unison tuning. No difference in the set up either way with nylon stringing. Why not try both to see
how you feel?
No experience with La Bella strings so cannot comment.
antekboodzik - 10-21-2012 at 03:50 PM
I am studying Kuerschner catalog at now... As I get I need to purchase i.e. one fluorocarbon string 180 cm long for a first course. And so on for
other courses, regarding they lenght, material and tension. Am I correct? Rather strange for someone, who is used to buying guitar sets
Edit: I mean, one 180 cm string would produce double course, or for single one and one spare.
jdowning - 10-22-2012 at 04:17 AM
A 90 cm string length should be just about sufficient for a 6 course, 60 cm vibrating string length lute. The longest string length will be for the
third course so you need to measure total distance from bridge to peg #5 at the end of the pegbox (about 75 cm in your case?) and add a bit extra (10
cm or so) for tying the string around the bridge and around peg #5.
antekboodzik - 10-25-2012 at 09:58 AM
Hi,
I am going to purchase pegs as You adviced me. But having some time I put on my workbench very simple lathe. It is powered with ordinary electric
drill machine. It is pretty noisy, but eventually works well. And making simple pegs is easier job that I thought.
So, after a bit of practice, I made my first pegs
They are made out from 12 mm "grooved" beech stick, a one just like you could buy in a building materials shop. It took me less than 10 minutes per
one. They are very simple, but as I get more experienced, and find better tools, I could be able to make better ones.
But couple of questions arose:
1. My pegs have pegheads 10-11 mm wide - quite small, aren't they? It may cause some hardness when tuning. But somewehre I saw they use wooden device
to tune pegs.
2. Can be pegs from beech? There is advice to rather not to use ebony. I wonder if beech is even worse. Again, I read somewhere that beech is
unstable. And also beech dust is somehow toxic...
3. I also have got some sapelle mahogany and ash - could be used for pegs?
jdowning - 10-25-2012 at 11:42 AM
Good progress!
My smallest lute pegs have heads about 14 mm wide. Provided the pegs are properly fitted you will probably not have a problem with tuning without need
for a wooden tuning aid.
I have tried Beech wood for pegs in the past but found it to be too soft so wears quickly. Seasoned Beech is a stable wood and not toxic as far as I
am aware (although best to avoid breathing any fine wood dust). I have never tried Sapele or Ash but reckon that they would be too open grained and
soft for pegs. Hard maple might be another possible choice.
Ebony is hard but contains abrasive salts that can cause excessive wear - but I have used it.
The best wood for pegs is fruit wood Pear or Plum wood - close grained and hard.
I use a South American variety of 'Boxwood' for pegs - mainly because I have lots of it, it is close grained and hard, well seasoned and it turns
nicely in the lathe. True Boxwood tends to be unstable as it takes many years to fully season.
Rosewoods are OK (particularly Brazilian Rosewood - if you can find it these days) but the dust contains oils that can be a skin irritant.
antekboodzik - 10-25-2012 at 01:04 PM
My pegbox has "walls" made out of Beech wood too.. At least as far I can recognize it.
Can pegs be made out from the same wood that pegboxes are?
jdowning - 10-25-2012 at 03:00 PM
Best engineering practice is to make the bearings (in this case peg box walls) softer than the journals (in this case the pegs).
antekboodzik - 10-26-2012 at 12:25 PM
Box of pegs
Here are my pegbox and some Beech pegs - not all of them and some not finished yet. Shafts are about 60mm, tapered roughly from about 7 mm to 5 mm.
Heads are about 10 mm wide.
Could they be? Or maybe they are too small and look odd, proportions are wrong, or even they are clumy and stupid?
Please, tell me what do You think.
Thanks in advance, antekboodzik.
antekboodzik - 11-5-2012 at 02:54 PM
My new pegs with ebonized pegbox. How do You like it now
I was experimenting a little with Plumwood. I must admit it was very promising. However, the spindle of my lathe (a conical one) always caused worked
wood to split. Later I will manage it by gluing thin slice of harder wood to ends of blocks to be turned.
So I came back to Beechwood I think Beech turns very nicely, never splits, and
accepts lacks in my woodturning technique. But it polishes very hard, and I never succed with making my own pegshaper and use it on them. Finally, I
managed to fit them by scraping one by one very carefully and observing how it fitted to the reamed holes. Now it looks better than works, but
friendly violinist, who saw my pegbox, said the pegs turns just right. At least, I have got some "remedies" - chalk, a violin "lipstick" for pegs and
dry soap, if they would jamm.
Again, I think my pegs are still too small (and so is the pegbox too). Pegheads are 14mm wide, but quite short, which makes them ever harder to
turn... Shafts are 7mm maximum thickness, and 60 mm long.
Well, I hope my pegs would work at last. If they will not, I will make another pegbox and pegs, especially from fruitwood, and replace this one.
antekboodzik - 11-11-2012 at 11:58 AM
This is my setup for soundboard gluing. Seems to be quite nice.
I am going to use ruby (od ruby/blonde combination) shellac on the bowl. Please, tell me, is it wise to do it now, prior to final shaping the top? I
guess with that I can avoid to have any unwanted shellac on the top. Or maybe it is better to have the joint between the bowl and the top varnished?
antekboodzik - 11-11-2012 at 12:01 PM
Another consideration for me is to tie frets. Can it be with nylon frets? Are there rules for frets height?
jdowning - 11-12-2012 at 12:23 PM
Varnish the bowl after the lute is completely assembled.
Nylon frets are more difficult to tie than gut and wear out the strings quicker than gut. There is a lot of information on the Internet about tying
lute frets etc. I have used both single and double tied frets graduating in diameter from largest at the nut end to smallest at the neck joint. Double
tied frets last longer.
Equal diameter frets can also work - depending on the set up.
Here is an article that may be of interest for lute set up.
http://www.lutesociety.org/pages/is-your-lute-set-up-well
antekboodzik - 11-25-2012 at 04:48 AM
My lute takes colors
The pictures show my instrument after sealing the bowl with superblonde shellac and four coats of ruby one. I think I use rather thin shellac, and
work carefully and patiently. I plan to do 8 to 12 coats of ruby shellac, depending how equal color I manage to do.
Eventually, while this yellow or goldish tone on the back looks nice (and thesee pictures don't show its natural beauty), it is far less "dark" than I
expected. Previously, I was using blond shellac only. I wonder if it is even possible to make deep orange or even brown tone like on the violins just
with the shellac only. And how many layers there should be?
jdowning - 11-25-2012 at 06:21 AM
Shellac can be coloured to a deeper tint by adding alcohol soluble dyes. These are available from luthier supply houses - 'TransTint' is one brand
that can be added directly to shellac.
Be warned that tinted shellac varnish is difficult to apply without ending up with a streaky, non uniform finish. It should be made thin (requiring
lots of coats) and a very soft brush used.
Here is a discussion on the Maestronet forum that may be of interest.
http://www.maestronet.com/forum/index.php?/topic/316971-color-me-sh...
antekboodzik - 12-8-2012 at 01:40 PM
Finished instrument
Dear JDowning, thanks to your contributions on this forum, and allways careful and helping advice I managed to make a playable instrument at my own. I
strung it with nearly exact strings you suggested, and it sounds very nice. My lute has rather dark, but loud, pleasant sound with good projection,
very similar to those I know from recordings. I am very happy and proud of it. Thank you a lot
My instrument works fine, but some things have to be checked and adjusted for even better performance. There are:
1. By now, my instrument has third nut I have made (from ebony), but it is still not as good as it could be. Some spacings are uneven and first course
apperas to be too close to the second one. Also, wounded strings don't go smoothly trought its grooves.
2. I had got only four diameters of nylon strings for tieing frets. With that first and second fret are the same in diameter, also 3rd and 4th and so
on. It causes some buzzes. Generally, I found setting up the lute is much more difficult than guitar.
3. Pegs work, but are somehow unpredictable, and I had to make simple device to tune instrument because of small heads. I would consider making
another ones.
4. I have decided to use octave tuning. It is good, but now I think for early stage of learning lute playing unison tuning is better option.
Sound examples soon, as I would be able to play something interesting
jdowning - 12-8-2012 at 04:17 PM
Congratulations antekboodzik. nicely done.
Ebony nuts are probably too soft. A bone nut would be best for optimum acoustic performance and will allow smoother operation of the wound strings -
provided the grooves are properly shaped to prevent sticking. Graphite from a pencil lead rubbed in the grooves for lubrication can also help prevent
sticking.
If you are using nylon for frets it is best to use softer more flexible nylon (not lute strings which are a harder material) found in low cost
ordinary monofilament nylon fishing lines. These also come in a wide range of diameters if you are using graduated frets.
antekboodzik - 12-9-2012 at 01:23 AM
Well, my frets are 0.9mm * 2, 0.85 * 2, 0.80 * 2, 0.75 * 2 and 0.7 *2. I was looking a little for fishing lines, but the thickest one they have in the
closest shop was 0.60mm, and more, orange-fluo colored There were also
green-fluo and red ones, I suppose. However, it might be good to have a particular colored one to mark e.g. 5th and 7th fret or use some thinner gauges to imitate so called "loaded" strings...
How do you find nylon lines from 0.7 to 1.00 mm? And can be nylon lute strings replaced by fishing lines of the same gauge?
Also, as I know, gut "strings" are sometimes used traditionally in tennis rackets. Maybe there are some cheaper sources of fret gut?
jdowning - 12-9-2012 at 06:11 AM
Monofilament nylon fishing lines are available in the range of diameters needed for fretting (1.0 mm to 0.5 mm) - the diameter dependent, of course,
on breaking tension. Not to be confused with Fluorocarbon fishing lines. Nylon fishing lines are usually made to be invisible to a fish so are
translucent and 'water' coloured. Nylon comes in many chemical compositions and densities. The stuff used for fishing lines do not make the best
instrument strings but fluorocarbon fishing lines and leaders do - being more dense than nylon instrument strings.
Gut is best for lute frets - nylon frets will wear out your strings more quickly. Fret gut is gut that for one reason or another does not make the
grade for instrument strings so is most readily available in all required diameters from the instrument string makers. Tennis racket gut would be of
even lower quality than fret gut and might be varnished for protection (?) but might otherwise be OK, however, not likely available in the smaller
diameters required for fretting. No gut strings of any kind are cheap - compared to nylon.
Those graduated fret diameters look OK to me. Allow your lute to settle under tension for a while and then make any further adjustments to the frets
to eliminate any buzzing. Make sure that all of your frets are tied tightly so that they are in contact with the fingerboard across the full width. A
very slight convex curve to the fingerboard surface across its width and well rounded edges of the fingerboard will help to ensure a tight fit of the
frets. Nylon frets are more difficult to tie tightly and securely than gut.
Also make sure that the height of the strings above the fingerboard at the nut is sufficient to prevent any buzzing.
antekboodzik - 2-3-2013 at 02:10 PM
Grrr, the bridge fell off... But fortunately, without no damage to the top. Looks like glue in the joint failed. I think it was due to combination of
two factors - the bridge wasn't glued well (too much glue and too thick, and gelled, glue when it was done) and centrally heated room, not enough
humid for storing instruments. But I hope it is not a very big deal to put it back to work.
Well, help me, please I am going to make fresh batch of not so thick glue, put
it back to a pre-heated bridge (with hetagun), and hold it firmly for a 10-15 minutes, Hope it would work. Is there anything I may not know, but might
be important in gluing bridges back (if it wouldn't be only one case).
But anyway, maybe it is a good reason to do some things with my instrument. I think I need to sand a little the top - just for removing some very
small grain tear-outs. I know it is not so good idea, but I am not so skilled in sharpening and using scrapers yet. Also, I would use an occasion to
slightly reshape and round edges of the fingerboard. And for a last - I am thinking of making completely new bridge and pegbox and convert it to seven
string
[file]25714[/file]
jdowning - 2-4-2013 at 06:10 AM
If you are using hot hide glue (and assuming that you previously used hide glue to glue the bridge) there are a few important points to note.
- remove all of the old (weak) glue from the joint faces.
- the joint faces must be smooth and a perfect fit - hide glue is not gap filling and the joint faces must not be roughened as they might be if you
were using epoxy cement.
- use freshly made glue - reheated old glue loses strength. The glue granules should be just covered with water (in a small glass jar) and allowed to
stand overnight to absorb the water.
- heat the glue container (glass jar) on a water bath (a saucepan filled with water heated on a kitchen stove. Place a piece of cloth underneath the
glue container to insulate it from direct contact with the bottom of the pan).
- glue temperature must not exceed 140°F (60°C) - use a thermometer to maintain water bath temperature to around say 150°F. Overheated glue loses
strength.
- judge the proper glue consistency - it should run off the glue brush in a steady stream. Add a little water if necessary but do not over dilute the
glue or it will be weakened.
- temporarily mark the front and back edge positions of the bridge on the sound board with masking tape and with pencil alignment marks on the masking
tape. This will enable exact positioning of the bridge when working quickly with the glue.
- work in a warm room, heat the bridge joint face, quickly brush on the glue and immediately position the bridge on the sound board.
- hold the bridge in place with finger pressure for a few minutes until the glue gels (there should be some glue 'squeeze out' all around the
bridge).
- then remove the masking tape and clean up any glue 'squeeze out' while the glue is still in a 'rubbery' state.
- allow the glue to dry for 24 hours in a warm environment. As the glue dries it will shrink and pull the joint faces even more tightly together.
Check the total string tension you are using . For five double courses with single treble, renaissance G tuning (A440) with octave tuning of the
bottom three courses, total string tension should be around 320 Newtons (or 33 Kg) for modern nylon stringing (Pyramid). Tension of each string should
increase from about 28 Newtons (2.9 Kg) for the bass strings to about 33 (3.4 Kg) and 35 Newtons (3.6 Kg) respectively for the top two treble courses.
Good luck.
antekboodzik - 3-30-2013 at 03:54 AM
Dear jdowning, I followed carefully your advice with regluing the brigde, and everything seems to be fine so far. Of course, I used hide glue ("bone"
glue called here, in opposition to so called "skin" glue) for all structural joints in my instrument.
Also, I made anothers, yet better pegs, now in cherry-tree. I found another, spiral and bigger reamer, unfortunately with 1:50 taper, but good enough.
Then I managed to prepare very simple peg shaper, and set it to a slightly more (?) taper, I think something about 1:45. Now my pegs aren't pretty,
but work much better (only two of them are a little to stiff to turn), and tuning of my lute became easy and quick job. However, I have some more
issues:
- there are available some compounds for pegs in bowed instruments - there are something like "soap" for pegs for have them operate easier, and
something like a lipstick for pegs, which should be used when pegs don't hold strings securely,
- am I correct with that?
- I found somewhere that usage of these compounds is a common way to make the pegs turn well - is it true?
And for the end I fitted new frets. I began with rounding fingerboard edges more than previously. Then I picked very carefully some old nylon guitar
strings with dimensions from 1 mm to 0.60 mm and 0.05 mm step. I found somewhere an idea to sand them before tieing. Also, I used a drop of CA glue to
temporairly hold the knot before securing it by burning ends... But now they are perfect, playing is comfortable and there is no buzzing anywhere
Later I am planning to put some top frets, and fine tune the nut.
[file]26539[/file] [file]26541[/file] [file]26543[/file] [file]26545[/file] [file]26547[/file]
antekboodzik - 3-30-2013 at 03:56 AM
Some more photos, forgive me
Sound examples soon, as I would learn something interesting on it.
jdowning - 3-30-2013 at 09:15 AM
Nicely done antekboodzik.
Your peg reamers are probably engineering taper pin reamers with a standard 1:48 taper.
You will find that your pegs as they wear will 'push through' the pegbox faster than a peg with a 1:30 or steeper taper.
As you have probably found already - using a straight bladed engineers reamer to cut wood - will result in 'chatter' of the tool, an uneven 'bumpy'
hole and a less than perfect fit of the peg. To avoid the problem of 'chatter' instrument peg reamers are usually solid on one half with only three
straight cutting edges on the opposite side - or with spiral cutters (which cut evenly and faster).
Pegs should fit slightly 'tighter' at the peg head end. Avoid a tighter fit at the 'tail end' of a peg as this can cause peg breakage (due to twisting
of the peg shank) if the peg 'binds' at that location.
If the pegs are perfectly fitted there should be no need of 'peg dope' unless at a later date there is some uneven wearing of a peg. Do a forum search
for 'peg dope' to see what other members recommend. A touch of bone dry soap (to provide more slip) or blackboard chalk (to provide less slip) - or
both in combination as judged necessary - would seem to be as effective as any commercial preparation.
Gut is best for frets and will result in less string wear but is more expensive than monofilament nylon which is harder and so will result in faster
string wear. Gut frets are easier to tie than nylon.
Hide glue is considered to be stronger than bone glue (but much depends on preparation and application). Bone glue is often sold as 'hide' glue so the
only way to be sure is to purchase the glue from a reputable dealer who sell both varieties and knows the difference.
antekboodzik - 4-19-2013 at 02:13 PM
My lute works. Here is a small sample of the sound of my lute
http://www.youtube.com/watch?v=JMmIyEKM0bg
That's all I can play on the lute by now... I hasn't developed desired special right hand technique yet. Also there are some minor issues with holding
the instrument (a strap pin and a strap needed!!!) and with tuning, but I shall manage them soon. Well, just now I might say that I meet the challenge
jdowning - 4-20-2013 at 04:05 PM
Congratulations!
.... and let's hear more of the compositions of those great Polish lutenists of the Renaissance.