jdowning
Oud Junkie

Posts: 3485
Registered: 8-2-2006
Location: Ontario, Canada
Member Is Offline
Mood: No Mood
|
|
Restoration of Egyptian Oud - part 1
Hello everyone - I have decided to make a full restoration of an old Oud by Hosain Mohey Al-Deen Helmy that I purchased in Cairo in 1963 and intend to
post details of progress over time. I welcome all comments and observations and hope to learn a lot in the process.
I shall start by recording details of the Oud in its present (unplayable) condition before commencing any restoration work.
This may take a little while, as I have many other projects in hand, so please be patient!
Hope that this will be of interest.
|
|
|
jdowning
Oud Junkie
Posts: 3485
Registered: 8-2-2006
Location: Ontario, Canada
Member Is Offline
Mood: No Mood
|
|
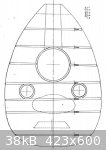
... and here is a scale drawing of the underside of the belly for information
|
|
|
jdowning
Oud Junkie
Posts: 3485
Registered: 8-2-2006
Location: Ontario, Canada
Member Is Offline
Mood: No Mood
|
|
Before l get into fine detail the following general comments may be of interest.
I purchased the instrument in 1965 (not 1963 as previously stated) - while working in Cairo Egypt on an engineering project - from a music store in
the centre of the city (I cannot recall the name of the store or its exact location. The Oud was on a rack with a number of others. What struck me
about the instrument was its age and the fact that it had seen a lot of use - unlike the other ouds that were new and seemed more decorative than
functional. It cost me 12 pounds Egyptian as I recall and I carried it back to London England with me as a "passenger" the aircraft being less than
half full (those were the days!). Customs in London charged me 80% duty on the price of the Oud although the customs officer when he asked how much I
had paid for it cut that figure in half because I had not haggled over the price in Cairo!!
As an amateur luthier interested in making and playing copies of stringed instruments of the 16th and 17th C - particularly European lutes - I decided
to carry out essential repairs to the Oud in 1977. Removal of the belly was found to be difficult as it seemed to have been glued in place, when last
repaired, with full strength hide glue - and lots of it, so some additional damage was done to the edge of the belly and bars in the process of trying
to separate the joint. At that point other projects and life got in the way so the oud has been sitting on the shelf untouched since then.
It would likely be easier and quicker for me to make a new belly for the instrument and be done with it but I agree with the advice kindly offered by
Richard (Dr Oud) that I intend to follow which is to conserve as much of the original fabric of the instrument as possible - to restore rather than
replace the belly for example.
The age of the instrument is difficult to determine without further information. As it was old and well worn when I bought it in 1965, it is safe to
say that it was made in the early 20th C but I feel that it may have been made - judging from the patina of the body - during the 19th C.
I also suspect that the belly of the oud may not be original to the body because the standard of workmanship of the body is superior to that of the
belly.
Close examination of the planing marks inside the oud - on the ribs, the underside of the belly and underside of the fingerboard extension on the
belly indicate that they were made with a toothing plane or similar tool giving all interior surfaces a rough finish. Toothing planes are fitted with
irons that are grooved to form a serrated cutting edge, the iron being set at a high angle to produce a scraping rather than cutting action. They were
used primarily to prepare surfaces for veneering (the rough surface increasing the gluing area) or for levelling surfaces prior to final finishing
with a cabinet scraper.I am not certain why this tool was used and the finish left rough. Is this standard practice among oud makers? I don't know as
I have not seen inside other ouds.
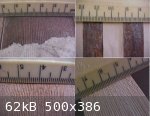
Comparing the planing marks, however, it is clear that different planes were used to prepare the ribs, the belly and the fingerboard inlay as there
are 11 grooves per cm on the ribs, 13 grooves per cm on the belly and 9 grooves per cm on the fingerboard inlay. It is possible, therefore, that the
belly and body were made by different luthiers or that one luthier used three different planes to make the instrument.
The attachments are images of the scoring left by the planes as well as a test piece made by me using my own toothing plane for comparison.
All comments and observations welcomed.
|
|
|
jdowning
Oud Junkie
Posts: 3485
Registered: 8-2-2006
Location: Ontario, Canada
Member Is Offline
Mood: No Mood
|
|
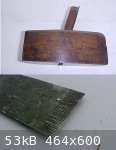
... and here is what a toothing plane looks like ..
|
|
|
Jameel
Oud Junkie
Posts: 1672
Registered: 12-5-2002
Member Is Offline
Mood: No Mood
|
|
I like your analytical approach to this project. Looking forwards to seeing your progress. Can we see some pics of the oud?
Apparently the maker didn't see the necessity of smoothing the interior beyond the toothing plane. All the arab ouds I've seen have been quite rough
on the inside (and sometimes even the outside too!). Maybe the sound waves bouncing around on all those little ridges give a certain sound quality?
Who knows, maybe THAT'S the secret!
|
|
|
jdowning
Oud Junkie
Posts: 3485
Registered: 8-2-2006
Location: Ontario, Canada
Member Is Offline
Mood: No Mood
|
|
I always make the interior surfaces of my lutes smooth - finished with a cabinet scraper - it just seems the proper way to go, fine craftsmanship and
all of that. On the other hand I have never seen the insides of a 16th C lute either (museums do not usually allow access to the instruments and the
working drawings sold by museums never mention how the interior surfaces are finished). If it is general practice among Oud makers to leave the
interiors rough finished then it is likely that the roughness either is of no consequence as far as sound quality or response is concerned or that it
does improve response. It would be interesting to find out how master oud makers past and present finish the insides of their instruments. After all
the oud makers have had several centuries to perfect construction of these instruments and must have got it right by now. If interior surface
roughness is an important factor then I suppose use of a toothing plane might be an improved finishing tool as it creates a fairly regular rough
finish?
It is not that the maker(s) of this oud could not provide a smooth finish - as the body exterior and barring are planed smooth - so a rough finish is
obviously intended.
As far as I know toothing planes of the same kind as my vintage plane are no longer made, however, Lee Valley of Ottawa now make a toothed blade
(05P29.04) to fit their Veritas scraping plane (05P29.01) - so if anyone wants to experiment .......
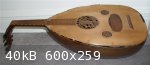
I shall be posting detailed close up images of the oud as I go along but here are some general photos for now - not the highest resolution so let me
know if you would like me to post specific images in more detail.
|
|
|
jdowning
Oud Junkie
Posts: 3485
Registered: 8-2-2006
Location: Ontario, Canada
Member Is Offline
Mood: No Mood
|
|
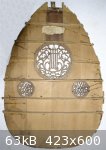
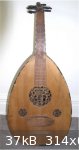
.... and an image of the back ...
|
|
|
jdowning
Oud Junkie
Posts: 3485
Registered: 8-2-2006
Location: Ontario, Canada
Member Is Offline
Mood: No Mood
|
|
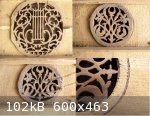
I shall now start to look at details of the oud to record current condition prior to restoration as well as to look for clues that might provide more
information about the instrument's history and the manner in which it was made.
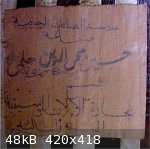
First to examine the rosettes. There is one large and two small cut from a dark hardwood about 3 mm thick with a fretsaw and glued to the underside of
the belly. The large rosette has shrinkage cracks in several places indicating that the wood had not been fully seasoned before use. The workmanship
is rough and poorly executed as is the single line purfling around the soundholes.
Each rosette carries a signature of the maker. I can not read Arabic script but assume from their appearance that the signatures are an abbreviation
of the full name written on the label glued inside the body of the oud - i.e. Hosain Mohey Al-Deen Helmy?
The signatures have been made with a copying pencil otherwise known as an indelible pencil (confirmed by making a light print from one of the violet
coloured signatures onto tissue paper slightly moistened with alcohol). This type of pencil was first introduced in the 1870's for making copies of
letters and documents but soon became widely used generally as a 'permanent'marker. Although these pencils are still being manufactured they generally
went out of use in the 1940's.
All of this does not tell us very much except that it confirms that the rosettes (and perhaps the belly of the oud) were not made prior to 1870. They
could have been made in the late 19th C but more likely in the early 20th C in my opinion.
The workmanship evident in the body of the oud - as we shall see later - is finely executed with perfect jointing of the ribs or staves - clearly the
work of a master craftsman. This contrasts with the poor workmanship evident in the rosettes and which may indicate that the body, neck and pegbox of
the oud were made by a luthier other than Hosain Mohey Al-Deen Helmy?
|
|
|
Hosam
Oud Junkie
Posts: 180
Registered: 12-6-2005
Member Is Offline
Mood: No Mood
|
|
It seems to me that Hussain Mohye el Deen Helmy is the name of the restorer of this oud and not the name of the original maker. My understanding is
that the rosettes were part of the restoration and were done by Mohye el deen. It seems that the original maker’s label has been removed and
replaced by the rather crude label done by the restorer. I am also ruling out that this oud was made in the 19th century. A master luthier would have
most likely done the restoration if the oud was that old at the time of the restoration. The restoration was probably done to just an “old oud” as
part of the school work or graduation project (I am estimating that the original oud was made between1920-1940).
This is only an educated guess and I could be very wrong.
The interior surface of the oud is usually made smooth. It is not a general practice among oud makers to leave it rough finished. The rough finish
will not improve the sound quality of the oud or other similar string instruments. There is an interesting paper by SALI Samo, KOPAC Janez. "The
influence of different machining processes on the acoustic properties of wooden resonant boards." CAS j., 1998, vol. 3, no. 5, series II, p. 15-21.
The conclusion of the paper is that even for smooth finish there is a correlation between the cutting process and the theoretical acoustic properties
of a wooden resonant board (a Square-shaped spruce boards were used). Experiments showed superiority of planing with low feeding speed and small depth
of cut over sanding and milling.
Catgut Acoustical Society Journal
CAS Journal
May 1998
Volume 3, No. 5 (Series II)
http://www.catgutacoustical.org/journal/may98.htm
|
|
|
jdowning
Oud Junkie
Posts: 3485
Registered: 8-2-2006
Location: Ontario, Canada
Member Is Offline
Mood: No Mood
|
|
Thanks for the interesting information Hosam. The experiments to measure the acoustic properties of soundboard material tested three different
machined finishes - planed,sanded and milled. I suppose that a milled finish here means rough sawn? I guess that a rough finish on the ribs or staves
of the body will have less effect on sound produced?
Nevertheless, I am still puzzled as to why the finish of the underside of belly was left rough by the maker. After all it is not possible to thickness
the belly with any degree of accuracy if finished in this manner. My measurements of about 1.6 mm thickness are the maximum values but the thickness
would, of course, be less in the grooves left by the plane. Therefore, the mean thickness of the belly will be somewhat less than my measured
values.
As this oud has had a number of internal repairs to both the body and belly, the belly must have been removed and replaced a number of times. My
feeling is that at some time the original belly may have been damaged to the point where it was replaced (by Hussain Mohey el Deen Helmy?). In turn
there is evidence that this belly too must have been removed and replaced several times. The last time the belly was refitted it was inexpertly done -
probably just to try to make the instrument presentable for sale around the time that I bought it?
There is no doubt that the oud has seen some use since its last state of restoration as the fingerboard is stained with use and there are stains on
the plectrum guard plate made by the strings.
|
|
|
jdowning
Oud Junkie
Posts: 3485
Registered: 8-2-2006
Location: Ontario, Canada
Member Is Offline
Mood: No Mood
|
|
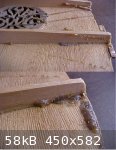
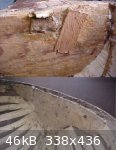
Moving on to examine the belly of the oud in more detail, first of all here is a general image of the underside of the belly. Present condition is
quite poor with the low bar detached, central bar missing, split bar ends, hairline cracks at the edge and extensive damage to the edge purfling and
glue everywhere. It is clear that the belly has been removed and replaced a number of times for repairs but on the last occasion full strength
carpenter's hide glue was used to glue the belly in place - making it impossible to remove the belly again without doing some further damage.
When gluing a belly to the back of a lute I use a freshly made hot hide glue diluted in strength to a consistency where it runs off the brush in a
fine stream. This facilitates both gluing and ungluing operations.
|
|
|
jdowning
Oud Junkie
Posts: 3485
Registered: 8-2-2006
Location: Ontario, Canada
Member Is Offline
Mood: No Mood
|
|
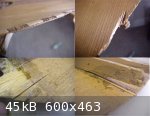
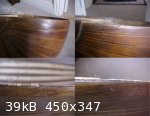
As can be seen there is thick, heavy glue everywhere which has caused loss of the edge purfling. This material will have to be removed from all
surfaces requiring regluing.
|
|
|
jdowning
Oud Junkie
Posts: 3485
Registered: 8-2-2006
Location: Ontario, Canada
Member Is Offline
Mood: No Mood
|
|
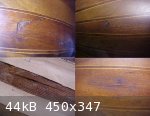
Here are some more details of damage to the belly requiring repair including split bar ends, small edge chips, and hairline cracks at the edges.
Note that the edge purfling was originally inlaid to about half the thickness of the belly. As it will not be feasible to rebuild the edges of the
belly to this original condition I plan to replace the purfling to the full thickness of the belly with a thin paper or silk reinforcement underneath.
|
|
|
jdowning
Oud Junkie
Posts: 3485
Registered: 8-2-2006
Location: Ontario, Canada
Member Is Offline
Mood: No Mood
|
|
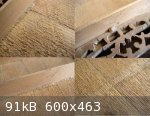
Before moving on to examine the body of the oud it may be of interest to note that the luthier has laid out the bar positions in pencil and has
numbered each bar on its side and on the belly. The bars have a truncated triangular cross section and have been planed to a smooth finish so it is
apparent from the pencil marks that the bars were finished prior to being glued to the belly - not afterwards.
Note also that the grain of the bars runs at an angle to the vertical. On early lutes, the practice was for the grain to run horizontally across the
bar section from side to side not vertically from top to bottom. This is supposed to allow a stronger glue joint by avoiding gluing of end grain (but
it likely does not make a lot of difference?).
|
|
|
Jameel
Oud Junkie
Posts: 1672
Registered: 12-5-2002
Member Is Offline
Mood: No Mood
|
|
| Quote: | Originally posted by jdowning
Here are some more details of damage to the belly requiring repair including split bar ends, small edge chips, and hairline cracks at the edges.
Note that the edge purfling was originally inlaid to about half the thickness of the belly. As it will not be feasible to rebuild the edges of the
belly to this original condition I plan to replace the purfling to the full thickness of the belly with a thin paper or silk reinforcement underneath.
|
This is an interesting detail about the binding being only inlaid half way. I know this is common for lutes. I've never (well almost) seen or heard of
it on an oud. A friend of mine who has a Karybian was telling me how Karybian used to cut the rabbet for the edge binding as a ramp, starting at zero
where the face meets the bowl, and tapering to about half the face thickness at the width of the rabbet. This allows the face to remain in contact
with the bowl, allows easier face removal at a future point by preventing the need to remove the binding since it remains in contact with the top.
It's also a stronger and more positive way to attach the face.
|
|
|
jdowning
Oud Junkie
Posts: 3485
Registered: 8-2-2006
Location: Ontario, Canada
Member Is Offline
Mood: No Mood
|
|
Lutes can be found both without edge purfling as well as with in later periods (and sometimes with the entire edge of the belly reinforced with a
narrow external parchment strip or "lace" glued in place).
I imagine that purfling around the edge of a soundboard is an attempt to introduce a controlled weakness in order to improve response? A full depth
purfling introduces a discontinuity on the soundboard that I would have thought was undesireable and would make removal of the belly for repairs etc
difficult without damage to the purfling. but clearly it does work. I wonder in what area of the middle east half depth purfling was used and when it
went out of use?
On this oud I judge that the belly has been removed and replaced a number of times because the underlying thin section of belly has been completely
worn away in places.
|
|
|
jdowning
Oud Junkie
Posts: 3485
Registered: 8-2-2006
Location: Ontario, Canada
Member Is Offline
Mood: No Mood
|
|
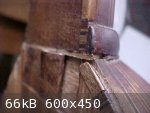
Moving on, here are images of the neck block and bottom plate on the body of the oud.
The neck is attached to the body by means of an integral bar of dovetail section. The neck block has a horizontal crack running through the bottom
section of the dovetail joint and into the rib on the treble side of the oud. This has been crudely repaired with a small piece of wood glued and
nailed a cross the crack - and lots of glue! Clearly this oud has seen some hard use!
The bottom plate is fashioned from a thin piece of wood (basswood?) about 2 mm thick with the edges feathered to a knife edge. This plate has been
glued to the inside of the body after removal from the mould but prior to gluing paper reinforcement strips to the rib joints - and is a feature found
in 16th and 17th C lute construction.
|
|
|
jdowning
Oud Junkie
Posts: 3485
Registered: 8-2-2006
Location: Ontario, Canada
Member Is Offline
Mood: No Mood
|
|
There are three cracks in the ribs of the oud - likely due to impact - and an indication of the hard use that this instrument has seen in the past.
The crack across the grain in the top left image of the composite looks as though it was caused by the oud being dropped onto a hard surface. I have a
similar crack on one of my lutes that I dropped (by accident!) on to a concrete floor. To my astonishment, the lute bounced like a basket ball but did
sustain a cracked rib that necessitated removal of the belly for repair. These instruments are tough!
|
|
|
jdowning
Oud Junkie
Posts: 3485
Registered: 8-2-2006
Location: Ontario, Canada
Member Is Offline
Mood: No Mood
|
|
Here are some images showing damage to the edge of the body at the belly joint including splices in the ribs at the bottom end of the body on either
side of the end cap and on the bass side upper shoulder near the neck joint, knife cuts in the ribs, file marks, heavy glue build up, local damage
filled in with purfling and a nail hole - a past unsuccessful 'quick fix' for a loose bar end no doubt!
|
|
|
jdowning
Oud Junkie
Posts: 3485
Registered: 8-2-2006
Location: Ontario, Canada
Member Is Offline
Mood: No Mood
|
|
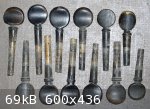
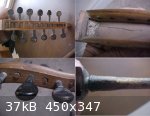
To complete this series of images detailing damage to the oud requiring repair, here are some of the pegbox.
The pegbox itself is partially separated from the neck. The back of the peg box has a repaired crack - indicated by glue 'squeeze out' that has not
been cleaned up. Glue has been poured into end of the pegbox presumably in an attempt to fix joint separation in that locality?
At present three different styles of peg are fitted some with the ends cut to length but the cut ends left unstained. The black stained pegs are ill
fitting and worn - some having been hand carved to "fit" - all of otherwise of poor quality, all signs that the instrument likely has been hastily
'repaired' for sale.
|
|
|
jdowning
Oud Junkie
Posts: 3485
Registered: 8-2-2006
Location: Ontario, Canada
Member Is Offline
Mood: No Mood
|
|
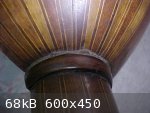
The last image for this first part of the restoration project details the "bracelet" at the neck joint and shows a roughly trimmed veneer insert (?)
in the neck joint itself. I am not sure of the purpose of this insert as it is of equal thickness throughout so does not seem to be for adjustment of
the neck alignment. It does, however, match up with the "fret" insert veneer on the fingerboard.
Note the perfect jointing of the ribs of the body.
The purpose of Part 1 of this restoration project has been to record the condition of the oud prior to restoration. Part 2 will be a new thread and
cover step by step details of the restoration itself.
As I presently have a number of essential 'non luthier' projects to complete, in the annual preparation for winter in this part of the frozen North, I
do not anticipate moving on to Part 2 for a couple of months or so - but it will happen!! In the meantime, please let me know if you have any comments
or observations so far.
Thanks for your interest everyone.
|
|
|


