jdowning
Oud Junkie

Posts: 3485
Registered: 8-2-2006
Location: Ontario, Canada
Member Is Offline
Mood: No Mood
|
|
Making Bone Nuts from 'Scratch'
Bone is the best traditional material for oud and lute nuts.
When I first took an interest in instrument making (50 years ago), elephant ivory was the material of choice, readily available and not very
expensive. Those days are now past history - hopefully.
Bone nuts are today's alternative available from luthier supply companies - relatively inexpensive until handling, shipping costs, custom duties etc.
are added in.
Bone for instrument work comes from domestic cattle and properly selected and prepared - de-greased and bleached (if required) - is very satisfactory
for the task.
There is a lot of information on the Internet about how to prepare cattle and other species of bone for various applications (including instrument
making). So - I thought that it would be of interest to try to make oud and lute nuts starting with raw cattle bone purchased from a local butcher.
I have no experience in preparing raw cattle bone so cannot guarantee that this project will have a successful conclusion. However - success or
failure - the journey may be more interesting than the final objective!
|
|
|
jdowning
Oud Junkie
Posts: 3485
Registered: 8-2-2006
Location: Ontario, Canada
Member Is Offline
Mood: No Mood
|
|
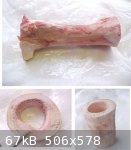
A piece of cattle leg bone was purchased from the local butcher (soup bone) with the large knuckle ends cut off to leave a short relatively straight
section of bone. (I know nothing about bones so was a bit surprised that a leg bone would have been so short in length - perhaps from a young animal?
- however it is a start).
The knuckle ends look promising but are comprised mostly of low density, 'spongy' porous bone structure - no good for making nuts. Furthermore this
part of the bone structure contains a lot of fatty material that must be completely removed if the bone is to be used for instrument work. Even very
small amounts of fat if left in the bone will eventually leach out years later causing damage to the wood of an instrument.
The bone as received from the butcher was frozen hard. However, it was left in a refrigerator for a few days before I could get around to processing
it so the small amounts of flesh attached to the bone were soft and more difficult to remove.
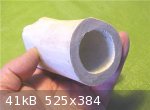
The first step is to scrape off as much of the flesh as possible with a sharp knife then to dig out all of the marrow from the centre of the bone
(soft and easily removed).
I had to cut more material from both ends of the bone to completely remove some remaining pink coloured porous bone matter. I used a metal cutting
bandsaw for this but cutting it by hand using a hacksaw would do just as well.
This has left me with a clean, relatively short section of bone
9 cm long by about 5 cm in diameter (3.5 inches X 2 inches). Not much material to work with but sufficient to make quite a few nut blanks.
After clearing up the waste material, suffering a sudden loss of appetite and thinking about becoming a vegetarian, I moved into the kitchen for the
next stage of the operation.
|
|
|
Aymara
Oud Junkie
Posts: 1162
Registered: 10-14-2009
Location: Germany / Ruhr Region
Member Is Offline
Mood: No Mood
|
|
... which will be cooking the bone in a vinegar / water mixture. That's what my girlfriend recommended to get rid of the fat and get a clean bone.
But you should open up the window widely ... that procedure stinks like hell  ...
because of the vinegar. ...
because of the vinegar.
PS: She says, it will also bleach the bone.
Greetings from Germany
Chris
|
|
|
jdowning
Oud Junkie
Posts: 3485
Registered: 8-2-2006
Location: Ontario, Canada
Member Is Offline
Mood: No Mood
|
|
Following instructions given by Sean Barry, luthier and former vertebrate museum curator/preparator at UC, bone prepared for lutherie work can be
simmered in hot water for up to two hours to cook away any soft tissue and start the degreasing process. Alternatively water with liquid dishwashing
detergent added speeds up the process to 50 to 90 minutes.
I used about 2 litres of water with a dash of liquid detergent and with the addition of a table spoonful of Borax (sodium borate) for good measure.
The bone was simmered for about an hour followed by simmering for another 30 minutes in clean water. I must have done a thorough job of mechanically
cleaning the bone as there was no fat 'scum' in evidence on the surface of the water and no smell (and so no complaints from my wife!).
The cleaned bone now has to dry for several days before the final most important step.
After drying overnight in a warm kitchen at about 50% Relative Humidity a small circumferential crack was noticed on one end of the bone - that I take
to be a shrinkage crack - so the bone has been moved to a cooler place to dry. This makes me wonder if the bone is going to be too soft - immature
bone from a young animal perhaps? The bone cross section seems to consist of 3 layers with a softer layer (?) in the middle, perhaps another
indication that it is immature bone - but I am not sure how cattle bone develops in the living animal. I imagine in a mature beast the bone stops
growing and develops the kind of density and hardness required?
More trials with an alternative bone sample may be required.
|
|
|
jdowning
Oud Junkie
Posts: 3485
Registered: 8-2-2006
Location: Ontario, Canada
Member Is Offline
Mood: No Mood
|
|
The bone is now dry ready for degreasing (even though it looks to be grease free). This is the most important step for any bone to be used in
instrument work as any residual grease in the bone will eventually - years later - leach out and damage any wood in contact with it.
The bone has first been cut into four sections using a metal cutting hacksaw (as the bone is quite hard). The wall thickness of the bone varies from
about 7 mm to 10 mm.
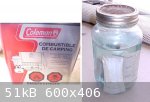
To degrease the bone, the pieces will be immersed in purified gasoline for about three weeks. Purified gasoline or 'white gas' is the fuel used in
'Coleman' camping stoves (no - it is not kerosene!). I use it a lot for degreasing machine parts etc. This is probably the cheapest and safest
(relatively) of the degreasing fluids to use. Ether or Trichlorethylene etc might do as well but are much too hazardous to safely handle around the
home even in small quantities.
After this initial degreasing, the bone sections will then be cut into nut blanks - the blanks then being degreased again in fresh 'white gas'.
Those with plenty of time do the whole bone cleansing treatment using natural bacteria and sunlight. They just leave the bone outside for the tissue
and marrow to rot and be consumed by bacteria and insects , finally to be bleached in the sun. This approach is not a practical one for me (certainly
not in winter!) as even in summer time any bone left outside would disappear overnight for sure - taken as a free treat by the coyotes and wolves
roaming around.
However, our residence is on an old farm property and I seem to remember seeing some bones lying around in the cedar bush at the back. Must check it
out in Spring once the snow cover has gone and before the vegetation starts growing again. Any old bones found would be at least 50 years old so might
be perfectly clean and good to use.

|
|
|
DaveH
Oud Junkie
Posts: 526
Registered: 12-23-2005
Location: Birmingham, UK
Member Is Offline
Mood: No Mood
|
|
Quote: Originally posted by jdowning  |
However, our residence is on an old farm property and I seem to remember seeing some bones lying around in the cedar bush at the back. Must check it
out in Spring once the snow cover has gone and before the vegetation starts growing again. Any old bones found would be at least 50 years old so might
be perfectly clean and good to use. |
"Under a juniper tree the bones sang, scattered and shining" TS Eliot
Sorry, it just seemed appropriate.
|
|
|
jdowning
Oud Junkie
Posts: 3485
Registered: 8-2-2006
Location: Ontario, Canada
Member Is Offline
Mood: No Mood
|
|
..... a.k.a. "Dem bones, dem bones, dem dry bones"!
|
|
|
jdowning
Oud Junkie
Posts: 3485
Registered: 8-2-2006
Location: Ontario, Canada
Member Is Offline
Mood: No Mood
|
|
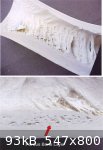
Spring conditions have arrived early in these parts and most of the snow cover has gone.
A quick search at the back of our old farm property resulted in finding three animal leg bones - partly buried in the soil and covered in moss. They
had been there, I would guess, for 50 years or more.
However, on closer inspection, it is clear that these bones are useless for making nuts as the attached image shows. Nature, over time, has taken its
course and the bones are now in a state of deterioration - split and with extensive surface cracking.
So, in order to process bone suitable for luthier material it can now be concluded that the bone should be fresh at the outset.
|
|
|
jdowning
Oud Junkie
Posts: 3485
Registered: 8-2-2006
Location: Ontario, Canada
Member Is Offline
Mood: No Mood
|
|
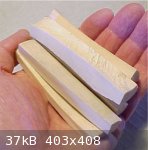
The freshly prepared bone has been soaking in the de-greasing fluid for 4 weeks so has been removed and cut into 8 narrower pieces. I did this by
hand using a hacksaw with a coarse 18 t.p.i blade. This is safer than using a power bandsaw and eliminates any risk of burning the bone due to
excessive heat generation during cutting.
The bone pieces are irregularly shaped but should be sufficient for about a dozen oud nuts with some material to spare for inlays etc. Material cost
for bone, de-greasing fluid etc (but not counting my labour!) - less than $5.
The bone pieces have a thin yellow coloured layer just below the outer surface. Not sure what this is but in case it might be absorbed fat, the pieces
will be immersed in the de-greasing fluid for another week or two.
Once cut to size, bone blanks may be further whitened - if required - by immersion for 10 minutes, maximum, in a 3% Hydrogen Peroxide solution (the
concentration for home use available off the shelf from a pharmacist). A longer immersion time causes the bone surface to become dull in
appearance.
This was quite a small bone so - back to the butcher to see if larger bone sections are available.
|
|
|
jdowning
Oud Junkie
Posts: 3485
Registered: 8-2-2006
Location: Ontario, Canada
Member Is Offline
Mood: No Mood
|
|
Having prepared another three bones from the local butcher over the past few weeks I have a bit more 'hands on' experience to share.
The butcher buys the bones in quantity, each week, from a local abattoir to sell as soup bones. These are all cut to a length of about 12 inches (30
cm) - all including the unwanted fat retaining knuckle joint at one end. Once the knuckle joint has been cut off by the butcher there remains only
about 6 inches (15 cm) or so of usable bone. I suspect that if I went to the local abattoir it would be possible to obtain more suitable longer
lengths of straight leg bone without the knuckle joints.
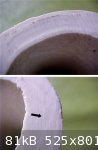
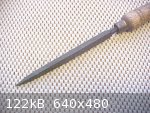
A good tool for cleaning out the central bone marrow and for scraping away tissue from the surface of the bone is a sharpened machinists triangular
scraper. (An old triangular file with the teeth ground off would serve just as well).
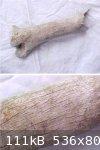
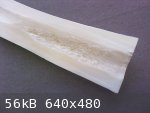
Once the bone has been cleaned manually it should be cut open lengthwise with a hack saw. Any spongy, porous bone should then be scraped away as this
contains fat that can soak into the bone and cause problems later. The porous bone can extend quite a way into the straight bone from the knuckle
joint - as can be seen in the attached image. This particular piece of bone has been de-greased but is unlikely to be of much use due to the extent
and depth of the porosity. Unfortunately it is not possible to determine if there is a potential problem with porous bone until the bone has been
cleaned and cut open. (however, at a cost of about a dollar for each piece of bone, the material cost in minimal).
The second image is another example of bone that - after boiling in detergent and water for an hour - was then cut open to reveal a section containing
porous bone. The porous bone has been cut away but some discolouration can be seen due to residual fat. This sample has now been boiled in an Ammonia
solution (household ammonia and water) for an additional 30 minutes to remove as much of the absorbed fat as possible. After drying for a few days,
the sample will be degreased in purified gasoline (camping gas) for 3 or 4 weeks. Time will tell if this procedure will succeed in completely removing
the absorbed fat.
|
|
|


