| Pages:
1
2
3 |
bulerias1981
Oud Junkie

Posts: 763
Registered: 4-26-2009
Location: Beacon, NY
Member Is Offline
Mood: John Vergara Luthier Lord of the Strings instrument making and repair
|
|
Oud #1
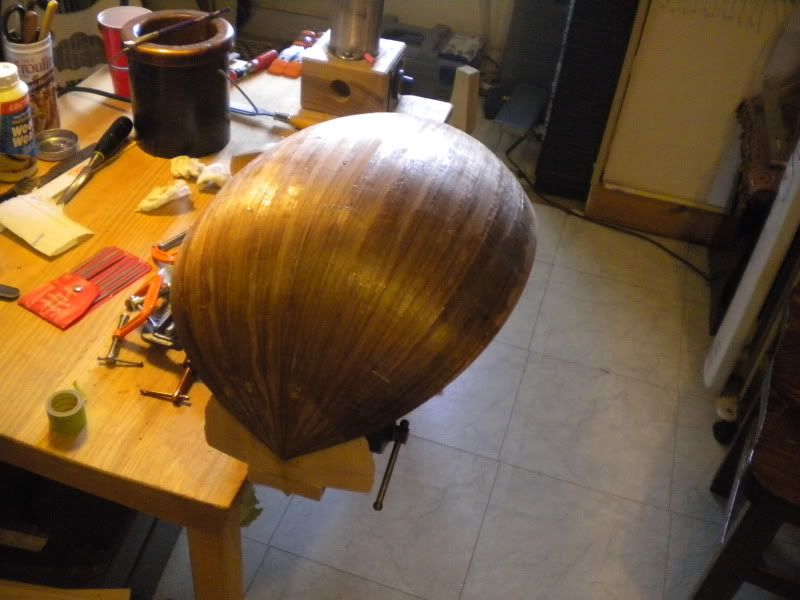
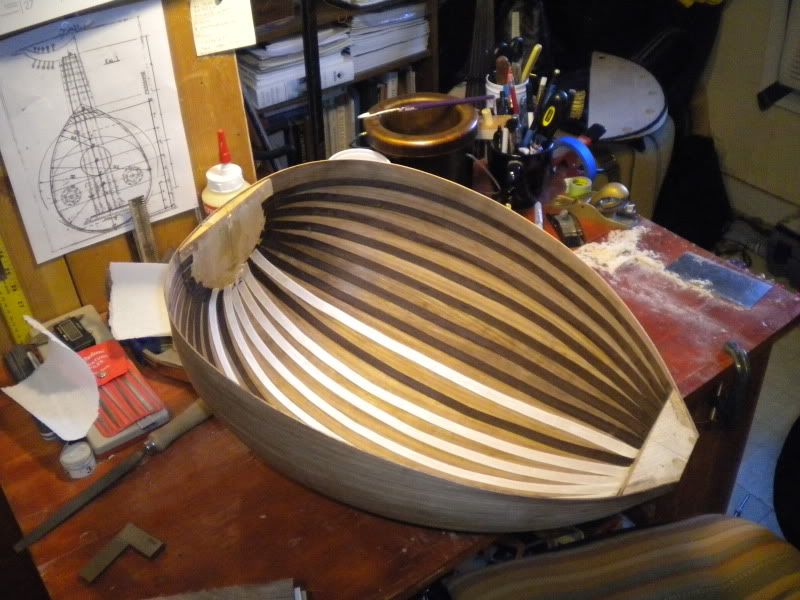
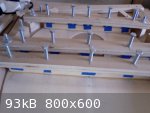
Hi all. After a year of delays, finally I've started to make some progress on my first oud. Here are some photos. The ribs are small, so there will be
many. Should be a total of 23. So far I've completed roughly 2/3s of the bowl.
|
|
|
paulO
Oud Junkie
Posts: 531
Registered: 9-8-2004
Location: California
Member Is Offline
Mood: Utz
|
|
Pretty nice looking wood with some neat grain -- what type of wood is it ? Thanks for the photos and I look forward to the next update.
Cheers,
PaulO
|
|
|
bulerias1981
Oud Junkie
Posts: 763
Registered: 4-26-2009
Location: Beacon, NY
Member Is Offline
Mood: John Vergara Luthier Lord of the Strings instrument making and repair
|
|
Thanks. Its dark walnut. Hard to see how pretty it is, cause theres glue all over the surface of the bowl. That will get cleaned up once all the ribs
are on.
|
|
|
Kelly
Oud Junkie
Posts: 285
Registered: 1-30-2007
Location: Manchester, UK
Member Is Offline
Mood: No Mood
|
|
Nice work there you;ve given my delayed project a boost- need to get the glue pot out!
Keep the photos coming
Regards
Kelly
|
|
|
paulO
Oud Junkie
Posts: 531
Registered: 9-8-2004
Location: California
Member Is Offline
Mood: Utz
|
|
Dude...dark walnut -- that's awesome ! Way to go. Regards..PaulO
|
|
|
SamirCanada
Moderator
Posts: 3404
Registered: 6-4-2004
Member Is Offline
|
|
Hey nice to see another oud project on the forums!
but if I can give you 1 word of advice, try not put that much glue. Just a very tinny bead of glue is more than enough.
I just feel for you... when it comes time to scrape that glue off it will be very hard on your scrapers and it will really be demanding on your
forearms... then again maybe you want the workout? 
@samiroud Instagram
samiroudmaker@gmail.com
|
|
|
bulerias1981
Oud Junkie
Posts: 763
Registered: 4-26-2009
Location: Beacon, NY
Member Is Offline
Mood: John Vergara Luthier Lord of the Strings instrument making and repair
|
|
Samir,
Thanks for the advice. I'm using hyde glue. It should come off easily. My method is I pin the "tuned' rib into place, then I apply the hot hyde glue
on onto the surface and massage it in between the ribs, then tape it. Not much time to work with this glue as it gels quickly. Its really a thin layer
of glue, and I already scraped a section off to see how it is and its not so bad.
Two more ribs and I'm done with the bowl.
|
|
|
jdowning
Oud Junkie
Posts: 3485
Registered: 8-2-2006
Location: Ontario, Canada
Member Is Offline
Mood: No Mood
|
|
Good to see that you are using hide glue for the rib joints.
When using hide glue for rib, sound board and sound board to bowl joints it is necessary to use a hot iron to remelt the glue. If a joint is closed
when the glue has gelled the joint will be weak and may fail.
The centuries old method for gluing rib joints of ouds and lutes using hide glue is to apply glued paper strips over the joint - ironing them in place
(as well as remelting the glue) as you work along the joint. The paper is immediately set in place by the heat of the iron pulling the joint faces
tightly together as the glue shrinks. The added advantage is that the paper strips covering the outside of the bowl act as temporary reinforcement of
the bowl preventing any danger of joint separation when the bowl is removed from the mold (if a mold is used) and otherwise worked upon before the all
important paper reinforcement strips have been applied to the rib joints inside the bowl.
The exterior of the bowl is then finished by removal of the dry paper strips with a cabinet scraper or by first moistening the paper bit by bit prior
to scraping.
It all sounds a bit complicated but in practice it is a straightforward procedure with no need to rush things and ensures close fitting and strong
joints.
I use a miniature electric iron available from most model/hobby shops but a standard household iron - although a bit clumsy - can also be used.
I describe the process in some detail for gluing rib, sound board and sound board to bowl in the topic "Old Oud - New Project".
In your case, to be safe, you might want to apply strips of masking tape across the outside of the bowl as temporary reinforcement in the absence of
the glued paper.
Good luck.
|
|
|
SamirCanada
Moderator
Posts: 3404
Registered: 6-4-2004
Member Is Offline
|
|
Bulerias, I know you are using hide glue. I am telling you, it dries to an almost glassy substance and it is quite hard to scrape off when it has
dried. All you need is a small bead of glue on the side of the rib that will be glued. take your time to apply the glue dont be scared to let it gel.
then place it on the rib it will be glued to and start working the joint with a heat source. You can use the tried trusted and true technique that our
colleague Jdowning above describes or you can use a heat gun on the lowest setting to resoften the glue as you work along the joint and press the ribs
together to squeeze out little tinny beads of glue. I find this method less messy and I dont need to use paper strips to prevent the glue from
touching the hot iron
@samiroud Instagram
samiroudmaker@gmail.com
|
|
|
Sazi
Oud Junkie
Posts: 786
Registered: 9-17-2007
Location: Behind my oud
Member Is Offline
Mood: مبتهج ; ))
|
|
Hey Samir, maybe you left it too thick and too long? I don't know, but I've used it recently on a couple of repairs (you saw the photo of the broken
head and neck of my newest oud) and found it scraped off nice and easy, (and the joints, under all that string stress, have held).
Nice to see an oud project with more ribs, look forward to seeing more progress pic's and hearing this one finished.
|
|
|
FastForward
Oud Junkie
Posts: 225
Registered: 6-2-2008
Member Is Offline
Mood: No Mood
|
|
Bluerias, I second what Samir said regarding the use of too much glue. I was thinking the same as I did my oud but it was a real pain to remove it.
Took many many hours of scraping and when I that was not enough I pulled the random orbital sander and used it to remove the rest. It took about
2.5hours with 60Grit paper on the ROS.
One note is I did apply quite a bit of it and not just a think layer. Maybe next time.
|
|
|
bulerias1981
Oud Junkie
Posts: 763
Registered: 4-26-2009
Location: Beacon, NY
Member Is Offline
Mood: John Vergara Luthier Lord of the Strings instrument making and repair
|
|
I used a heat gun for violin making/repairs, it is a good method. However, I have tried to scrape off some glue and it comes off fairly easy.. so not
sure if were using the same hyde glue or not. Also, its 23 ribs, so that means many joints which means more glue.
|
|
|
Ararat66
Oud Junkie
Posts: 1025
Registered: 11-14-2005
Location: Portsmouth, UK
Member Is Offline
Mood: mellow yellow
|
|
Just a thought - would an excess of hide glue soak into the bowl wood and compromise its acoustic reflectivity so that however much scraping it would
have gone too far.
I may well be wrong but it is just an observation.
Good work and lovely wood.
Cheers
Leon
|
|
|
bulerias1981
Oud Junkie
Posts: 763
Registered: 4-26-2009
Location: Beacon, NY
Member Is Offline
Mood: John Vergara Luthier Lord of the Strings instrument making and repair
|
|
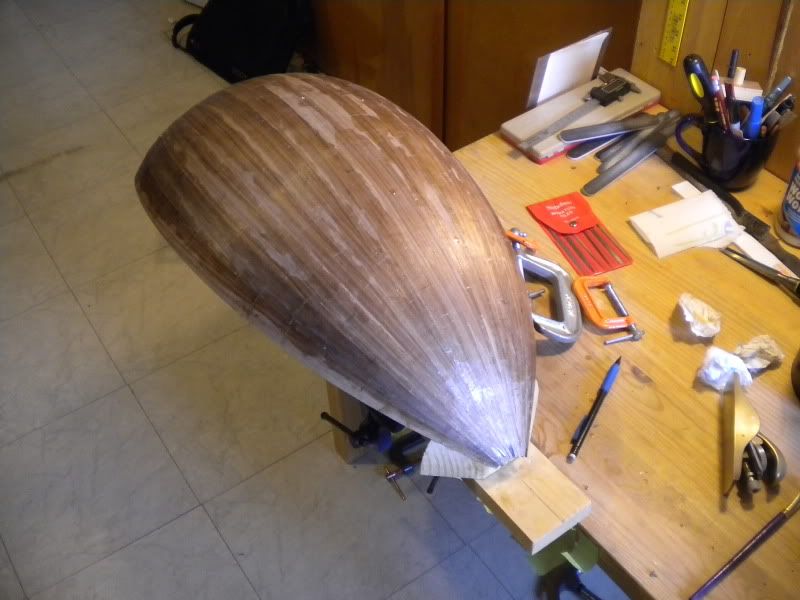
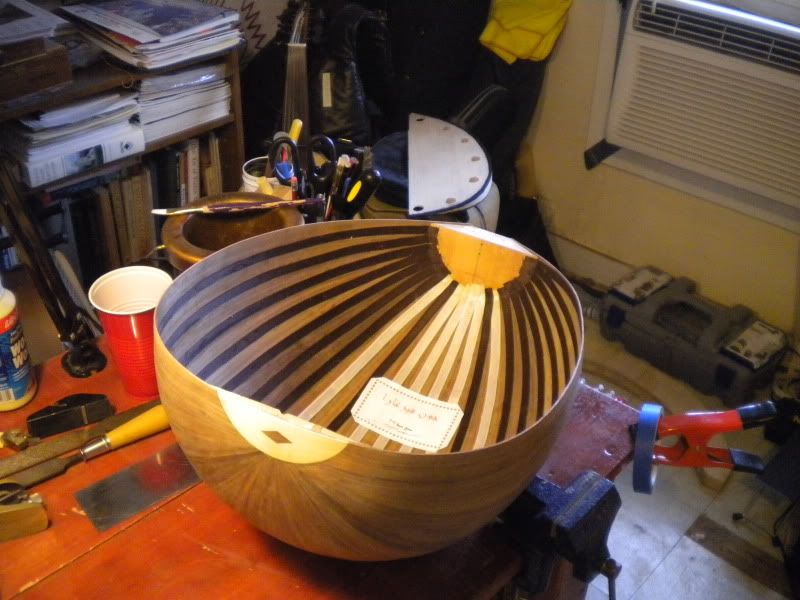
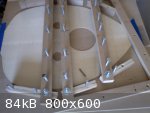
Here is the latest. Everything is scraped. Worst than what I thought it would be, yet not as bad as everyone was scaring me! lol
However the symmetry is not perfect on both sides. I'm not sure how that happened. I didn't use a mold obviously, so I'm assuming this is one of the
cons of not using a mold. And I'm not sure what that means for the rest of the project however.
You can see jdowning's oud from his project on my wall, as I'll consider that for my next project! But scale it up to modern oud dimensions.
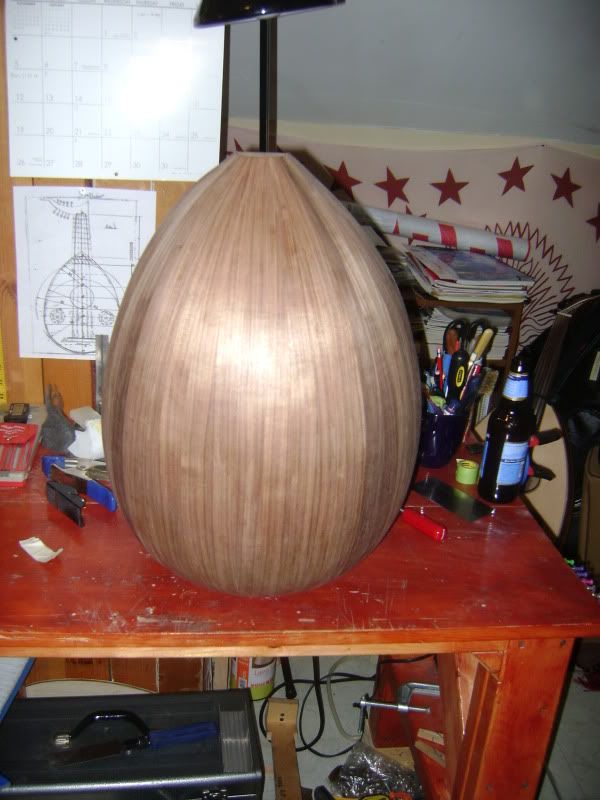
The ribs came to the point nicer than I thought they would. I wonder if I should do an inlay there or not? Any advice?
|
|
|
SamirCanada
Moderator
Posts: 3404
Registered: 6-4-2004
Member Is Offline
|
|
very nice man.
that is an awesome feeling isn't it!
You dont have to put an inlay or to cover it if you feel the points match up well enough. That is really impressive by the way! chapeau to you. I am
still unable to make that happen.
Also, using a mold is the way to go if you want to stick to your planned dimensions for sure. Although its not a terrible thing to sway from it a
little bit as happened in your case. this happened to me as well on my first oud. Just make sure you use the dimensions of the finished bowl on a wood
or paper outline to plan the distribution and lenght of the braces according to the actual size. I am sure you figured that much though since I am
stating the obvious and your work shows that you are quite talented and meticulous.
all the best on the rest of the oud buddy.
oh and what kind of beer you got there? You americans have some of the best microbreweries.
@samiroud Instagram
samiroudmaker@gmail.com
|
|
|
bulerias1981
Oud Junkie
Posts: 763
Registered: 4-26-2009
Location: Beacon, NY
Member Is Offline
Mood: John Vergara Luthier Lord of the Strings instrument making and repair
|
|
Thanks Samir.
There is a method I used to shape the ribs which I just realize I didn't point out.
I saw this on a lute making website. The luthier says if the lute is half round, no need to make a mould and suggested making a wedge. Heres the
link.
http://www.cincinnatiearlymusic.com/medieval_lute.html
He calls it a "speed tip", but in all honesty, it takes time to make this perfectly as well. But I think its a good method. I wonder how many oud
makers have tried this on here.
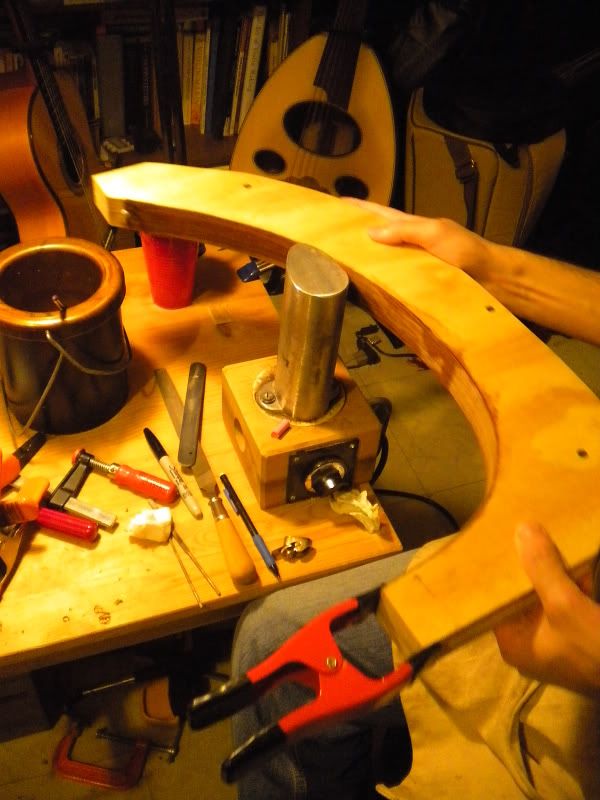
As you can see, I made a wedge shaped piece of wood from spruce (but you could use anything I suppose) that has the exact shape of the rib. I clamp
the bent piece of wood to the wedge and just plane it until you cannot plane anymore. And that SHOULD be the shape of the rib. Which is why I was able
to get the points to line up in such a way.
I ended up putting an inlay over the points afterall. A half round piece of maple with a walnut diamond inlayed into that. Its clamped and glueing
now, so I'll take photos of it tomorrow. Not 100% happy with how that came out, but it was my first time doing inlay. But not bad. Didn't really need
to do it either, but I figure what the hell.
I have my own method for bending ribs which I haven't seen anyone do on here. I'm willing to share that too if anyone is interested. I can bend a rib
to near perfect shape in 3 minutes using an outer mold shaped to the rib's target shape. A photo of that will come soon.
The beer I was drinking was Blue Moon.. love that stuff! lol
Samir, I'm accepting advice on the next steps... because I'm trying to figure out the best way to approach making the top. Thanks!
|
|
|
jdowning
Oud Junkie
Posts: 3485
Registered: 8-2-2006
Location: Ontario, Canada
Member Is Offline
Mood: No Mood
|
|
This is the method that was used by luthier Philip Macleod-Coupe described in the Lute Society Booklet No. 4 "Lute Construction" published way back in
1978. Here the 'no mold' procedure was used with the bowl of the lute being semi circular in section.
In my opinion it is a method that is more trouble than it is worth as much depends upon the accuracy of the wedge pattern - otherwise, the pattern
will just be a rough guide and you will end up making adjustments to the rib joints as you go along anyway.
Most if not all surviving lutes are not semicircular in section so that each rib is of different geometry and must be individually fitted (planed
freehand to fit). On 'flattened' section lutes the ends of the ribs do not meet at a point but this is of no consequence as they are covered by a
capping strip. And so it is with ouds - that is the reason for the semi circular inlay covering the points. With freehand fitting each rib width may
vary slightly as well.
The earliest drawing of a lute (mid 15th C, Arnault de Zwolle) describes construction of a mold of the 'toast rack' or 'bulkhead' type. It would seem
that the early lute and oud makers designed their instruments to strict geometrical designs and must have used a mold (solid or bulkhead types - as do
many lute and oud makers today) in order to conform to the required geometry. Use of a mold does not guarantee that a bowl will be symmetrical,
however, unless care is taken to ensure that every rib is bent and jointed so that it precisely fits the mold profile (without forcing and heavy
clamping).
|
|
|
bulerias1981
Oud Junkie
Posts: 763
Registered: 4-26-2009
Location: Beacon, NY
Member Is Offline
Mood: John Vergara Luthier Lord of the Strings instrument making and repair
|
|
Jdowning,
Yes, this method works well if the wedge is shaped properly which I made sure and was careful during that process. But as I said earlier, doesn't save
you a lot of time really. A little if anything.
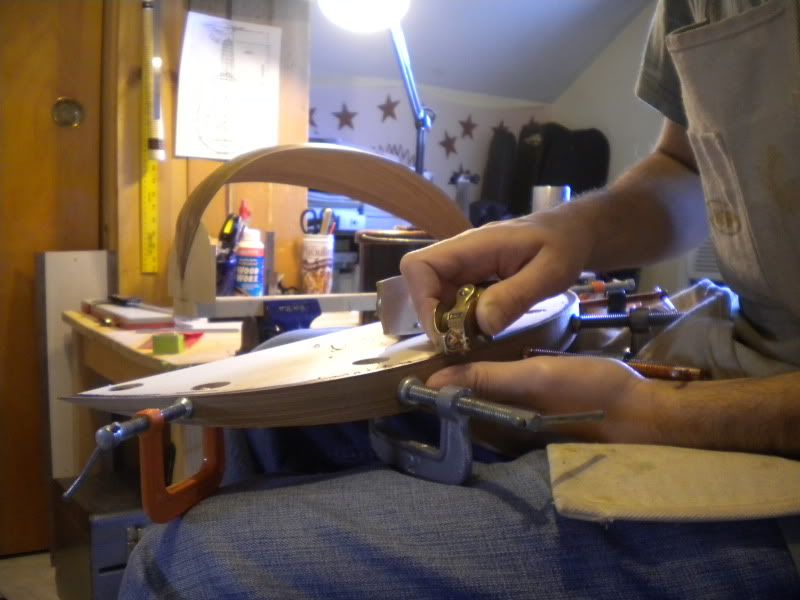
Here is a photo of the inlay I installed last night. Not the best, but its ok for my first time I suppose.
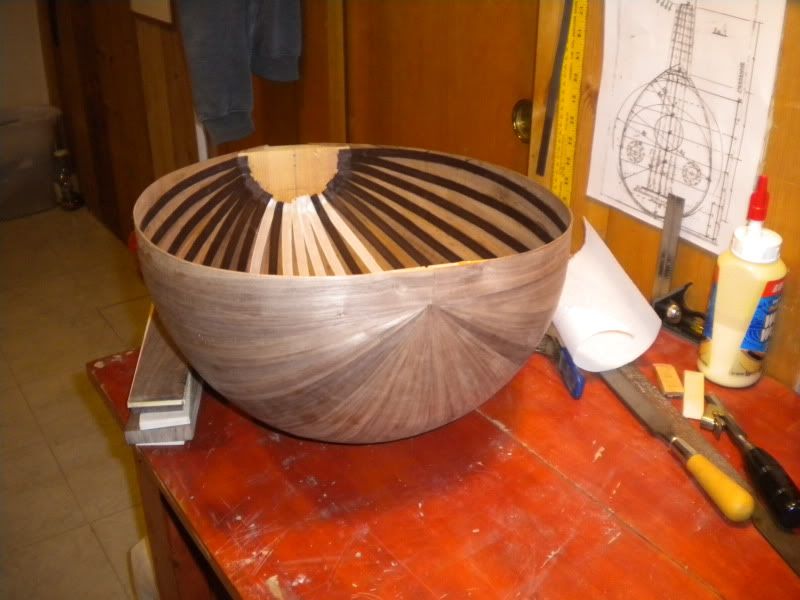
And here is the outside mould I use to bend the rib. I simply dampen the rib with a brush, then move it slowly along the iron. If I give it the right
rate, I can take the rib off the form after 1 or 2 passes only and it really maintains that shape. As I said earlier, the mould is made from the
template, and is from plywood.
|
|
|
Peyman
Oud Junkie
Posts: 496
Registered: 7-22-2005
Member Is Offline
Mood: Mahoor
|
|
I like Blue Moon too, specially with a wedge of orange! This is a nice project! I am definitely following. Do you prebend the rib and then put it in
the mold?
|
|
|
FastForward
Oud Junkie
Posts: 225
Registered: 6-2-2008
Member Is Offline
Mood: No Mood
|
|
Nice progress Bluerias. Keep it up, its looking very good.
Regarding the top, start by preparing the edges with a shooting board (two pieces of plywood) and my 14" Jack plane. Once no light was showing I
stopped planing the edges. It took me some practice as I've never done that and my the pieces were wide enough to accommodate my practice which reduce
the width by about 1/4" total (1/8" on each side).
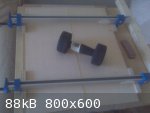
I used two 24" aluminum clamps that I got from Harbor Freight for about $8 each to lightly apply pressure to the two pieces as I applied some hide
glue to the joint. Some weights were added on top of the sound board to prevent it from buckling (see the last photo below).
Once the pieces are joined, you need to reduce the thickness close to the final thickness (I sanded it down to 2.1mm, final thickness was 1.6mm
tapering on the sides to 1.3-1.4mm).
Once that is done, start by outlining the back profile on the soundboard (decide which side needs to be in and which side needs to be out first and
draw the outline on the inside).
Once that is done, identify the key distances, like location of the bridge, location of the large rosette. Then you can start drawing the remaining
bracing pattern.
Also, it helps if by now you have decided what kind of inlay work you want to do on the top if any.
Once your finish drawing the pattern and you are absolutely sure about it, drill 1/8" or 1/16" holes in the center of the large/small rosettes. Flip
your top and start outlining your inlay work. What inlay work you want determines the next steps and I will skip this part to the braces.
Once the inlay work is done, sand down the soundboard approximately to final thickness.
Then, you can cut the rosette holes open. If you have the rosettes ready, its your choice if you want to glue the rosettes now or later, I would
suggest gluing them later but its up to you.
Then, trim the soundboard around the oud profile you outlines earlier, leaving about 5mm. From the brace blocks, cut your braces and trim them to
length. I didn't fit them inside the out until after they were glued to the soundboard, mainly because any misalignment in the gluing of the fitted
braces will translate into poorly fitted braces and will affect the structural stability of the oud as well as the sound coming out of it.
To glue the braces, I used a home made clamping jig that looks like the photos below.
Once your braces are glued in place, you can start trimming the edges of the braces slowly to fit them into the oud bowl perfectly. The process took
me about 2hours and the outcome was perfect. I used a combination of a utility nice blade, sharp chisels, and a small sanding stick. Be careful not to
ruin the soundboard.
The above is how I did the top and I am no expert what so ever. That was my first oud and I would love to hear how the others do it.

|
|
|
freya
Oud Junkie
Posts: 275
Registered: 2-8-2004
Location: Asheville NC
Member Is Offline
Mood: Happy in the mountains of WNC
|
|
Shooting Boards
If you look around on youtube, there are plenty of videos on truing and joining tops & backs. I like the tapered jig shown here:
http://www.youtube.com/watch?v=2xOJAjdGZUY&feature=related
though I don't currently have easy access a band saw and have been using the long clamps referred to above.
|
|
|
bulerias1981
Oud Junkie
Posts: 763
Registered: 4-26-2009
Location: Beacon, NY
Member Is Offline
Mood: John Vergara Luthier Lord of the Strings instrument making and repair
|
|
Quote: Originally posted by Peyman  | | I like Blue Moon too, specially with a wedge of orange! This is a nice project! I am definitely following. Do you prebend the rib and then put it in
the mold? |
We are brothers in the oud and in bluemoon! hehe.
To answer your question, my ribs were rather thin. 1.5mm! So I didn't have to prebend them in order to fit them in the mold. If they are thicker, I
would recommend to prebend them.
I use HOT water by the way. I forgot to mention that detail, but I believe that helps prevent cracking and also gives the best performence of the
steaming during bending.
To join the top pieces together shouldn't be an issue for me. I'll use my long bench plane to do this. I joined many spruce and maple tops for violins
and are much thicker and problematic to do this operation. I'll try to achieve a spring joint, to assure it wont seperate later.
I guess I'm debating certain details such as what inlay to do on the top. How to execute it.. (by hand or with dremel) What kind of joint to do for
the neck into the neck block. I'm thinking of doing a dovetail joint, or even the kind of joint demonstrated by Dr. Oud in his book. I have yet to
plane/sand the edges of the bowl flush with the blocks.
I want to start a question for everyone...
Have you seen curly maple as a fingerboard? I'm considering using that. I've seen them on baroque violins, viols. But what about ouds/lutes? Any
opinions? I'm trying to keep the oud themed with walnut and maple only. No ebony or roserood. Not even for the bridge, fingerboard, inlays or pegs.
Even the pegs I'm planning to make myself on my lathe from maple.
|
|
|
Peyman
Oud Junkie
Posts: 496
Registered: 7-22-2005
Member Is Offline
Mood: Mahoor
|
|
Wow 1.5mm. That's a lute! I've used the same method the other way, bending the ribs on a form with a hot iron. Like I am ironing. I think your method
is better though.
In a Guild of American Luthier's article, maple and a bunch of other woods were tested as fingerboards and maple did better than expected and I think
better than almost all the other material. But it wasn't curly maple, which I think might have a stability issue with the swirls. As long as we're not
talking about striped or flamed maple. You should consider all the cons of using a light wood for a fingerboard too (wear, grime & dirt etc). You
can dye the maple black too.
|
|
|
bulerias1981
Oud Junkie
Posts: 763
Registered: 4-26-2009
Location: Beacon, NY
Member Is Offline
Mood: John Vergara Luthier Lord of the Strings instrument making and repair
|
|
I am good with wiping my fingerboard everytime I play because my hands get sweaty. But I guess the fingerboard will stain. I know there was an oil
some violin makers were using.. (not linseed) So I'll have to look into that in Maestronet violin making forum.
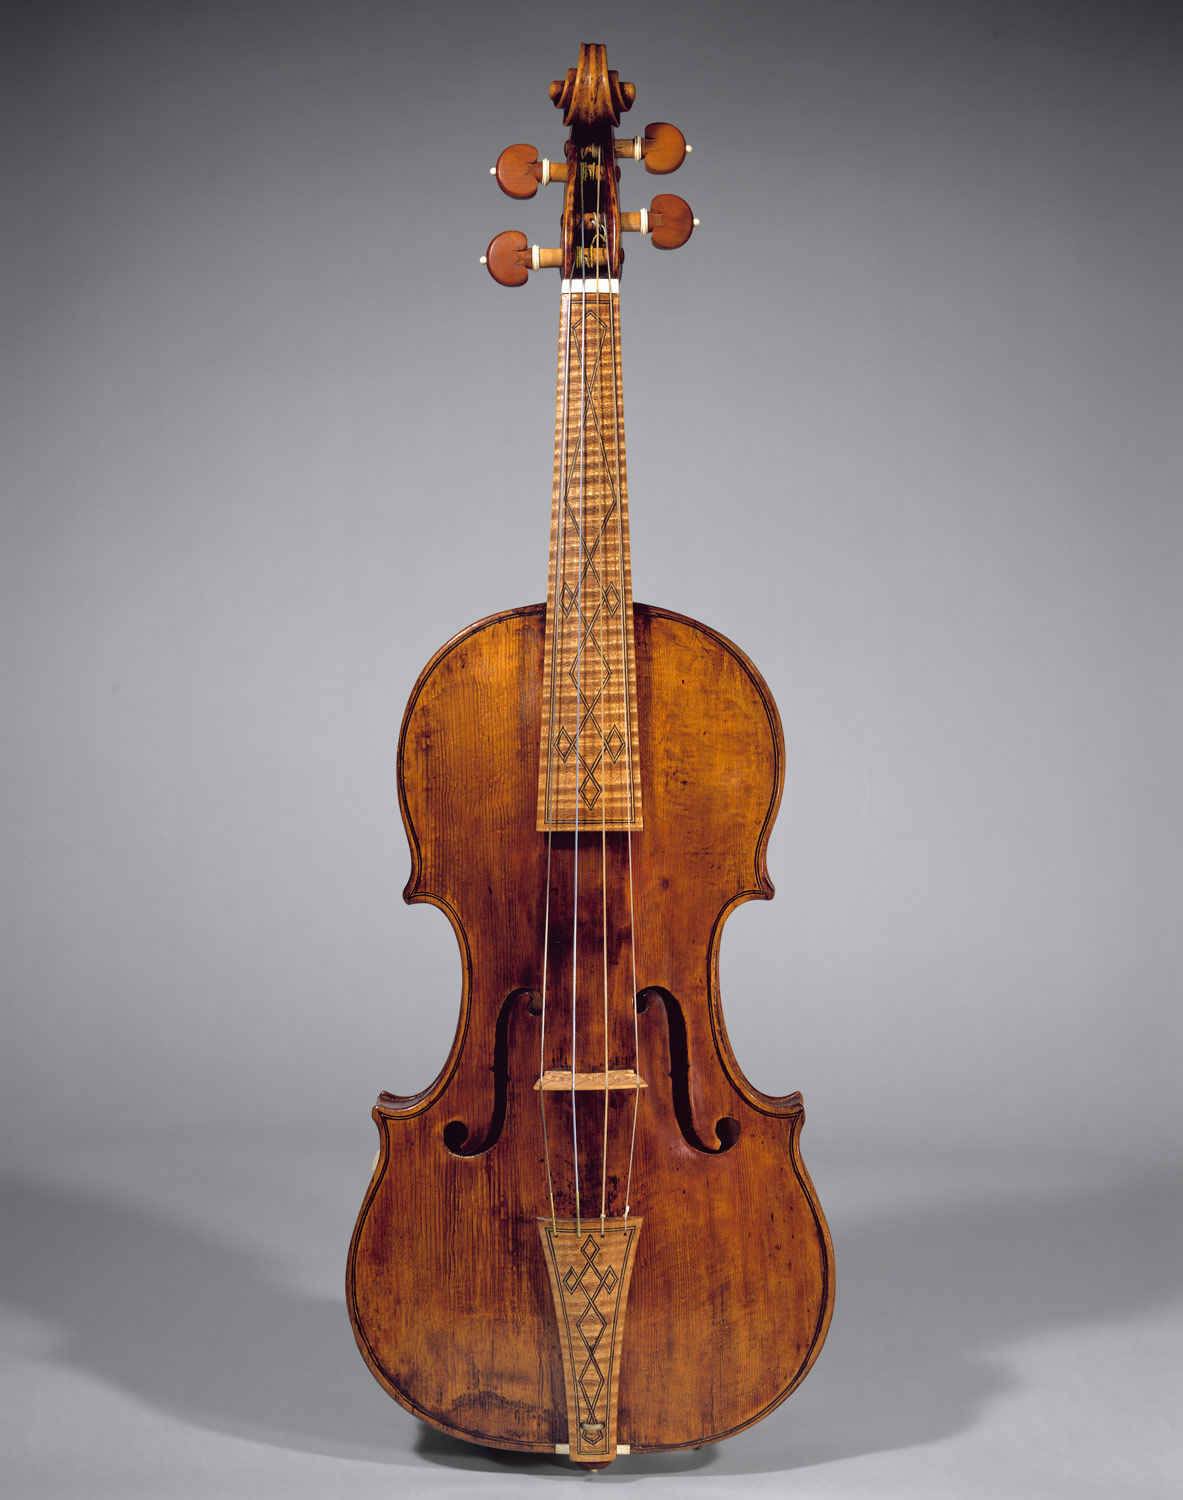
Here is a photo of an original Amati violin in which I assume it's baroque setup has remained untouched. I'm also assuming the fingerboard and tail
piece is original. There is an example of an Amati violin like this at the Metropolitan museum of art in NYC, with curly maple fingerboard and tail
piece with baroque setup.
This is a modern maker of Viols (made to baroque specs)
http://www.brandtviols.com/index.html
So there are examples of curly maple fingerboards. I need more info on the conditioning. I guess there might be good practical reasons curly maple was
discontinued as a preferred wood for fingerboards. Perhaps ebony became more available to European makers and/or more fashionable?
|
|
|
Peyman
Oud Junkie
Posts: 496
Registered: 7-22-2005
Member Is Offline
Mood: Mahoor
|
|
I don't know why ebony became so popular, but you're right maple is used for fingerboards all the time (guitars and other instruments). I think I was
trying to distinguish between curly and flamed/striped maples. Curly maple has swirls that are kind of weird to deal with. The swirls can crack while
working on it. This is from my own experience and I also recall having a hard time sanding out saw marks. But I think if you use striped maple (like
this violin), it would look really nice and different than what we usually see on ouds. With age, it'll turn orangish which is fitting to play on
while enjoying some blue moon 
I have also heard of "cooked maple" which has a very nice color and is very stable.
|
|
|
| Pages:
1
2
3 |


