| Pages:
1
2 |
jdowning
Oud Junkie

Posts: 3485
Registered: 8-2-2006
Location: Ontario, Canada
Member Is Offline
Mood: No Mood
|
|
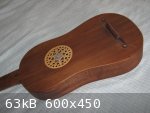
Another Refurbish Project - Renaissance Guitar
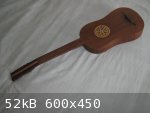
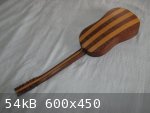
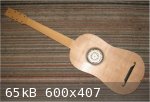
I built this instrument - a 'vaulted back' (but not fluted ribs) 4 course renaissance guitar - in 1974 as an experimental project. It was then
probably one of the first reconstructions of this type of guitar in modern times.
No four course renaissance guitar survives so the proportions of this instrument were based upon photographs of the Dias five course guitar in London
(the museum drawings of the Dias guitar did not become available until 1976) and some 16th C engravings.
In the light of new information, there are a number of details that need to be changed so it has been decided to completely refurbish the instrument.
Hopefully there may be some information in the course of this project that might be of some interest to forum members.
Changes to be made include:
1) removal and replacement of the sound board and bracing.
2) replacement of the rose.
3) replacement of the pegs.
4) replacement of the nut and finger board.
5) replacement of bridge
6) shorten and refit the 'peg box'
7) reinforce the vaulted back to increase stiffness.
8) add brace supports and side stiffeners.
9) add 'scoop' or 'cut out' to the sides to provide extra string clearance over the sound hole.
|
|
|
jdowning
Oud Junkie
Posts: 3485
Registered: 8-2-2006
Location: Ontario, Canada
Member Is Offline
Mood: No Mood
|
|
Most of the old oil varnish has been stripped from the instrument - before sound board removal - for convenience. The top was removed in the usual
manner using water, a hot iron and thin spatula.
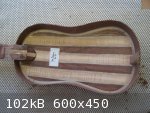
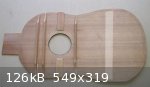
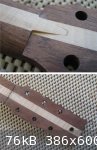
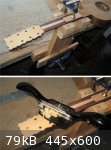
With the top removed the construction of the guitar can be seen. The guitar has been built in the so called Spanish style i.e. the neck and neck joint
are made in one piece and the side ribs are glued into slots cut into the side of the neck. With this method the guitar is built, inverted, on a flat
base using a solid mold.
The other method used by the early luthiers was to attach the neck separately to the body with a glued butt joint and a nail (or nails). These methods
were used for both guitar and violin - a nailed joint being preferred by the French and Italian luthiers like Stradivarius, for example.
I prefer the Spanish method.
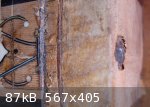
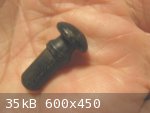
The attached images illustrate the two methods. The nailed joint example is on a 17th C Venetian guitar where a single large headed 'clout' nail has
been used.
This image has kindly been provided by Daniel Sinier and Françoise de Ridder see under 'Restorations' at
http://sinierderidder.free.fr

|
|
|
Yaron Naor
Oud Junkie
Posts: 275
Registered: 1-24-2009
Location: Bat Hefer, Israel
Member Is Offline
Mood: Happy
|
|
Thanks for shearing Mr. jdowning
It is a very interesting instrument and process that you are doing
Please keep us updated with more detailed images - I learn so much from you
Regards,
Yaron.
|
|
|
jdowning
Oud Junkie
Posts: 3485
Registered: 8-2-2006
Location: Ontario, Canada
Member Is Offline
Mood: No Mood
|
|
Thanks Yaron - there is more to follow!
As with a few of my other instrument making/repairing projects some take longer than others to complete as either life gets in the way or the
motivation is temporarily lacking. I started work on this refurbishment a few years ago so the sound board and rosette are already prepared as are the
boxwood pegs. So, with a bit of luck I might get around to completing the work later this year.
I currently play the surviving four course renaissance guitar repertoire on a seven course lute (using the second, third, fourth and fifth courses and
making the necessary mental adjustment when reading from the tablature). This is possible because the 16th C four course Spanish guitar was
essentially a cut down version of the Spanish vihuela - presumably to reduce string costs (particularly by avoiding the expensive and short lived top
strings and costly basses) but possibly also an historical throwback to the traditions of the Moorish oud when it too was strung with only four
courses.
The challenge is to obtain a bright sound and projection from such a relatively small instrument (54 cm string length) when strung throughout in gut
(or silk).
|
|
|
jdowning
Oud Junkie
Posts: 3485
Registered: 8-2-2006
Location: Ontario, Canada
Member Is Offline
Mood: No Mood
|
|
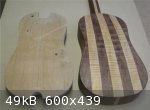
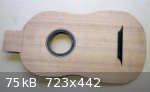
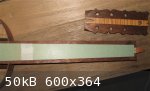
The new sound board is made from Sitka spruce and is ready to fit with the bridge and braces glued in place The old sound board was made from western
red cedar (a popular choice for lute makers in the 1970s but non authentic).
The bracing is around and above the sound hole to ensure adequate stiffness in this area to prevent the neck from lifting under tension. There are no
braces below the sound hole so the sound board is 2.5 mm thick to compensate.
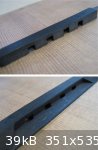
The bridge is from solid ebony with slots - not drilled holes - cut for the strings. There will be additional decorative trim glued to the ends of the
bridge.
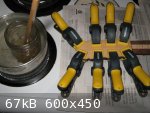
The pegs have been made from boxwood already fitted to the peg box but require finishing and polishing.
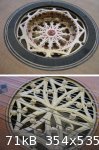
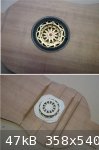
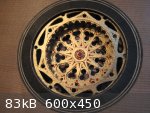
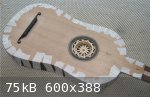
The shallow 3 dimensional rosette has been cut from stiff card and painted gold with colored detailing. No four course guitars survive so it is not
known what design of rosette was used - most likely it would have been more like this on one of my vihuelas (see attached image). Nevertheless the 3D
rosette provides a nice contrast so - rather than spending time to make another rosette - I will stick with this one.
The 3 dimensional rosette is usually found on five course guitars of the 17th C.
With the fingerboard removed, the next step is to cut off and shorten the peg box and reduce the neck length by about
1 cm to bring the string length to 54 cm. This will give a pitch of about G (A 440) for the instrument
|
|
|
Yaron Naor
Oud Junkie
Posts: 275
Registered: 1-24-2009
Location: Bat Hefer, Israel
Member Is Offline
Mood: Happy
|
|
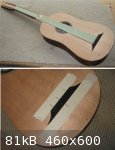
Parchments Strip?
Thanks for the info, regarding the soundboard braces, I saw a parchment strip 1" width glued to the area front of the bridge,
at Baroque guitars and some other, will you glue one like this?
Thanks,
Yaron.
|
|
|
jdowning
Oud Junkie
Posts: 3485
Registered: 8-2-2006
Location: Ontario, Canada
Member Is Offline
Mood: No Mood
|
|
No - the sound board will be left without any cloth reinforcement.
I have seen this feature on two 'Baroque' guitars (mid 17th C or later) that I assume was original and not a later repair. Some strips do not extend
the full width of the sound board as you have represented it. However, we do not know if this might have been a feature of the smaller Spanish
Renaissance guitars made 100 years earlier.
The sound board was made about 5 or 6 years ago, as far as I can remember, and has been 'gathering dust' since then. Checking the sound board over and
tapping it revealed a 'rattling' noise traced to the bridge joint starting to separate at the ends. The bridge was removed using a heated spatula. I
had used epoxy cement to glue the bridge but the brand used in error has remained relatively soft so was unsuitable for the job. I have used epoxy for
this application in the past without any problem but the grade of glue has to be hard setting.
This will be an opportunity to reshape the bridge slightly and after clean up of the joint surfaces the bridge will be refitted with hot hide glue.
|
|
|
jdowning
Oud Junkie
Posts: 3485
Registered: 8-2-2006
Location: Ontario, Canada
Member Is Offline
Mood: No Mood
|
|
Having removed the bridge this may be an opportunity to convert the guitar to a six course vihuela (single treble with five double courses). Something
now to consider before proceeding further. This will entail modifying the bridge and widening the neck and adding more pegs to the 'peg box'.
Interestingly the epoxy (LePage Regular) that I used for attaching the bridge has been tested and compared with other adhesives (including hot hide
glue) at
http://woodgears.ca/joint_strength/glue.html
It also performed badly in these trials - not necessarily because it is a inferior glue generally but one that is unsuitable for high strength wood to
wood applications. The trials do not test for 'creep' over time or humidity effects. The author also does not consider hot hide glue to be an adhesive
for wood!! Nevertheless - within these limitations - some interesting comparative results.
|
|
|
jdowning
Oud Junkie
Posts: 3485
Registered: 8-2-2006
Location: Ontario, Canada
Member Is Offline
Mood: No Mood
|
|
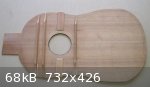
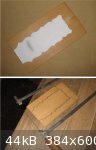
The neck width has been checked with card templates sized for four courses (1 single , 3 double) and six courses - based upon the string spacing now
used on my lutes. When the guitar was built string spacing was wider - more suitable for a modern classical guitar. Current string spacing that I
today find comfortable is a lot narrower and is very similar to historical lute (fretted) string spacings as well as modern oud (unfretted) string
spacings.
Nevertheless, there is insufficient neck width available for a simple conversion to a six course vihuela - so a four course guitar it will remain. The
overall string spacing at the nut (with gut or silk strings) will be about 25 mm so the neck can be trimmed back in width to allow about 4 mm on
either side of the strings.
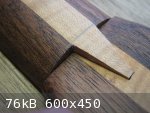
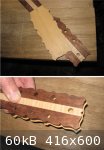
The 'peg box' length has been reduced by about 2 cm to be proportionally more historically correct and will be re-attached to the neck with a
traditional (for early guitars and vihuelas) 'V' joint. This is a difficult joint to make and fit accurately (in 3 dimensions) so has initially been
prepared in the rough with extra material to allow for precise fitting.
|
|
|
jdowning
Oud Junkie
Posts: 3485
Registered: 8-2-2006
Location: Ontario, Canada
Member Is Offline
Mood: No Mood
|
|
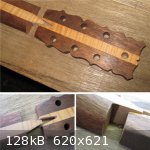
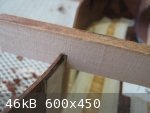
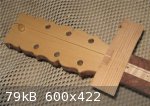
The pegbox V joint is in the final stages of fitting - a difficult an time consuming joint to make but unavoidable in this case where the original
pegbox is to be reused. Ah well nothing like a woodworking challenge!
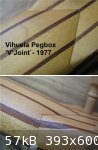
I have made this type of joint before on a vihuela that I built in 1977 - a scaled down version of the then only known surviving 16th vihuela from a
monastery in Guadalupe now in the Musée Jaquemart-André, Paris. A working drawing of the instrument made by luthier Maish Weisman in 1974 shows a
'V' joint - cut the full depth of the pegbox - reinforced with a wooden dowel.
A similar joint is noted on the 16th Dias guitar in London on the drawing made by Stephen Barber in 1976.
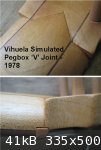
I made another smaller vihuela the following year (1978) but, because of the difficulty in making the 'V' joint, this time around the neck and pegbox
were made in one piece and the 'V' joint simulated with knife cuts. This is a much simpler solution so I did wonder at the time why the 16th C vihuela
and guitar makers chose to go to all the trouble of making a complex 'V' joint rather than going with this obviously much simpler, cost effective (and
potentially stronger) 'one piece' solution.
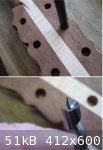
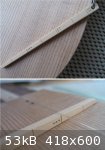
It can be seen from the attached images that the 'real' 'V' joint can be distinguished from a 'simulated' joint by either the discontinuity or
continuity of the wood grain running across the joint.
Luthier Alexander Batov has examined the pegbox joints of both the Dias guitar and the so called 'Chambure' vihuela in Paris (that also has this style
of 'V' joint) only to conclude that both these instruments - judging from the wood grain continuity - do not have 'real' 'V' joints at all but that
they are 'simulated'
So when I thought in 1978 that I was cheating (to save time) by making a simulated 'V' joint this would appear in fact to be the historically correct
method! We live and learn!
Detailed images comparing the joints of the Dias and Chambure instruments can be found here
http://www.vihuelademano.com/vgcrossroads.htm
|
|
|
jdowning
Oud Junkie
Posts: 3485
Registered: 8-2-2006
Location: Ontario, Canada
Member Is Offline
Mood: No Mood
|
|
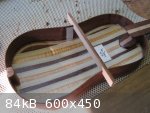
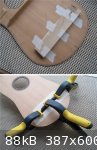
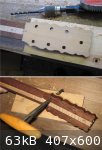
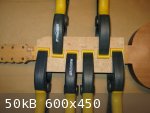
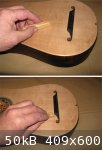
The vaulted back of the guitar is thin and currently too flexible. In order to stiffen the back of the guitar 15 mm wide strips of close weave cotton
cloth have been glued over the rib joints using high bloom strength hide glue.
In order to keep everything in alignment while the glue dries and cures (and shrinks!) - a simple jig slipped over the 'waist' of the guitar should to
the job.
If this extra reinforcement is not sufficient 3 or 4 additional strips of cloth may be glued across the width of the back.
|
|
|
jdowning
Oud Junkie
Posts: 3485
Registered: 8-2-2006
Location: Ontario, Canada
Member Is Offline
Mood: No Mood
|
|
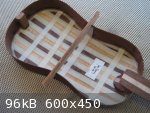
Additional reinforcement of the back has been provided with four cloth strips glued across the width of the guitar body. Shrinkage of the hot hide
glue has caused the sides to close in by a couple of mm.
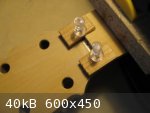
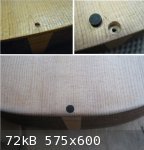
The sound board has been fitted by trimming the brace ends to be a precise fit to the sides. The correct alignment of the sound board to the neck is
then maintained with two wooden pins (tooth picks) - one drilled into the bottom block the other into the neck. These pins - after the sound board has
been glued into place - will be covered by the fingerboard and a decorative inlay at the bottom of the sound board.
The pegbox has been glued to the neck after completing fitting of the 'V' joint (a difficult joint to make - not to be recommended!). The top of the
pegbox will be covered with a
2 mm thick Boxwood plate - further reinforcing the 'V' joint. This will match the fingerboard that will also be made from Boxwood.
|
|
|
jdowning
Oud Junkie
Posts: 3485
Registered: 8-2-2006
Location: Ontario, Canada
Member Is Offline
Mood: No Mood
|
|
With the sound board aligned and the registration pins in place it is time to align the bridge in preparation for gluing it in place.
A card template representing the exact string length and outside string width at bridge and nut is used to position the bridge. Double layers of
masking tape placed in front of and behind the bridge provide a temporary register for the bridge to prevent sliding out of alignment when being
glued.
A flat block of wood is temporarily taped underneath the bridge as a support for clamping and the clamping arrangement tested with a 'dry run' (always
a good idea when working with fast setting hide glue).
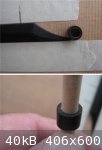
The bridge is of the traditional guitar slotted design - slots cut rather than holes drilled for the strings. The ends of the bridge will be finished
with decorative circular end pieces separately glued in place. The end pieces are made from a short tube of Ebony with a contrasting Boxwood core
(turned on a lathe but could also be done by drilling a hole in a piece of Ebony and then shaping the exterior by hand after gluing in the core for
support). This assembly will be thinly sliced with a razor saw to form the individual end pieces.
|
|
|
jdowning
Oud Junkie
Posts: 3485
Registered: 8-2-2006
Location: Ontario, Canada
Member Is Offline
Mood: No Mood
|
|
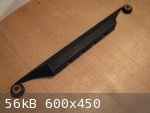
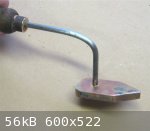
The bridge and rosette have been glued in place using hot hide glue.
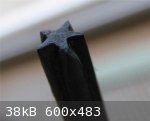
The bridge end pieces have been decorated with a star branding iron - easily made by filing the end of a steel rod with a triangular section file.
The branding iron is first heated with a propane torch, tested for correct temperature on some scrap wood and then applied to the piece. Temperature
should be just sufficient to form a clear burnt depression after applying the hot iron for a couple of seconds.
The end pieces have been glued with hot hide glue - a drop of glue being applied to the sound board only. Each end piece is then stuck on the end of a
needle (to facilitate handling) and applied to the glue. Each piece is then held in place with finger pressure for a couple of minutes until the glue
gels.
With the glue pot in action, the rosette has also been glued in place.
All set for gluing the sound board in place - next

|
|
|
jdowning
Oud Junkie
Posts: 3485
Registered: 8-2-2006
Location: Ontario, Canada
Member Is Offline
Mood: No Mood
|
|
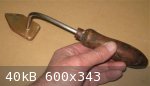
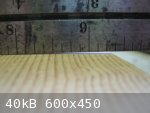
Before gluing the sound board it was decided to 'scorch' the underside (of the unbraced area below the sound hole) with a hot iron as an experiment
and as an extension of the scorching tests reported in the recent topic "Burnished Soundboards" (Advice , Tips and Questions" page 3).
Scorching is found on some surviving Baroque period guitars but the reason for this is something of a mystery.
To scorch the sound board an old style (non electric) 'iron' was used - made from a small block of copper attached to an iron rod fitted with a wooden
handle (an old file handle). The iron is heated using an external source such as an open flame. A propane torch was used here.
The hot iron was tested for temperature on a scrap of spruce (just sufficient to discolour the surface of the wood) and then quickly rubbed over the
whole area of the sound board below the sound hole - avoiding the area immediately under the bridge (risk of softening the glue).
After scorching, the sound board became slightly 'crowned' (i.e curved upwards) from being originally flat. The crowning occurs around the edges of
the sound board for about 4 cm with the central portion of the sound board remaining flat.
So was this the purpose of scorching - to crown the sound board (in the absence of bracing shaped to to achieve the same purpose)? Deliberate crowning
of the sound board is found on modern classical guitars and some of the old surviving ouds.
Therefore, was the purpose of scorching an unbraced guitar sound board done to achieve an acoustic performance improvement?
|
|
|
jdowning
Oud Junkie
Posts: 3485
Registered: 8-2-2006
Location: Ontario, Canada
Member Is Offline
Mood: No Mood
|
|
Overnight temperatures were Minus 11°C and with wood stove heat, Relative Humidity is steady at 55% so the sound board was glued in place this
morning.
A low Bloom strength hot hide glue was used - well diluted - so that setting time was increased and strength decreased. Nothing special about the
procedure (if hot hide glue is used - as it should be).
The joint faces and ends of the braces were coated with glue and the sound board placed in position with the alignment pins in place. By this time the
glue has 'gelled' so has to be remelted to make a viable joint. Working around the sound board joint - little by little - using a hot iron applied to
the upper surface of the sound board, the glue was remelted and the joint clamped in place using strips of masking tape. Traditionally glued paper
strips - scorched in place with the hot iron - would have been used in place of masking tape. Masking tape is a bit more convenient - but not
necessarily better.
Tomorrow - after the glue has completely cured - the masking tape will be removed and the joint inspected. Any areas (if any) where the joint has not
properly closed will be reworked with the hot iron.
|
|
|
jdowning
Oud Junkie
Posts: 3485
Registered: 8-2-2006
Location: Ontario, Canada
Member Is Offline
Mood: No Mood
|
|
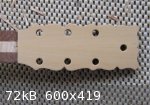
With the sound board glued and trimmed to size, the next step is to cut and fit the pegbox head plate. The head plate is a thick veneer glued to the
upper face of the pegbox to strengthen the 'V' joint and for appearance. I have a lot of old boxwood stock in sawn billets (the older the better for
boxwood as it takes years to fully season) so will make both the fingerboard and head plate from this material.
As boxwood comes from a small diameter tree the sawn billets are not wide enough for a head plate so a blank has been made from two book matched
pieces about 3 mm thick. (The head plate will be later be planed down thinner than this after it has been glued in place).
These are first jointed with a plane on a 'shooting board' and then glued with hot hide glue. No clamps are required - the two pieces - with glue
applied to the joint surfaces - are first rubbed together (to squeeze out surplus glue) and then held together (on a flat surface) with finger
pressure for a couple of minutes until the glue gels. This is the so called 'rubbed joint' familiar to woodworkers who use hot hide glue. All quickly
done and uncomplicated - a benefit of hot hide glue joints.
After 24+ hours to allow the glue to fully harden and moisture content in the area around the joint to stabilise, the surplus glue on the surface was
removed with a scraper blade.
The exact profile of the pegbox was traced onto a piece of paper to make a template - by rubbing a finger around the edge of the pegbox. This outline
was marked on the head plate blank with a pencil and then cut slightly oversize with a fretsaw fitted with fine tooth blade.
The plate blank was tested in place to ensure that adequate material was available for final trimming to size.
As this is a 'retrofit' project, the peg holes will be re-drilled (through the plate) after the head plate has been glued in place.

|
|
|
jdowning
Oud Junkie
Posts: 3485
Registered: 8-2-2006
Location: Ontario, Canada
Member Is Offline
Mood: No Mood
|
|
The head plate has been glued to the pegbox with diluted hot hide glue (same as for gluing sound board) - all done in the kitchen as the unheated
workshop - with snow on the ground outside - is too cold for gluing operations. The good quality, but inexpensive plastic spring clamps - quickly
applied - are ideal for this work.
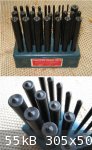
With the head plate glued in place the peg holes must be drilled though the plate from the back of the peg box - using the existing peg holes as a
guide. The centering of the drill must be precise so a 'transfer' centre punch was used to mark the exact centre for the drill through each peg hole.
Transfer punches come in sets of increasing diameter in steps of about 0.4 mm and cost about $10 - inexpensive for a precision tool. A handy tool for
both metal and woodworking.
The woodworking drill is a single spur type that cuts a clean straight hole - slightly undersized in diameter. The holes were cut using a hand drill
so that the point of the drill could be felt to engage exactly in the punched centre marks before drilling.
The drilled holes were then 'cleaned up' with a peghole reamer.
Box wood is a hard and brittle wood so that the inevitable slight chipping around the drilled holes was removed by scraping the surface of the head
plate with a cabinet scraper. The surplus material around the edge of the plate was then removed by filing to finish the job.
Next to prepare, fit and glue the fingerboard.
|
|
|
Yaron Naor
Oud Junkie
Posts: 275
Registered: 1-24-2009
Location: Bat Hefer, Israel
Member Is Offline
Mood: Happy
|
|
As usual - great work
Thanks for updating with those images, It is a great opportunity for me to learn some new stuff from you!
You are doing a great work
Yaron,
|
|
|
jdowning
Oud Junkie
Posts: 3485
Registered: 8-2-2006
Location: Ontario, Canada
Member Is Offline
Mood: No Mood
|
|
Thanks for your interest Yaron.
Almost finished with this project I but am in no hurry - all the time in the world (but not a moment to lose!).
No 4 course guitars survive and the written evidence and iconography is limited in scope - leaving much open to interpretation. By the end of the 16th
C the little guitar had become something of a toy - strummed and pretty well 'low class' and irrelevant musically.
So this instrument will be set up to perform the 'high art' guitar music of the mid 16th C evident in the surviving tablature - the 4 course guitar
originally being essentially an economical 'cut down' version of the six course Spanish vihuela - same tuning but missing the first and sixth courses.
A quick check of the surviving tablature indicates that the fretting of both French and Spanish guitars mostly extend to the 8th fret position but
with some excursions to the 10th fret position (one instance was found of the 11th fret position being used). Spanish sources state that the four
course guitar had 10 frets on the fingerboard - so the fingerboard of this project guitar will be made of sufficient length for 10 frets (with
sufficient space on the neck still for one more fret less position).
|
|
|
jdowning
Oud Junkie
Posts: 3485
Registered: 8-2-2006
Location: Ontario, Canada
Member Is Offline
Mood: No Mood
|
|
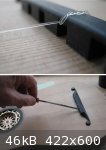
A preliminary check on string action has been undertaken to determine the thickness and taper of the fingerboard blank (thicker at the nut end than at
the neck joint).
A piece of nylon string was attached to the bridge, tied to a peg and tensioned. The correct nut height was set with packing.
At the bridge the string height was raised by filing the slots at an angle - one advantage of a slotted bridge that cannot be done with a drilled
bridge.
The string action is measured with an easily made tool. This is just a small strip of hardwood cut with a slender taper calibrated in half millimeter
steps (measured with precision calipers). The metal key ring is just so that it does not get lost among the other wood shavings.
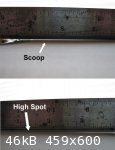
Checking the sound board with a straight edge revealed a high spot over the 'neck block' which was removed with a cabinet scraper. The guitar has been
made with a sound board 'scoop' - found on some old ouds , lutes and guitars - to avoid risk of string contact with the rosette when the sound board
is distorted under full string tension.
Interesting to note that with the sound board glued in place the 'scoop' remains despite the convex sound board profile induced by the previous sound
board scorching. This may be a result of the hot iron application when gluing the sound board in place - causing scorching of the upper face of
soundboard edge? It will be interesting to see how all of this might affect the acoustic response of the completed guitar.
Current string action - with the neck planed and scraped straight and flat - is measured at 3 mm which will probably increase a bit under string
tension so is about right. From these measurements the fingerboard will be made with a taper - thickness at the nut end 4 mm and at the neck joint
2 mm.
Final finishing of the finger board surface and action adjustment will be done after the fingerboard is glued to the neck.
|
|
|
jdowning
Oud Junkie
Posts: 3485
Registered: 8-2-2006
Location: Ontario, Canada
Member Is Offline
Mood: No Mood
|
|
The pre-shaped finger board has been glued to the neck with hot hide glue.
To minimise warping of the fingerboard from moisture of the glue during the gluing operation (moisture causes the surface of the wood to swell
temporarily), the upper surface was first moistened with a damp cloth and glue only applied to the neck.
Low bloom strength glue was used - well diluted so that it runs from the glue brush in a continuous stream and does not gel too quickly.
Spring clamps and a flat 'caul' (block of wood to apply an even pressure) were used to clamp the fingerboard in place with two pins inserted first at
the nut end to ensure the finger board did not slide out of alignment as the clamps were applied.
Another method of applying clamping pressure (without using a caul) would be to quickly wind string (or rubber surgical tubing) tightly around the
fingerboard and neck for the full length. Long flat woven bootlaces that have some elasticity or stretch would work well enough. This method takes a
bit more practice, however.
After allowing 24 hours for the glue to cure and moisture in the wood to dry out and stabilise the finger board and sound board surfaces and edges
will be trimmed to size and finished. The sound board edges will be tapered slightly but left without a half binding inlay. This might be added later
if improvements to acoustic response are considered necessary.
|
|
|
jdowning
Oud Junkie
Posts: 3485
Registered: 8-2-2006
Location: Ontario, Canada
Member Is Offline
Mood: No Mood
|
|
After fitting the fingerboard the instrument has been trimmed and fine sanded prior to finishing.
The register pin hole at the 'tail' end of the sound board left after gluing the sound board has been filled with an ebony plug (left over from
another project) - purely cosmetic. The register pin hole on the neck has now been covered by the fingerboard.
Another item left over from other projects is an ebony 'tail button' - turned free hand on a lathe from some scrap ebony. This will be fitted later.
The tail button is for the attachment of a shoulder strap to help support the guitar when playing - the instrument being too small to hold across the
legs in the usual manner.
The entire guitar is to be refinished. As I recall there was a problem with the varnish originally used, way back in 1974, which did not cure properly
- remaining slightly 'sticky'. To make matters worse, I may have wax polished over the varnish to counteract the problem - but cannot remember - so,
regardless, all of this has to be removed.
After wiping the surfaces of the body and neck with a grease remover fluid ('Goo-Gone') they have been sanded with fine 'open coat' papers (3M) until
all visible traces of old varnish/wax deposits (seen as slight 'clogging' of the sandpaper) have been removed.
The sound board and fingerboard will remain unvarnished but will be burnished to a gloss finish. The rest of the guitar will be finished with a hand
rubbed 'TruOil' type varnish.
|
|
|
jdowning
Oud Junkie
Posts: 3485
Registered: 8-2-2006
Location: Ontario, Canada
Member Is Offline
Mood: No Mood
|
|
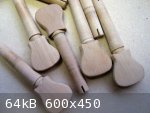
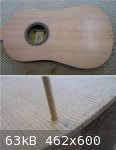
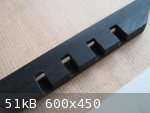
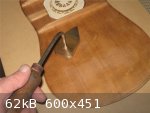
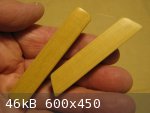
Two boxwood burnishers have been made - one for general burnishing the other to get into tight corners around the bridge. The surface of each
burnisher is slightly rounded - as are the edges - to ensure the sound board is not marked or scored.
The burnisher working surfaces were then polished to a mirror finish on a piece of burlap sack cloth.
The burnishers are rubbed with light hand pressure in the direction of the sound board grain and quickly result in a glossy surface finish of the
sound board.
Having messed around with a number of hopeful sound board finishes (like egg white distillate) I am coming around to thinking that the old lute sound
boards were finished in this way i.e. without any kind of varnish or other applied substances. And so might have been the old ouds? Over time
(centuries) the sound board wood will oxidise naturally to the dark brown colour seen in the surviving lutes and together with the polished sound
board surface gives the appearance of having had some kind of finish applied when there never was.
The burnished surface should also discourage local dirt accumulations on the sound board if regularly kept polished with a soft cloth.
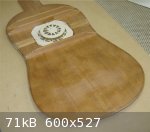
With the old finish all (hopefully) removed a first coat of 'home made' rubbing oil varnish (see 'Make Your Own 'Tru-Oil' Varnish' on this forum) has
been applied to the back and pegbox. The neck will be varnished separately later - just for convenience in handling.
Three coats will be applied initially - allowing 24 hours to dry between each coat - followed by rubbing down between successive coats with fine 3M
'open coat' sand paper to fill the open grain of the 'mahogany' ribs.
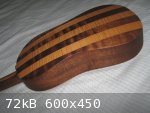
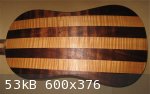
The wood used is not a true mahogany but was cut from a highly figured piece of a pseudo mahogany ('Utile') rescued (at low cost) from the 'odds and
ends bin' of a local wood supplier. Utile wood is quite similar in Specific Gravity and structure to true Central American Mahogany. The wood grain is
quite open so varnishing could take some time - six or more coats perhaps.
The overall appearance with the contrasting 'flamed' Sycamore ribs should be quite dramatic - overstated even.
|
|
|
jdowning
Oud Junkie
Posts: 3485
Registered: 8-2-2006
Location: Ontario, Canada
Member Is Offline
Mood: No Mood
|
|
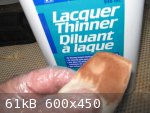
Attempts to finish the body with a 'rubbing varnish' have been abandoned. The resin/oil content of the highly figured Utile wood - used for the back
and sides - is preventing the varnish from drying properly - this is the problem originally encountered when the guitar was first built - a problem
common to oily woods like Brazilian Rosewood, Cocobolo etc. The varnish would likely dry eventually but this might take weeks, months or years
even.
The neck and pegbox - cut from plain grained Utile - do not seem to have this problem.
The solution (hopefully) is first to strip off the varnish that has already been applied and to remove as much of the surface oils as possible. This
was done with a fast drying lacquer thinner containing Toluene that will dissolve waxes. It will also dissolve some plastics - including Nitrile
gloves - so cheap polythene protective gloves were necessary. After removing the varnish coats the surface was rubbed down with 400 grit 3M open coat
sand paper and then wiped over again with the lacquer thinner. This was repeated until no clogging of the sandpaper was seen and all stain (oils and
waxes) was removed from the wood surfaces.
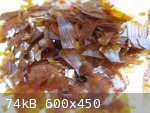
To seal the wood, three coats of Orange Shellac have been applied - wiping on with a cloth pad and allowing three hours or so to dry between coats.
The Shellac will be allowed to fully dry in a warm kitchen for another couple of days. The surfaces will then be rubbed down with 400 grit sandpaper
and re-coated with Shellac. This operation will be repeated for several coats until the required finish is achieved.
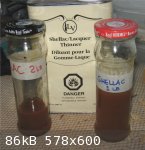
I do not use premixed Shellac (it has a limited shelf life of about 6 months. If too old it may not dry) but always prepare my own fresh stock - in
small quantities as required - from Orange Shellac flakes that have an unlimited shelf life. Orange Shellac is good for darker woods. The Shellac
flakes are dissolved in ethyl alcohol. I purchase both Shellac flakes and an alcohol based Shellac thinner (not the same stuff as the above lacquer
thinner) from Lee Valley Tools.
The Shellac is used in various dilutions - known as 'cuts' - measured in pounds of Shellac dissolved in a gallon of alcohol - 5 lb, 3 lb, 1 lb 'cut'
etc. Best to apply dilute solutions and many coats.
For this project a 2 lb cut Shellac was first mixed (14 grams of Shellac flakes in 70 c.c. of thinner). This was used for the initial sealer coats.
The finishing coats will be a more dilute solution of about 1lb cut.
|
|
|
| Pages:
1
2 |


