| Pages:
1
2
3 |
sabbassi
Oud Junkie

Posts: 570
Registered: 4-28-2008
Location: Morocoo
Member Is Offline
Mood: happy
|
|
OUD building project (cocobolo / macassar)
For this project I would like to share with you guys more details from the start how to build an Arabic oud, following the general rules. by saying
general rules, also meaning: rules are made to be broken, so there will be also some non standard things or unkown ways of doing things.
I will also discuss wood, tools, sound as much as I can with pictures if possible.
Making some writing mistakes is natural as english is not my mother language.
Ps: at the same time of the cocobolo build I will build a Macasar ebony oud.
Any way let start right away and cut some ribs, !
Best regards, Samir
|
|
|
sabbassi
Oud Junkie
Posts: 570
Registered: 4-28-2008
Location: Morocoo
Member Is Offline
Mood: happy
|
|
I will use Cocobolo for this one (for the first time builder, go for mahogany or beech, although some beech kind of wood is not very stable)
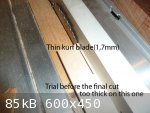
I'm using a bosch table saw with a very thin carbide kerf blade (1,7mm) to save some wood/mone(this are expensive but save more money at the end and
last longer), especialy if it is cocobolo, macassar or any exotic expensive wood.
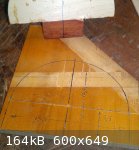
When I buy a big piece of wood like cocobolo, I cut the whole lumber in pieces and let it dry for couple of mounts, after tha, I plan the pieces
before starting sawing the ribs out. this pieces are about 3,5cm wide (width of the rib) and 70cm long.
depending of the lumber, some pieces can give from 8 to 15 ribs.
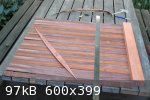
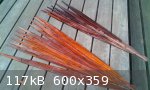
In this pictures, this particular piece of cocobolo gave me 9 nice ribs.
before cuting the ribs to final thikness, I usualy do some trial with regular wood before using the expensive one.
the final thikness is 2,8 mm.
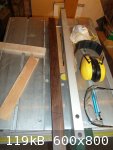
for safety reason, always use dust mask, eye and ear protection.
I always, always use push sticks and (also side stick) , my fingers are more worth than any oud on this planet 
Best regards, Samir
|
|
|
sabbassi
Oud Junkie
Posts: 570
Registered: 4-28-2008
Location: Morocoo
Member Is Offline
Mood: happy
|
|
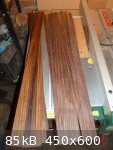
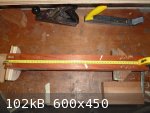
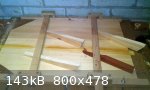
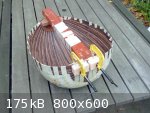
final Ribs
the final ribs are equal in thikness and almost ready for use.
70cm it too long, I will shorten them by 2,5 cm. the usual lenght for a standard oud (not big and not small) is about 67,5 cm depending on the shape
and the curve of the oud of course.
we will go more in details to that later.

Best regards, Samir
|
|
|
sabbassi
Oud Junkie
Posts: 570
Registered: 4-28-2008
Location: Morocoo
Member Is Offline
Mood: happy
|
|
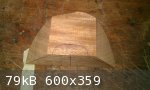
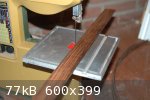
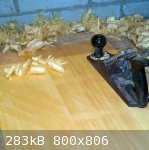
neck and tail blocks
before bending the ribs, I would first build the ground where the ribs will be built on. neck and tail blocks
for the neck, first grade mahogany is a must. it is a very stable wood.
the tail block is made from spruce, about 6mm thick
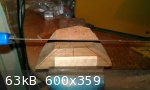

the tools used also illustraed in the pictures. Hand saw, stanly Planerfile, stanley planner for the final adjustement
the final neck should be symetric, bit round and smooth. some testing with an already made rib show that the ribs fall perfect to the shape of the
neck.
the measurement are 5cm at the neck joint. 4,5cm thikness of the block. 14 cm high and wide.
Best regards, Samir
|
|
|
sabbassi
Oud Junkie
Posts: 570
Registered: 4-28-2008
Location: Morocoo
Member Is Offline
Mood: happy
|
|
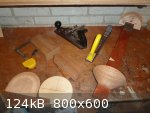
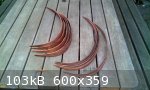
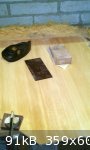
tail block
here are 2 type of tail blocks shapes. depending of the shapre we are looking fore.
the one I use for this oud is made from spruce (old piano soundboard).
Best regards, Samir
|
|
|
SamirCanada
Moderator
Posts: 3404
Registered: 6-4-2004
Member Is Offline
|
|
!! I cant wait for this thread
so juicy
@samiroud Instagram
samiroudmaker@gmail.com
|
|
|
BaniYazid
Oud Junkie
Posts: 225
Registered: 8-20-2010
Location: France
Member Is Offline
|
|
Thank you for this detailled thread
|
|
|
em.20
Oud Maniac
Posts: 74
Registered: 8-27-2011
Location: Germany
Member Is Offline
|
|
Hi,
how did you exactly form the neck block. On the second picture you're holding a saw in 45 degree and cutting it straight?
|
|
|
dkhoury35
Oud Junkie
Posts: 181
Registered: 11-3-2010
Location: Melbourne Australia
Member Is Offline
Mood: IM IN THE M-OUD
|
|
you are the master !!!!
|
|
|
sabbassi
Oud Junkie
Posts: 570
Registered: 4-28-2008
Location: Morocoo
Member Is Offline
Mood: happy
|
|
Thank you guys,
em.20, if you see the last pictures , there are 3 blocks. first design the shape of the neck block respecting the measurement given above. some oud
have the neck more rounde than the one I make. I mean the join. the one u see is bit flater to fit the hand shape when playing. 5 cmm will be at the
join, but when you add the two last ribs, you will end up with about 5,8 cm.
from any oud, you can follow the curve shape at the end of the oud and design the curve where the ribs will sit on.
the saw on the picture is not 45degree, I just show how you can remove the excess.
Best regards, Samir
|
|
|
sabbassi
Oud Junkie
Posts: 570
Registered: 4-28-2008
Location: Morocoo
Member Is Offline
Mood: happy
|
|
tail block
I took a piece of spruce and traced the tail shape.
the measurements can be seen in the pictures
after some , plannig, tweaking and curving, the tail block is also little round and the end of the ribs will fall in to this round perfectly.
at the end the tail and neck blocks are mounted on a solide piece of paduk.
the distance from the end of the tail block to the beginning of the neck is exactly 49cm. when the bow is removed later it will move little backward
to around 50cm
also, the flat part of the neck and the flat part of the tail are perfectly alligned, (can be tweaked later on if the soundboard is not flat at the
first try)

Best regards, Samir
|
|
|
sabbassi
Oud Junkie
Posts: 570
Registered: 4-28-2008
Location: Morocoo
Member Is Offline
Mood: happy
|
|
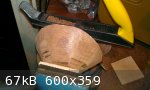
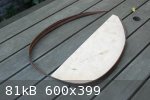
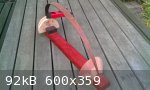
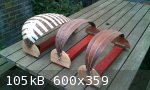
oud shape
I have bended two ribs already to test and see how the final share will be approximatly.
Bending the ribs exactly the same can be a challange but with practice (trial and error) it should be easy.
I always use a half pattern to check the curve line of the oud.
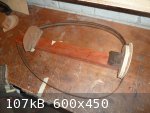
I will get back to this later with more detail,
Best regards, Samir
|
|
|
sabbassi
Oud Junkie
Posts: 570
Registered: 4-28-2008
Location: Morocoo
Member Is Offline
Mood: happy
|
|
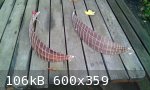
ribs layout
After the 19 ribs have been all shorted to 67,5cm (except the last 2 ribs at both ends), the layout can can be done. eventually bookmatching some ribs
and playing with the layout.
A line is drawn on top of all the 17 ribs at the same level, and ribs get left and right marks and numbers.
After this all the ribs get the arrow layout with a pencil and then remove the excess with the bend saw.
(ribs 18 and 19 do not need to be cut yet as they will close both ends of the bowl)
I try to cut as close as I can to the lines to minimize the planing work after bending the ribs.
The arrow design can be copied from many oud around or by computer design program and tweaked the the shape you like to build.
Best regards, Samir
|
|
|
sabbassi
Oud Junkie
Posts: 570
Registered: 4-28-2008
Location: Morocoo
Member Is Offline
Mood: happy
|
|
purfrings
I have also bended 4 maple ribs to the same shape as the oud and cut about 40 purfling for in between the ribs (1mm thick) for both ouds using a small
table saw with a very thin blade.

Best regards, Samir
|
|
|
sabbassi
Oud Junkie
Posts: 570
Registered: 4-28-2008
Location: Morocoo
Member Is Offline
Mood: happy
|
|
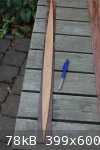
Ribs cut to shape
the ribs are cut very close to the lines of the shape, so less work is done when planning.
Sometimes it is not necesary to wet the wood, depending on the type of wood and the structure of the grain.
to avoid any risk of broken ribs or tear outs I have wetted the macassar and the cocobolo.
Best regards, Samir
|
|
|
sabbassi
Oud Junkie
Posts: 570
Registered: 4-28-2008
Location: Morocoo
Member Is Offline
Mood: happy
|
|
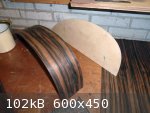
bending
the half oud shape on the table help me to get as close as possible when bending. it is very time consuming and finger burning part of te build
Any way a very important rule here is that the rib should fall square on the table, no twists at the back or the front and folow the shape with 0
pressure. if all the ribs have almost exact the same shape, the build is made easier later.

Best regards, Samir
|
|
|
sabbassi
Oud Junkie
Posts: 570
Registered: 4-28-2008
Location: Morocoo
Member Is Offline
Mood: happy
|
|
testing the curve
After planning the ribs with a Stanley hand planner, the rib should be perfectly flat and square, the ribs should land on the neck with ease just
keeping the shape of the oud in place.
If we pull or push the ribs just a bit, it will loose it squareness and flatness and we may have to plan it again to fit the new shape (push or
pull)
Best regards, Samir
|
|
|
sabbassi
Oud Junkie
Posts: 570
Registered: 4-28-2008
Location: Morocoo
Member Is Offline
Mood: happy
|
|
first 3 ribs
When i start building the bowl, I can choose to start by glueingthe first rib, let it dry and than 2 ribs(left right) etc, or I join the 3 first ribs
together at one time with a thiny rope and purfling in between.
the ribs are then mounted on the free mould and the bowl build is now started.
ribs 3,4 and 5,6 etc are joined by masking tape. this tape has enouph pull power to squeeze the glue between the ribs, than we know we have a tight
join.
By the way, I'm building another oud (indian rosewood) at the same time)
until next time take care guys
Best regards, Samir
|
|
|
Microber
Oud Junkie
Posts: 853
Registered: 1-20-2006
Location: Belgium - Liège
Member Is Offline
Mood: No Mood
|
|
 
SO FUN TO FOLLOW YOUR WORK SAMIR !!!
|
|
|
sabbassi
Oud Junkie
Posts: 570
Registered: 4-28-2008
Location: Morocoo
Member Is Offline
Mood: happy
|
|
meanwhile
Thank you Robert.
Back on track
meanwhile I took another old piano soundboard and used the dewalt thikness planner and plan it to 3,2mm.
using a shootingboard the two pieces are trimmed square until there is no light in between the joint than I used the jig to join the two pieces. the
jig is very simple but very effective.
I used some moisture to clean the glue squeezed. the moisture also helps the join to get even more consistent.
using a handplaner(rasor sharp), scraper (scraper sharpening tool) and a sanding block, all is brought down to 2.0mm clean finish.
the scraper can get very hot and burn the fingers , ooch. but when it is has sharp edges, it is a joy to work with.
Best regards, Samir
|
|
|
sabbassi
Oud Junkie
Posts: 570
Registered: 4-28-2008
Location: Morocoo
Member Is Offline
Mood: happy
|
|
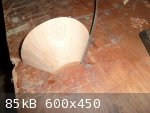
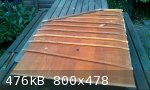
Bowls are finished
The bowls are finished and after have been removed from the mould, the shape of the bowl can be tweaked couple of mm to achieve the right size.
the size of the maccassar bowl in the picture is about 36cm wide, 50cm long.

Best regards, Samir
|
|
|
ondalud
Oud Addict
Posts: 30
Registered: 2-12-2011
Member Is Offline
|
|
Hello Samir,
I see that your production is always booming.
Very good.
My / your "cocobolo" oud continues to be a surprise.
It 'very èiaciuto to other friends of the group.
I'm telling you right now, that when you get one with nature (aesthetics and sound)
different from mine, I'm going to buy another.
Good job, good time and good music
|
|
|
sabbassi
Oud Junkie
Posts: 570
Registered: 4-28-2008
Location: Morocoo
Member Is Offline
Mood: happy
|
|
Hi There, nice to hear from you. (what is èiaciuto ?) hhh
well I will first finish Indian rosewood oud for a friend beforr I go on holidays fo 10 days.
When I come back I will then finish this project doing the maccassar and the cocobolo oud all together.
On the cocobolo, I will use the old piano soundboard and old piano braces and see what's going to happen
thank you my friend
Best regards, Samir
|
|
|
Aymara
Oud Junkie
Posts: 1162
Registered: 10-14-2009
Location: Germany / Ruhr Region
Member Is Offline
Mood: No Mood
|
|
Hi Samir!
Old piano? Tell us more.
Greetings from Germany
Chris
|
|
|
sabbassi
Oud Junkie
Posts: 570
Registered: 4-28-2008
Location: Morocoo
Member Is Offline
Mood: happy
|
|
Hi Chris,
Sorry that I didn't mention it on this post, but I have already posted a story how I have got 4 old piano sound board from the local piano dealer
here is the link : http://www.mikeouds.com/messageboard/viewthread.php?tid=12162&p...
Best regards, Samir
|
|
|
| Pages:
1
2
3 |


