| Pages:
1
2
3
4
5 |
jdowning
Oud Junkie

Posts: 3485
Registered: 8-2-2006
Location: Ontario, Canada
Member Is Offline
Mood: No Mood
|
|
Before fitting the frets the sound board has been further cleaned up using a cabinet scraper blade to remove a few fine shavings. A 'before and after'
resonance test showed a drop in measured air resonance frequency of 2 Hz i.e. from 201 Hz to 199 Hz at an ambient temperature of 15°C. At this
frequency range the human ear might just detect a drop of 2 Hz. Not much but I think that this will explain the difference in the measured air
resonance frequency when the instrument was first completed (212 Hz) and now (201 Hz) as the sound board was finished to be thinner around the edges
than in the centre - a difference of about 0.5 mm - except in the area between the bridge and the bottom of the bowl where the sound board has been
left full thickness of about 2.5 - 3 mm. This thinning made the sound board more flexible and so lowered the air resonance frequency as should be
expected - all else being equal. ( the trapped air inside the bowl acts like a cushion or spring so any increased flexibility of the walls of the
resonance chamber - i.e. the bowl/sound board structure - will soften the spring effect of the trapped air and so lower the air resonant
frequency).
In this case the sound board - small in area and relatively thick compared to an oud or lute - has no bracing below the very stiff upper section where
the sound hole is located. So one might expect removal of even a small amount of material from the vibrating area to have some reasonably significant
effect. This effect will be further tested later when the sound board edge is to be rebated and finished for a half depth binding so further reducing
the sound board stiffness around the edges.
In the case of an oud or lute the same effect would be achieved by reducing the stiffness of the multiple sound board braces - a more complex
procedure to control and predict no doubt.
For information the attached Audacity spectrum analysis is attached to compare with the graph previously posted.

|
|
|
jdowning
Oud Junkie
Posts: 3485
Registered: 8-2-2006
Location: Ontario, Canada
Member Is Offline
Mood: No Mood
|
|
As the air resonance frequency is about where it should be, it has been decided at this stage - and before fitting the frets - to rebate the sound
board edge for a half depth binding mainly to assess the effect, if of any significance, on lowering the air resonance frequency. The frequency should
be lowered somewhat.
I have also added my maker's brand to the sound board area over the neck block - a lute maker's tradition. The brand was made from sheet brass high
temperature brazed together, filed to shape and fitted to a wooden handle. In use the brand is heated to a temperature high enough to scorch the wood
using a propane flame.
The rebate for the half binding is cut with two tools - a purfling cutter to scribe the inner edge of the rebate and a special plane to cut the
rebate. The rebate width is 4 mm. I made both of these tools from brass - as reported a while back on this forum.
Once the rebate has been cut and finished the air resonance frequency will be measured again to assess the effect before fitting and gluing the
binding/purfling.
 
|
|
|
jdowning
Oud Junkie
Posts: 3485
Registered: 8-2-2006
Location: Ontario, Canada
Member Is Offline
Mood: No Mood
|
|
Here is the post on how to make the purfling cutter.
http://www.mikeouds.com/messageboard/viewthread.php?tid=5796#pid346...
|
|
|
jdowning
Oud Junkie
Posts: 3485
Registered: 8-2-2006
Location: Ontario, Canada
Member Is Offline
Mood: No Mood
|
|
..... and here is the tutorial on how to make the little rebate plane
http://www.mikeouds.com/messageboard/viewthread.php?tid=7435
|
|
|
jdowning
Oud Junkie
Posts: 3485
Registered: 8-2-2006
Location: Ontario, Canada
Member Is Offline
Mood: No Mood
|
|
In addition to the half depth binding ebony finger board 'points' will be added to reinforce the bottom edges of the fingerboard - as found on the
Dean Castle colascione. The points extend to the front edge of the neck block. A metal template will be used for marking out the points on ebony prior
to shaping.
The half depth rebate has been finished to about 1mm depth with a low cost nail file or 'emery board'. The rebate where it meets the points must be
cut with a chisel as the rebate plane cannot get in close enough.
With the rebate finished the air resonance frequency has again been tested and measured as 195 Hz - a drop of 6Hz from 201 Hz. This is only about half
a semitone so not of great significance. No doubt when the half binding is glued in place the air resonance frequency will return to around 200 Hz!
  
  
|
|
|
jdowning
Oud Junkie
Posts: 3485
Registered: 8-2-2006
Location: Ontario, Canada
Member Is Offline
Mood: No Mood
|
|
The ebony points must be fitted before the half binding. They have been cut and filed to shape and rebated into the fingerboard/soundboard. The rebate
is first outlined with a knife (using the points as a pattern) and then cut out to depth with chisels. The points shown here have not been hammered
and glued tightly into place until further fine adjustments have been made to the depth of the rebate. There will also be a strip of ebony inlaid
across the top of the points at the end of the fingerboard.
Small 'cranked' chisels are useful to cut out narrow rebates. These are easily made from small diameter high carbon steel rod (broken drill bits,
sewing needles etc)- softened by heating to bright red heat in a propane flame and hammered to shape. Then further filed to shape after cooling. The
chisel edge is re-hardened by heating to a dull red colour and then dropping it to cool rapidly into a can of old engine oil (or just stick it into a
potato!). The hardened cutting edge is then sharpened and honed in the usual way.
 
|
|
|
jdowning
Oud Junkie
Posts: 3485
Registered: 8-2-2006
Location: Ontario, Canada
Member Is Offline
Mood: No Mood
|
|
With the inlaid ebony 'points' completed and the half depth rebate around the edge of the sound board finished the half depth binding has been made up
and glued in place ready for scraping down level with the sound board surface.
The binding is the same as that around the sound hole edge with black-white-black purfling and solid ebony outer edge. The purfling has been made by
gluing dyed maple veneer together (like a plywood sheet) from which strips are then cut with a saw. The saw marks are removed and the strips brought
to the required thickness by drawing each strip though a block of wood in which slots of varying depth have been cut with a router. A block plane held
stationary at an angle over the strip does the cutting operation.
The tightly curved purfling around the bottom edge of the sound board was made the same way as that of the sound hole purfling - preformed on a mold.
The disadvantage is that the colour of the end grain does not exactly match that of purfling cut from longitudinal grain veneer. I shall be varnishing
the binding so the colour difference may not be so distinct when finished.
The ebony outer edging has been hot bent to fit. The whole binding assembly has been made in pieces (rather than one or two continuous strips) for
convenience in handling and economy of material. For convenience of handling I have used PVA carpenters glue to secure the binding - the sections
being clamped tightly in position with adhesive tape.
All the binding strips have now been glued in place ready for scraping down to sound board thickness with a scraper blade. To prevent damage to the
sound board surface, the corner of the scraper blade has been covered with adhesive tape.
I expect to finish the edge binding tomorrow so will then again measure the air resonance frequency to see if there are any changes resulting from
adding the half depth binding.
Note that half depth binding is a style of sound board edge reinforcement found on surviving lutes of the 17th/18th C as well as on some old ouds. It
is also found on the Dean Castle mezzo-colascione.
  
 
|
|
|
jdowning
Oud Junkie
Posts: 3485
Registered: 8-2-2006
Location: Ontario, Canada
Member Is Offline
Mood: No Mood
|
|
The half depth binding has now been finished and levelled with a scraper blade. The outside edge will eventually be refinished and sealed with
varnish.
Measuring the air resonance frequency gave a value of 203 Hz (G#3) raising the frequency - as expected - back to the original measured value (i.e.
plain sound board edge without the half depth binding).
To reduce the air resonance frequency further will necessitate reducing the sound hole diameter. However, I first plan to tune the two melody strings
a fourth apart (rather than a fifth apart) following the Al-Farabi instructions for fretting the 10th C tunbur. So with the top string tuned to d' (at
A440 standard -maximum pitch for a gut string of length 79 cm) the second string will then be a220Hz. In this case the current air resonance frequency
at more than a semi tone lower in pitch should be about right. We will see.
The string 'action' is still quite a bit too high. I do not want to reset the neck so will first plane back the fingerboard (excess thickness was
deliberately left at the nut end for this purpose). If that is not enough, the bridge may be redrilled (with the string holes about 2 mm lower this
would match the string hole height of the Dean Castle instrument that was measured as 4 mm above the sound board -but a bit on the low side I
think).
|
|
|
Luttgutt
Oud Junkie
Posts: 578
Registered: 1-10-2009
Location: Norway
Member Is Offline
Mood: Curious
|
|
A True Beauty!!
The wood might be dead, but the oud is alive.
|
|
|
jdowning
Oud Junkie
Posts: 3485
Registered: 8-2-2006
Location: Ontario, Canada
Member Is Offline
Mood: No Mood
|
|
Thank you Luttgutt!
By planing down the fret board, the action (underside of string to fingerboard surface) is now just over 3.5 mm at the 7th fret position (1/3 string
length) at full string tension. This location coincides with the join in the two part fingerboard so has been marked for future convenient reference
with a piece of ebony inlay (now nobody can see the joint - more luthier trickery!).
The string action is measured with a simple, easily made tool - a tapered piece of hard wood with the depth (measured with calipers) marked along the
length.
At the last fret position (fret #27) the action is 5 mm. I will use 0.58 mm diameter nylon (low cost, ordinary fishing line) for the frets so the
action above the frets will be around 3mm at the 7th fret. As fret spacing is quite close in places the frets will be single rather than double
tied.
The Pythagorean fret spacings - measured from the nut - have been marked on a strip of wood and transferred to the fingerboard with pencil marks. This
is how the 16th C lutenists like Dowland did it and so - no doubt - did the early ud and tunbur players. Total number of frets to start with is 27 -
but there is space for more.
Tying nylon frets is hard on the fingers (gut frets would be better but too costly for this project) so a small set of pliers helps a bit in making
the frets tight. The fret knots are sealed by melting the cut ends with a small soldering iron and the frets slid into position - the taper of the
neck providing added tension.
Tying frets is one of my least favourite luthier jobs so the work will be spread over a couple of days. Seven frets tied - only 20 to go!
  

|
|
|
jdowning
Oud Junkie
Posts: 3485
Registered: 8-2-2006
Location: Ontario, Canada
Member Is Offline
Mood: No Mood
|
|
Nylon frets require a special kind of knot due to the slippery nature of the material - a knot familiar to fishermen. The attached images should make
it clearer than words alone.
A suitable length of line is required that allows sufficient surplus length to obtain a good grip and exert sufficient tension once the knot has been
tightened and the fret drawn into position. About 15 cm or so should be adequate for this instrument.
A 'figure 8' knot is first tied at one end and the free end passed under the strings and around the back of the neck to the bass side (the fret knots
should always be on the bass side of the neck for right handed players). The free end is then passed first through the underside of the loop at the
bottom of the 'figure 8' and then through the underside of the loop at the top of the 'figure 8'.
The knot is then pulled tight and the fret pulled up as tight as possible onto the neck at a position some distance (about 5 cm) above the final
location of the fret. For good measure a simple half hitch knot is then tied over the knot and the surplus material cut away to leave two free ends
about 3mm in length. The free ends are then melted back to the knot - using a small soldering iron - so sealing the knot against unravelling.
The fret is then slid down the neck to its final position - the taper of the neck adding additional tension to the fret to hold it tight against the
fingerboard surface.
Once all of the frets have been tied to the theoretical positions marked on the fingerboard they will require further adjustment to allow for the
increased string tension (and hence increased pitch) caused by stopping a string against a fret. The proportional increase in pitch depends upon fret
diameter, string diameter, string material, string tension of the open string, vibrating string length (of the stopped string), strength of sounding a
string, and string 'action' or clearance above a fret. Final adjustments will be made 'by ear'- a compromise until everything sounds in tune.
  
  
|
|
|
jdowning
Oud Junkie
Posts: 3485
Registered: 8-2-2006
Location: Ontario, Canada
Member Is Offline
Mood: No Mood
|
|
The fretting is now complete with the sealed fret knots arranged on the bass side of the neck. Nylon fret knots are not very elegant (compared to gut)
but they will have to do.
Pythagorean fret spacing of long necked lutes is unfamiliar ground for me so I have referred to the expertise of others for guidance.
The fret spacing - measured from the nut - is in accordance with the calculated values given by the free on-line 'Hoffman' fret calculator (Advanced
version) with additional values provided by Paul Beier' string and fret calculator software. This gives more fret positions than I will likely end up
using but unwanted frets are easily removed.
As the colascione was most likely developed from the Ottoman tambura of the late 15th C it will be interesting to initially follow the Pythagorean
fretting arrangement proposed by Al-Farabi for the 10th C tunbur fitted with two melody strings tuned a fourth apart. This fret arrangement is
identical to the principal tuning system proposed by Safi Al-Din in the 13th C for the seven fret positions of an oud.
A table of the Pythagorean intervals is available for reference here in Wikipedia.
http://en.wikipedia.org/wiki/Pythagorean_interval
Referencing this table, the fret positions for the Al-Farabi's 17 fret to the octave tunbur (total 20 frets on the neck) starting at the nut is
Unison(P1), Minor Second (m2), Diminished Third (d3), Major Second (M2), Semiditone (m3), Diminished Fourth (d4), Ditone (M3), Perfect Fourth (P4),
Diminished Fifth (d5) Augmented Fourth (A4) Perfect Fifth (P5), Minor Sixth (m6) Augmented Fifth (A5) Major Sixth (M6), Minor Seventh (m7) Augmented
Sixth (A6), Major Seventh (M7), Octave (P8), Diminished Ninth (d9), Augmented Unison (A9?) and Major Second (m9?). The appropriate Pythagorean ratios
are given in the table.
|
|
|
jdowning
Oud Junkie
Posts: 3485
Registered: 8-2-2006
Location: Ontario, Canada
Member Is Offline
Mood: No Mood
|
|
With the frets in their theoretical 'Pythagorean' positions it is now necessary to 'fine tune' the fret positions to allow for pitch variations caused
by stopping a string at each fret - as previously noted.
Adjustments will first be made 'by ear' checking/comparing intonation of the two melody strings - by intervals of unison or octave or pure fourth or
pure fifth - at various fret positions. As a double check the intonation and temperament will be verified using tuning software that provides
deviation in cents from 12 tone equal temperament tones. So, for example, the ditone E or Pythagorean major third, ratio 81/64 at the Al-Farabi 6th
fret position should measure 7.8 cents more than the equal temperament value of 400 cents (100 cents = an equal tempered semitone).
However, all precise theoretical measurements aside, it is immediately apparent - on preliminary testing of the current stringing/tuning arrangement
for this instrument - that tone pitch, particularly in the higher fret positions, may be noticeably modified by axial movement of the stopping finger
to produce a vibrato effect. This is an embellishment technique that is used by modern classical guitarists as well as by Middle Eastern players of
long necked lutes such as the baglama saz - so imitating in accompaniment the vocal gymnastics of their singers.
Vibrato was also used by fretted instrument players in Europe from at least before the early 16th C so is likely an historically valid technique for
the colascione.
|
|
|
jdowning
Oud Junkie
Posts: 3485
Registered: 8-2-2006
Location: Ontario, Canada
Member Is Offline
Mood: No Mood
|
|
My set up for fine tuning of the fret positions is to use a low cost 'lapel' clip on microphone (The Source #2616448) input directly to my PC sound
card. This is mounted on the colascione with a simple Z shaped clip cut from tinplate and lined with felt to protect the sound board surface. This
little microphone provides a signal strong enough for the purpose.
I am testing instrument tuner software 'AP Tuner' and 'Tune!It' both shareware but free to download and use for a limited time. The latter program is
a lot more complex and sophisticated and includes an extensive library of historical temperaments, auto sound card calibrator, 3D spectrum display,
wave form graphing, inharmonicity analysis etc. etc. and even a facility for ear training. Accuracy of both programs is 0.1 cent. Screen display
images are attached for information.
AP tuner can be used indefinitely without registration whereas Tune!It costs about $10 US for registration after 30 days trial. I am tempted to
purchase the Tune!It software if these trials live up to expectations.
  
|
|
|
jdowning
Oud Junkie
Posts: 3485
Registered: 8-2-2006
Location: Ontario, Canada
Member Is Offline
Mood: No Mood
|
|
For information I have just successfully tested AP Tuner and Tune!It - both designed for Windows - on Linux using the Wine Windows interface.
Also tested as working (in PC virtual environment VirtualBox) in Windows 10 June 2015 prelease version.
|
|
|
jdowning
Oud Junkie
Posts: 3485
Registered: 8-2-2006
Location: Ontario, Canada
Member Is Offline
Mood: No Mood
|
|
The frets have been 'fine tuned' using the tuner software set to A440 equal temperament and measuring the off-set in cents for each fret position and
string. So - for example - the first fret position (diatonic semitone) at 90.225 cents (ie 90 cents) is off-set from the equal temperament position by
-10 cents (there are 100 cents to an equal temperament semitone) and fret 12 (augmented fifth), for example differs from equal temperament by +16
cents.
The tuners can measure to 0.1 cent but that level of accuracy is not required as the human ear can only detect pitch differences of 2 or 3 cents at
best.
Currently the colascione is tuned A a d' (or A2 A3 D4) at A440 standard - the third (bass string) being a worn Pyramid wound #1010 at 3.5 Kg tension,
second string plain Nylon 0.6 mm diameter tension 3.6 Kg and the top string Pyramid PVF 0.37 mm diameter at 4 Kg tension. The tuning of the top string
is chosen because is about the maximum pitch allowable if plain gut stringing was used (as it would have been originally). In fact the instrument at
this tuning could be strung entirely in plain gut with a top string of 0.40 mm diameter, the second 0.53 mm diameter, and the third 1.04 mm diameter -
all at equal 3.5 Kg tension.
With the current stringing arrangement the final fret positions are a compromise due to the different string materials, diameters and construction
each requiring a slightly different fret location to remain precisely in tune as measured by the tuners. All plain gut stringing might be a bit better
in this respect. In any case if tone vibrato is then factored in, high precision in fret location is perhaps not really a practical objective.
So, at the end of the day, if it sounds right to the player it is right!
|
|
|
jdowning
Oud Junkie
Posts: 3485
Registered: 8-2-2006
Location: Ontario, Canada
Member Is Offline
Mood: No Mood
|
|
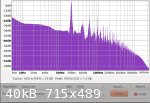
As this is primarily an experimental project, the air resonance frequency spectrum and sound board frequency spectrum (with the sound hole blocked)
have been measured for comparison purposes.
The audio signals were recorded with an H2 Zoom digital recorder analysed with Audacity software. The most prominent frequency peaks up to 2000Hz have
been marked for information and reference.
The air resonance spectrum (measured over the open sound hole with strings under tension and damped) on tapping the bridge show clear frequency peaks
for the G and D harmonics (A440 standard reference pitch). Comparing this with the sound board frequency spectrum indicates that the small bodied
colascione should respond primarily to its air resonance frequency characteristics rather than those of the soundboard.
As the strings are initially to be tuned to A2 A3 D4 it will be interesting to see how the overall measured frequency spectrum for the instrument at
this tuning will turn out.
It is also planned to test tuning G2 G3 D4 ie with the interval of a 5th between first and second strings rather than a 4th - both tunings being
possibilities according to historical record.
One might predict from the air resonance spectrum that the G2 G3 D4 tuning would work 'best' acoustically?
I also plan to test stringing pitched an octave lower ie A1 A2 D3 and G1 G2 D3 although this would mean that all plain gut tuning would not be
feasible as the third string (at a string length of 79 cm) would have to be of higher density than plain gut - ie metal wound on gut/silk or loaded
gut/silk - but still an historical alternative.
The other tuning possibility to be tested is E3 A3 D4 (like the bass string tuning of a guitar) - easily accomodated with all plain gut stringing - or
an octave lower with a wound third string.
The overall frequency spectrum could be modified to some (unknown) extent by locally reducing sound board thickness. This action would affect both
sound board and air resonance response but would be non reversible.
Alternatively, and more predictably, the sound hole diameter may be adjusted (made smaller) to modify the air resonance response (to a lower frequency
range). As this is an action that may be undertaken reversibly, this will be tested later as a separate experimental trial sequence.
Ultimately the colascione will be 'finished' by fitting a parchment rosette in the sound hole.
|
|
|
jdowning
Oud Junkie
Posts: 3485
Registered: 8-2-2006
Location: Ontario, Canada
Member Is Offline
Mood: No Mood
|
|
With the current stringing - first string 0.37 mm PVF, second Nylon 0.6 mm and third Pyramid wound #1010 - tuned as A2 A3 D4 and G2 G3 D4 - attached
for information and comparison are the Audacity frequency spectrum graphs showing the most prominent frequency peaks.
The colascione with either tuning is quite loud and resonant. If anything the G2 G3 D4 tuning sounds a bit 'richer' in tone.
Next to restring the instrument to sound an octave lower in pitch i.e. A1 A2 D3 and G1 G2 D3.


|
|
|
jdowning
Oud Junkie
Posts: 3485
Registered: 8-2-2006
Location: Ontario, Canada
Member Is Offline
Mood: No Mood
|
|
The colascione has been restrung to test tuning an octave lower as A1 A2 D3 and G1 G2 D3.
Strings used are those that I have to hand so not ideal - first string Pyramid 0.63 PVA, second Pyramid wound 1010 and third Pyramid wound 1027.
String tensions are A1 2.7 Kg, A2 3.5 Kg. D3 2.9 Kg and G1 2.2 Kg, G2 2.8 Kg and D3 2.9Kg.
The attached spectrum analyses, for information and comparison, show some of the more prominent harmonics with the strings sounded open.
For comparison the two attached sound clips are for open strings for G2 G3 D4 and G1 G2 D3. On balance I prefer the richer more resonant sound of the
G1 G2 D3 stringing. Interestingly the fundamental tone G1 is not prominent in the spectrum graph although the bass string sounds loud enough. The top
D3 string 'sings' nicely in the upper fret positions.
(Unfortunately the sound files have now been lost)


|
|
|
jdowning
Oud Junkie
Posts: 3485
Registered: 8-2-2006
Location: Ontario, Canada
Member Is Offline
Mood: No Mood
|
|
A preliminary assessment of the variation of air resonance frequency with sound hole area for this instrument was undertaken in two ways:
1) by covering the soundhole with 2 mm thick card and then recording the air resonance signal (generated by tapping the sound board just in front of
the bridge with all strings damped) - the card being moved in 5 mm steps until the whole sound hole area was uncovered.
2) by covering the soundhole area with 2 mm thick card squares each with different soundhole diameters and measuring the air resonance signal.
The results - air resonance frequency (obtained from 'Audacity' spectrum analysis) against sound hole area - are plotted on the attached graph for
information.
The difference in the curve profiles is primarily due to different sound hole geometries - full circle area compared to segment of a circle area.
Changes in air resonance pitch are easily distinguished by ear as soundhole area varies.
The loudest air resonance frequency occurs at the point when the sound hole is uncovered to an open area of about 35 cm² (77% of the full sound hole
area of 45.4 cm²). This corresponds to an air resonance frequency of 192 Hz G3 which is also the air resonance frequency of the open sound hole there
being about a 6 Hz bandwidth tolerance in the measured frequencies.

|
|
|
jdowning
Oud Junkie
Posts: 3485
Registered: 8-2-2006
Location: Ontario, Canada
Member Is Offline
Mood: No Mood
|
|
Having established the measured air resonance frequencies for various sound hole areas is is possible to use the 'calibration' graph previously posted
to predict the 'optimum' sound hole diameter for a particular open string tuning.
By way of example, for an open string tuning of G1 G2 D3 the resonance frequency signal at the sound hole was recorded with each string sounded open
for soundhole diameters 7.6 cm, 4.1 cm and 1.9 cm and spectrum analysed with Audacity to determine the peak frequencies G1 G2 D3 and their harmonics.
The attached spectrum analysis charts are attached for comparison.
As might be expected (by reference to the air resonance 'calibration' chart), the 4.1 cm diameter sound hole (area 13.2 cm²) equates to a maximum dB
for frequency D3 and the tiny 1.9 cm diameter sound hole (area 2.8 cm²) gives the loudest response at frequency G2.
That this small diameter sound hole actually worked was something of a surprise. Indeed all three selected sound hole diameters worked well with this
particular open string tuning - the sound just differed in tone 'colour' in each case.
On balance I think that I prefer the 4.1 cm diameter soundhole result with its slightly softer bass and stronger first string response.
|
|
|
jdowning
Oud Junkie
Posts: 3485
Registered: 8-2-2006
Location: Ontario, Canada
Member Is Offline
Mood: No Mood
|
|
Calculating the air resonance frequency based upon the full (single) sound hole area for musical instruments such as ouds, lutes and guitars does not
agree with the calculated frequency for a perfect Helmholtz resonator - giving higher than measured values.
Some comparative resonance chamber tests with varying sound hole diameters and chamber depths/volumes can be found here:
http://www.mikeouds.com/messageboard/viewthread.php?tid=14874&p...
For the relatively flexible and shallow bodies of instruments, the mass flow of air oscillating at resonant frequency within the boundaries of the
sound hole is concentrated around the outer perimeter so that there is a 'dead area' in the sound hole centre where there is minimal air movement. The
diameter of the dead zone appears from tests to vary between about 0.5D and 0.8D where D is the open soundhole diameter. The active area of the
soundhole is then used to predict the air resonant frequency of an instrument.
For this colascione with a bowl volume of 3660 ml the 'dead zone' diameters for the 7.6 cm diameter soundhole works out to be 0.55D and for the 1.9 cm
and 4.1 cm diameter sound holes 0.48D. Had the bowl geometry been such that the space below the sound hole had been deeper it is anticipated from the
resonance chamber trials that the 'dead zone' diameters would have been a greater proportion of sound hole diameter.
(The above link to yet another one of my topics on this forum that is missing all of the images required to understand the text!)
|
|
|
jdowning
Oud Junkie
Posts: 3485
Registered: 8-2-2006
Location: Ontario, Canada
Member Is Offline
Mood: No Mood
|
|
So, for the current open sound hole diameter of 7.6 cm blocking the central area with a disc of diameter 0.55D (4.2 cm diameter - representing the
'dead zone' of the sound hole) should not significantly affect the acoustic response. The validity of this data - based as it is upon resonant chamber
trials by MIT researchers and confirmed by my own trials - will next be put to the test.
The measured air resonant frequencies for the temporary test soundhole diameters of 7.1 cm, 6.4 cm 5.7 cm, and 4.1 cm on the colascione allows the
'active' sound hole areas for each diameter to be calculated. Applied to the full sound hole diameter of the colascione (7.6 cm) the equivalent 'dead
zone' diameter for each test sound hole result may be determined. So, for example, the active area of the 4.1 cm diameter soundhole calculated from
the measured air resonance frequency of 148 Hz is 10.2 cm² (compared to the open area of the soundhole of this diameter = 13.2 cm). If the colascione
sound hole (diameter 7.6 cm) is then blocked with a central disc to form an open ring shaped sound hole of area 10.2 cm², the disc diameter would be
6.7 cm and the ratio of dead zone diameter d to open sound hole diameter D would be 6.7/7.6 or 0.88. Likewise, dividing the measured air resonant
frequency for the 4.1 cm diameter sound hole (148 Hz) with the 7.6 cm sound hole diameter frequency (198 Hz) gives a normalised value of 148/198 =
0.75. The datum points obtained by repeating the calculations for the remaining test sound hole diameters have been plotted on the attached graph for
information.
It can be seen that the curve f/f0 against d/D for the colascione is not identical to the curve obtained from the resonance chamber tests performed at
MIT athough it is of similar profile. The difference is likely(?) due to the assymetric, shallow geometry of the colascione sound box and sound hole
placement compared to the symetrically positioned sound hole and greater depth of the resonance chamber. In other words the colascione is even less
perfect as a Helmholz resonator than the symetrical, steel test chambers.
So a second series of tests will be undertaken to verify the air resonance frequencies of the colascione fitted with central discs of various
diameters to form open ring type sound holes.
Will, for example, an open ring sound hole of area 10.2 cm² give the same acoustic result as an open circular sound hole of 4.1 cm² - both having
the same 'active area' (10.2 cm²)?
Time will tell.
[file]35968[/file]
|
|
|
jdowning
Oud Junkie
Posts: 3485
Registered: 8-2-2006
Location: Ontario, Canada
Member Is Offline
Mood: No Mood
|
|
The normalised 'ring sound hole' graph has been updated to include datum points for test sound hole diameters of 1.9 cm, 2.9 cm and 4.9 cm.
Note that although this data has been obtain by tests on the colascione it will also apply to any instrument with a single round sound hole and
lute/oud like bowls. It therefore might be used as an aid to fine tuning of the air resonance frequency of an oud by blocking the central area of the
sound hole with a circular disc of appropriate diameter. Here the normalised curve for the colascione might be more representative for an oud than the
MIT curve.
From the colascione curve it can be seen that a solid disc of proportion d/D = 0.45 placed in ther centre of a sound hole will result in a lowering of
the air resonance frequency of less than half a semitone. Interestingly, the old lute and oud makers seem to have understood the relationship of sound
hole diameter to air resonance judging from the attached examples where the diameter of the inner circle in the rosette designs is about 0.45 D.
So these traditional rosette designs might seem to indicate to a luthier that it is OK to fill in the central area to 0.45D diameter (if they so wish)
without having any significant effect on the air resonance frequency. Beyond that limit increasing the relative diameter of the central solid disc
will have a proportionally increasing effect in reducing the air resonance frequency for a given sound hole diameter.
The presence of a rosette does not usually significantly affect the air resonance frequency compared to an open sound hole unless the rosette pattern
is particularly dense so blocking most of the air movement at the more extreme d/D ratios (in cases where a central solid disc is used to tune the air
resonance frequency).
The next series of tests will be to instal central discs of increasing diameter in the colascione sound hole to measure the effect on air resonance
frequency and so validate the attached curve of f/f0 against d/D.
[file]35986[/file]
[file]35989[/file] [file]35991[/file]
|
|
|
Hibari-San
Oud Maniac
Posts: 78
Registered: 6-4-2015
Location: Germany / Leipzig
Member Is Offline
Mood: contented
|
|
Thank you so much for sharing your researches.
You're helping me to understand those kind of things way better.
I'm pretty sure a lot of others too ! 
Best regards
Hibari
--------------------------------------------------------
"If you spend to much time thinking about a thing, you'll never get it done. Make at least one definite
move daily toward your goal."
- Bruce Lee -
|
|
|
| Pages:
1
2
3
4
5 |


