antekboodzik
Oud Junkie

Posts: 109
Registered: 5-24-2010
Location: north poland
Member Is Offline
|
|
Another work in progress
Hi dears,
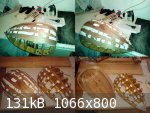
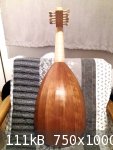
being curious about the technique described here by Jdownig http://www.mikeouds.com/messageboard/viewthread.php?tid=4274&pa... I started assembling another lute bowl. It is made of one long plank of cherry veener (about 1.4mm thick). It is now off the mould, and top ribs are
still not trimmed to size. This is the 6th lute bowl i have done so far and I would say it is the best and the most accurate one. I found the
technique of helping gluing ribs together with paper stripes quite nicely and efficiently. Currently, some of the stripes are removed, just because I
was curious, what had happened beneath them 
What I found more, is that the best paper for stripes was an ordinary white envelope - it is a bit heavier one and with highly orientated fibres. I
bought also a small portable iron at flea especially for this project, and it appeared not to be a very powerful one. And it must stay set to maximum
temperature when used.
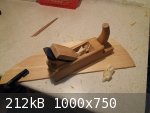
And speaking about tools - there are two block planes on the picture. One is newly bought Stanley G12-220, and the second is my favourite one, a quite
old No 110. It has no adjusters, but I like it so much for both its lightness and simplicity
|
|
|
antekboodzik
Oud Junkie
Posts: 109
Registered: 5-24-2010
Location: north poland
Member Is Offline
|
|
The next step will be gluing paper reinforcements of the joints inside. I am pretty confussed, which kind of paper to choose, because I have no idea,
what's better, and if it really matters. Please, help me and write what works for You.
Now I have got three types of paper on hand:
- an ordinary 80g/m^2 white drawing paper,
- one sheet of paper from shop for painters - it is a paper for painting with "aquarelles", it has right, alcali pH, 30% content of cotton, and it is
pretty heavy, 200 - 250g/m^2 I guess, and quite stiff and strong,
- and some of another type for fine arts, a very thin one, and with fibres remarkably orientated in one direction (it resembles a screen).
Thicker paper would be stronger, but also would be more difficult to glue, will add weight and can cause distortion of the bowl. Thin one would not
provide enought strenght, I may guess? Also, these strips would be placed better with fibres running along rib joints (can shrink and close joint even
stronger, but can cause distorted, "fluted" ribs), or across? The third described kind of paper should be good for that, as it is stronger in one
direction (according to fibre orientation), than in another.
|
|
|
Dr. Oud
Oud Junkie
Posts: 1370
Registered: 12-18-2002
Location: Sacramento, CA, USA
Member Is Offline
Mood: better than before
|
|
I recommend parchment paper, it is the only pure cellulose paper so it has the same qualities as wood (also cellulose). Get the paper from an
art/craft supply, not the grocery store parchment paper intended for baking release. Use hot hide glue, apply over the seam, lay down the paper then
apply more glue with hot water to infuse the paper with glue.
|
|
|
antekboodzik
Oud Junkie
Posts: 109
Registered: 5-24-2010
Location: north poland
Member Is Offline
|
|
Hi,
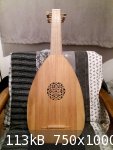
small update. I decided to use that paper from crafstsman shop. It seems to be going well, it glued nicely and the bowl is now stable and pretty
solid.
What I meant was that virtually all paper is made from cellulose (cotton fibres are also a cellulose). But old-way-made paper from cotton or linen
rags is considered to be far more superior to the one made from wood pulp. I only found that one brand that consist of 30% cotton.
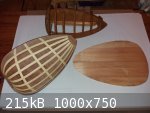
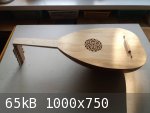
I also resawed an old board for top - you can see it on the picture two posts above, next to lute form and assembled bowl. It is probably local,
low-land spruce (but might be a pine), but it was quartersawn (quite unusual in carpentry, I think), and as far as I could get to know it is very old.
Unfortunately, best part of it has happened to be useless for making an instrument top - it appeared, that something had been spilled on this board,
soaked quite deep inside and the two final resawed top would have ugly, dark stains right along the joint line... So here is the other part resawed
from what was left, I am going to use it as a top anyway.
But I am very happy that I managed to put to work an old wooden plane. I it something completely new to me, but I found it working just ok, and it
also looks quite stylish
|
|
|
antekboodzik
Oud Junkie
Posts: 109
Registered: 5-24-2010
Location: north poland
Member Is Offline
|
|
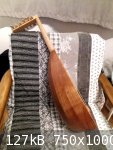
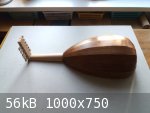
Ha, finished!
It was a kind of experiment for me. Along using paper strips when assembling the bowl, i have tested several aspects:
- width of the nut is extremely small, about 39 mm, it stays on the tight side but it is yet comfortable and perfectly playable,
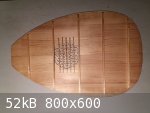
- sound board has only 5 supporting bars, equally distributed across the lenght of the top, and a few small ones under rosette,
- "recesses" in the rosette were cut from the top side in a full thickness of the top (no graduation from any side in that area),
- I have almost not used sandpaper (only in a few hardly accesible areas), planes/scrapers/files instead,
- finished instrument was covered two times with "white egg distillate" (as reported here by jdowning http://www.mikeouds.com/messageboard/viewthread.php?tid=10991 ) - I was afraid if it could distort and crack thin ribs or top, but nothing wrong
happened. Eventually, back, neck and pegbox got a few coats of shellac afterwards,
- I have strung it with PVF from fishing lines (exept lowest string, which is classical guitar d string). The instrument sounds loud and not too bad,
as you can guess looking on the quality of the wood for top. Buto my ears, PVF makes a little too harsh and too bright sound, but I am going to leave
it as it is anyway.
Summarizing - I am pretty happy with this instrument.
But I keep asking myself - why I am doing this
|
|
|
jdowning
Oud Junkie
Posts: 3485
Registered: 8-2-2006
Location: Ontario, Canada
Member Is Offline
Mood: No Mood
|
|
Why are you doing this? Because you are fascinated by the lute and its music, have a curiosity about the instrument and its construction and have the
skill to experiment and satisfy your curiosity! Nicely done!
I have checked typical overall string spacing for six courses at the nut on some surviving lutes of the 16th and 17th C and it can range from 36 mm to
38 mm or even less - and that remember is with thicker gut string pairs (not thinner modern nylon/wound strings). Closer spacing of the courses (than
say for a modern classical guitar) facilitates stopping of two or more courses with a finger tip (rather than a full barré) - essential for
performance of some early lute compositions.
What is the string length of the lute?
|
|
|
antekboodzik
Oud Junkie
Posts: 109
Registered: 5-24-2010
Location: north poland
Member Is Offline
|
|
Hi, thank You for your feedback. Especially to jdowning, thank you a lot for your encouraging and wise words
The string lenght is 590 mm. It comes from placing proportions of dividing part of the soundboard between neck- and end block to a bracing pattern,
considering necessary "amount" of neck block to securely glue the top, having appropriate neck widht at the neck-body joint, and fitting of the 9th
fret onto the neck.
About nuth width - well, I have written "extremely" just because I have almost no "on hand" experience with professionally made lutes (only just a few
mid-east instruments, and two instruments owned by players I had priviledge to hold for a while). All my "lutemaking" is based on what I can find over
the net or guess myself. Comparing partially finished neck for that instrument to classical guitars, I had a feeling, that 39 mm would be almost but
playable (if even). So it was a nice surprise for me, that it is, well, much more different of what I am used to, but playable.
And I want to add one more thing. Over some years I had owned about a two dozens of old, pre WWI, mass manufactured sicilian and neapoletan mandolins
(Puglisi, Casella etc - not so hard to acquire here). Vast majority of them had frets (staight brass bar stock) protruding from each side of the
fretboard of about 0.5 mm because of lateral shrinkage of the neck and fretboard. Also, their nuts seemed to be slightly "oversized". So I think, that
exact width of necks of surviving much more older lutes and historical guitars must be taken with that precaution of wood shrinkage of even wider
necks and fretboards. Is it right?
Also stopping two string with a fingertip - it makes some sense to me, but I have never seen that or was in need of that (maybe - not yet). As far as
I am aware, violinists do that, but it is not exactly possible on all violins, and not available for all players. So in my feeling spaces between
courses (lesser especially between bass courses on multicourse instruments) play role in it, isn't it?
Sorry for a long post with my thougts, and for my language Correct me if
necessary, it is a valuable lesson for me too.
|
|
|
jdowning
Oud Junkie
Posts: 3485
Registered: 8-2-2006
Location: Ontario, Canada
Member Is Offline
Mood: No Mood
|
|
Your question about shrinkage of wood over time as it affects the dimensions of the neck is a valid one. Both wood, ivory and bone are hygroscopic so
will shrink or expand with changes in relative humidity (moisture content of the air) and to a lesser extent temperature changes. Wood is more
sensitive than ivory and bone the least sensitive to these environmental fluctuations. However, more extreme environmental conditions that might cause
damage by shrinkage cracking or swelling of these materials would also be destructive to the wellbeing of any musical instrument. Nevertheless over
long periods of time (centuries), even with an instrument that has been cared for and not subject to extremes, there will be some permanent material
shrinkage (long term seasoning).
Material shrinkage is of particular concern for antique wood wind instruments made from wood and/or ivory as the shrinkage modifies the shape of the
bore of an instrument and so change the tonal pitch from original. Maker Bruce Haynes estimates that the longitudinal shrinkage for ivory (less than
cross grain shrinkage) is about 0.993 for instruments made in the 18th C. (Of course shrinkage would be greater on instruments made from materials
that have not been properly seasoned but those instruments likely would not have survived due to damaging excessive shrinkage).
The information about antique lute string spacing I have on file is for lutes in the European collections shown on full sized drawings made by Stephen
and Miranda Murphy in 1974/1975. The string spacings are measured on the nut so the width of the fingerboard/neck is of no consequence here. So if
longitudinal shrinkage of a nut measuring 39mm across the strings over time is 0.993 then the original spacing would have been about 39.3mm - so not
practically significant.
When attempting to copy lutes and related instruments that are centuries old great care must be taken in deciding what is or is not original - some of
the best instruments of their time being subject to major modification/conversions in later years. So for example measured sound board thicknesses
must be treated with caution not only due to slight long term shrinkage but because of physical removal of material over successive repairs/rebuilds
etc.
For set up of a lute, the courses should be set as close together as practically possible for a player consistent with avoiding the strings clattering
together when plucked and, of course the action (string height above the frets) should be as low as possible - often achieved by using frets that
gradually reduce in diameter from nut to neck joint.
Note that for a lute of the Renaissance period (late 15th C to late 16th C) a neck length would accommodate only 7 tied frets in the beginning
(although sometimes only 5 frets were tied - as on the early fretted ouds) changing typically to 8 tied frets by the mid 16th C. Relative neck lengths
and number of tied frets increased in the later Baroque period.
|
|
|
jdowning
Oud Junkie
Posts: 3485
Registered: 8-2-2006
Location: Ontario, Canada
Member Is Offline
Mood: No Mood
|
|
For information.On the question of stopping 2 or more strings with a finger tip when playing chords on a lute, this article by luthier/lutenist Martin
Shepherd gives historical examples from various 16th/17th C sources where two and three courses are stopped by first, second, third, and fourth
fingers (but not all at once!)
http://luteshop.co.uk/all-fingers-and-thumbs/
All made easier by close practical spacing of courses (and large finger tips) - the exact set up dependent upon the physical dimensions of an
individual player's hand.
|
|
|
|


