| Pages:
1
2 |
jdowning
Oud Junkie

Posts: 3485
Registered: 8-2-2006
Location: Ontario, Canada
Member Is Offline
Mood: No Mood
|
|
Early oud construction methods?
The familiar mid 15th C diagram of a lute by Henri Arnault de Zwolle is a composite giving a geometry and barring layout for a lute as well as
information on how to construct the body of the lute. According to a translation of the latin text by Ian Harwood, Lute Society Journal, 1960, the
parallel lines on the diagram depict the placement of 5 wooden 'bulkheads' of a lute mold. As the lute has only 9 ribs or staves, the semicircular
sections are flattened at the rib positions. To construct the body, thin strips of wood are shaped to conform to the 9 divisions on the bulkheads. The
first, central rib is first glued to the neck block and bottom block. The next rib is glued to the blocks and then attached to the neighbouring rib
with a long piece of paper coated with glue - and with a rather warm iron. When all of the ribs have been joined together, the mold underneath is
taken away leaving the ribs joined to the blocks. Next the joints inside the body are glued with parchment (reinforcement strips) and the paper
outside the body is then scraped off. Then the bars and belly are put on "as you know"
Arnault de Zwolle is describing the familiar "toast rack" mold used today to make ouds and lutes.
He also is describing a method of joining the ribs together (in days before the convenience of modern self adhesive tapes) using glued paper strips
'scorched' into place with a hot iron.
Thomas Mace, writing in 1676 (Musick's Monument) describes this technique for 'do it yourself' lute repairs in his chapter 4 "Concerning the
Mechanical Order of the Lute" in which the belly is held in place during re gluing with penny sized pieces of glued paper. An iron hot enough to
scorch the paper (but not the wood of the instrument) causes the glue - apparently - to set rapidly and 'crust' (and shrink the paper?) pulling the
joint tight. The paper can then easily be removed later by moistening with a damp cloth.
I have never tried this method but imagine that it may have some advantage over more modern methods using tape - possibly one being hot glue drawn
into the joints by capilliary action without the need to apply glue first (very quickly!) along the joint edges?
On website http://www.oudmaker.com there is a slide sequence of luthier Dincer Dalkilic making an oud. Unless I am mistaken, he appears to be making the body
of an oud using this technique (except that he is using an electrically heated iron). Is this technique commonly used these days among oud makers? If
so what are the advantages?
John
|
|
|
jdowning
Oud Junkie
Posts: 3485
Registered: 8-2-2006
Location: Ontario, Canada
Member Is Offline
Mood: No Mood
|
|
I finally got around to contacting Dincer Dalkilic yesterday and he confirmed that he does indeed use this early method of construction for making oud
bowls. On his website Dincer has posted an interesting series of images in "Oud Making Photo Show" depicting the making of an oud including images of
the bowl assembly process.
It can be seen that he glues the ribs (and 'lines' between the rib joints - after hot bending to shape - by first applying hide glue along the edges
of the ribs (and lines). Each rib is then placed upon the mold and glued to the neighbouring rib in stages using glued strips of paper first laid over
the joint followed by a hot iron which re-melts the glue in the joint and then rapidly cures the glue on the paper which also shrinks a little so that
it holds the rib joint tightly together. To prevent the ribs sticking to the mold, strips of paper are also placed under the ribs in places where the
ribs make contact with the mold surface.
When complete, the entire outside surface of the bowl is covered in paper strips which helps to temporarily reinforce the finished bowl as it is being
removed from the mold. The paper strips are then removed by scraping, after first softening the glue with a damp cloth.
I am going to try this method on my next instrument project as it seems to have a lot of advantages.
|
|
|
Oud Freak
Oud Junkie
Posts: 291
Registered: 11-23-2007
Member Is Offline
Mood: Oud Jerk 
|
|
| Quote: | Originally posted by jdowning
On website http://www.oudmaker.com there is a slide sequence of the luthier making an oud. |
Nice slideshow, really.
I think more care could have been brought to the bracing. Although a bracing is "invisible" it should be nice to look at, it should be perfect, with
perfectly shaped pieces of wood, and the parallelisms have to be respected. The bracing is the brain of the oud. Supposing this doesnt affect the
sound at all, the sound is not everything.
for example in this thread is shown a clean bracing. Good work Raby
http://www.mikeouds.com/messageboard/viewthread.php?tid=6873&pa...
Also in http://www.khalafoud.com, are shown some bracings, real beauties, made with lot of care.
Even though I know none of Raby and J. Khalaf, I appreciate their care for their precise and clean work. Congratulations for you folks. Keep it up!
|
|
|
jdowning
Oud Junkie
Posts: 3485
Registered: 8-2-2006
Location: Ontario, Canada
Member Is Offline
Mood: No Mood
|
|
Perfection in anything man made is an illusion. No harm in dreaming though.
|
|
|
Oud Freak
Oud Junkie
Posts: 291
Registered: 11-23-2007
Member Is Offline
Mood: Oud Jerk
|
|
| Quote: | Originally posted by jdowning
Perfection in anything man made is an illusion. No harm in dreaming though. |
Downing, look at the bracings of Khalaf and Raby, they are very real and excellent, consequently they are not a dream, and u'll understand  No one is perfect, but there is a minimum. A musical instrument is not a scratch
paper. No one is perfect, but there is a minimum. A musical instrument is not a scratch
paper.
|
|
|
jdowning
Oud Junkie
Posts: 3485
Registered: 8-2-2006
Location: Ontario, Canada
Member Is Offline
Mood: No Mood
|
|
Oud Freak - What have your opinions expressed in this thread got anything whatsoever to do with early oud construction methods?
|
|
|
Oud Freak
Oud Junkie
Posts: 291
Registered: 11-23-2007
Member Is Offline
Mood: Oud Jerk
|
|
Jdowning: I think it is worth to be tried. But what is particular about ouds, is somehow a kind of freedom in the design and in the constructing
methods, as well as many potentials for developing the instruments, without deying the old methods. Violins, flutes and pianos for instance cannot
tolerate such changes and are more rigid.
Despite the possible evolution of the oud, and regardless of the building methods, the inside and outside finishing must be the closest possible to
the excellent i.e Jameel Khalaf. Really beautiful work
Ibrahim Sukkar's finishing is also not bad, despite the affordable prices of his instruments.
If there is some oud which is built with the early methods, I'd be most delighted to try it!
I had a phone conversation with Nazih Ghadban this morning and he told me he was making a oud in the traditional way, but I ignore if it is the early
method or not.
Best Regards and Merry Xmas wishes
OF
|
|
|
jdowning
Oud Junkie
Posts: 3485
Registered: 8-2-2006
Location: Ontario, Canada
Member Is Offline
Mood: No Mood
|
|
I am not aware of any step by step, 'hands on', detailed description - ancient or modern - of how an Arabic luthier might go about constructing an oud
bowl using this ancient method. Therefore, until such time as such a description is posted lets look at what 17th C Thomas Mace has to say in an
attempt to uncover a few more clues about the old ways. Mace gives a detailed account of how to remove, repair and replace a lute belly which
includes use of the glued paper/hot iron technique for making joints - a technique just as applicable for gluing the rib joints of a bowl.
In Chapter 4 of the second part of "Musick's Monument entitled
"Concerning the Mechanical Order of the Lute", Mace first gives a list of the tools needed to carry out the repairs and maintenance of a lute. The
first item is a glue pot of about a pint capacity (0.57 litre) and ".... some of the clearest and best made glue, together with isinglass (both which
mixed together make the best glue)" .
Isinglass is a type of fish glue, the best of which is made from the swim bladders of the sturgeon fish - now generally unavailable due to
overfishing and destruction of the environment of that species - although isinglass is also made from other unprotected species of fish. It is less
viscous and stronger than hide glue but also brittle in nature. Both hide and fish glues were being used in Egypt at least 3500 years ago.
Cennino d'Andrea Cennini in his "Il Libro dell' Arte" published in 14th C Florence, describes both glues - fish glue being good for "mending lutes"
and hide glue, made from goat skin, being good for "making lutes" - both available then in leaf or sheet form.
Mace does not give the proportion of isinglass to hide glue needed to make 'the best glue' so it might be assumed to be a 50/50 mix.
A source of isinglass in powder form may be found at home brew suppliers. It is used for clarifying wine and beer by the brewing industry.
Both isinglass and hide glues are prepared in the same way - by first soaking in water and then heating the glue in a water jacketed glue pot until
liquid. Both glues are used hot. I have never used isinglass glue so cannot verify its properties through experience but it is reported to be good for
gluing porous materials (such as parchment) and presumably its low viscosity facilitates its penetration into a glue joint by capilliary action. Also
mixing isinglass with hide glue may help reduce the brittleness of the isinglass if used alone.
If I can obtain powdered isinglass from a local brewers supply store I shall conduct some experimental trials to see how it performs when used as a
glue.
|
|
|
jdowning
Oud Junkie
Posts: 3485
Registered: 8-2-2006
Location: Ontario, Canada
Member Is Offline
Mood: No Mood
|
|
The sturgeon is now globally threatened with extinction and is listed by CITES (Convention on International Trade in Endangered Species of Wild Fauna
and Flora) as endangered due to destruction of spawning grounds (building of dams, reservoirs etc.) and overfishing - both legal and illegal for the
eggs of the fish (caviar). Sturgeon isinglass is a byproduct of this international trade so - as I would never use elephant ivory in the construction
of a musical instrument - regardless of whether or not it had been legally acquired - the same must apply to sturgeon isinglass. Therefore, I will not
be attempting to carry out any trials or experiments to test a combination glue containing locally purchased brewers isinglass finings as previously
proposed.
|
|
|
jdowning
Oud Junkie
Posts: 3485
Registered: 8-2-2006
Location: Ontario, Canada
Member Is Offline
Mood: No Mood
|
|
Apart from a glue pot and a quantity of 'best' glue, Mace's tool kit for repair and maintenance of a lute includes two heating irons - a large one,
in section measuring about 3/4 inch (19 mm) square and about 3 inches (76 mm) long or "the length of your middle finger" made of iron filed flat and
smooth at one end and at the other end fitted with a long shank with a sharp end run into a handle of wood to hold it by. The other iron, although not
essential, should be a quarter of the thickness of the large iron - useful for finer work.
Mace goes into detail about how to remove and repair a lute soundboard and then describes how to re-glue the soundboard to the bowl as follows:
"Now to your glue pot with back and belly, and begin with which(ever) you please, and anoint all the edges carefully around (with glue) where you know
they must join........ then, having a good fire ready, bring both to the fire and warm them a little and (then) clap them together quickly.......
Now having in readiness your great (large) iron red hot, heat the edges (of the soundboard) thoroughly all over ..... until you perceive the glue (in
the joint) has become warm and thin. "
Mace then describes how small pieces of paper "wet with glue" are place over the soundboard joint spaced so that there is a small gap between each
piece of paper ("a straw breadth or two .... so that you may see how the joint joins"). Using the end of the hot iron and "leaning pretty hard", each
piece of paper is then scorched in place - one by one - working gradually around the soundboard joint equally on both sides as work progresses, inch
by inch ("to avoid any unevenness"). The iron "must not be too hot for fear of burning the belly, yet hot enough to scorch the papers and (turn) the
superfluous glue into a crustiness" Having completed the joining of the soundboard in this manner the instrument is set aside for the glue to dry
until the following day.
To clean off the papers, a rag dipped in water is used to moisten all of the scorched papers and crusty glue "often renewing the moisture" a little at
a time so that within the space of about half an hour the glue will be so soft that the papers can be gently scraped off using a fingernail. Mace
cautions against using any tool other than a fingernail to avoid damaging the soundboard. The glued joint is then allowed about two days to cure.
This procedure is the same as would have been used for gluing the ribs of the bowl during construction the only difference being that the paper strips
remain on the bowl exterior (for temporary support) until the bowl has been removed from the mold.
|
|
|
jdowning
Oud Junkie
Posts: 3485
Registered: 8-2-2006
Location: Ontario, Canada
Member Is Offline
Mood: No Mood
|
|
Now for some trials to test the method of using the paper and glue - a la Mace and Arnault de Zwolle. I am not sure how well it will work so a bit of
'hands on' experimentation is in order.
I figure that the glued paper strips will shrink when scorched with a hot iron - drawing the joint tightly together and possibly allowing sufficient
glue to seep into the joint as well.
A bit of cross technology research to find out about paper shrinkage revealed that bookbinders know all about it. Paper has a grain direction - like
wood - as well as built in directional stresses, due to the manufacturing process. When soaked with water on one side, paper will expand across the
direction of the grain (but very little along the grain) causing the paper to curl. It will shrink again when it dries. Running a few tests it was
found that paper samples shrank between 3% and 5% across the grain direction from their fully expanded state when saturated with water to their fully
over-dried state when rapidly heated (on a woodstove surface). Shrinkage along the grain was found to be almost negligible.
The best paper from these limited tests was found to be that from "junk mail" (you have just won a million dollars or other 'special deals' etc!).
This kind of paper is of a fairly heavy grade (to feel impressive no doubt) but contains no fillers or sizing so the paper absorbs moisture quickly.
Whether or not it will be strong enough to shrink without splitting under test remains to be seen. Other paper may also be suitable on testing.
Two test are planned using jointed walnut plates, with a piece of purfling between, mounted on a wooden block held in place with pins. Paper covering
the block will prevent the test pieces sticking to the block itself.
The first test will be with a dry joint, the glued paper strips being scorched over the joint - to see if glue will seep into the joint - and the
second test will be first to apply glue to the joint surfaces and purfling followed by scorching the glued strips in place.
I shall be using an old household electric iron set at maximum temperature to do the paper scorching operation. This setting is just enough to scorch
the paper a light brown colour.
The paper strips - about 1" x 3/4" (25 mm X 19 mm) - will be applied with their grain in the same direction as the joint (or the cross grain direction
across the joint) so that when the paper strips shrink, the joint surfaces will be pulled together.
So, with some good quality pearl (hide) glue soaking overnight (no isinglass glue added!) the trials will be carried out tomorrow. Lets hope it all
works!

|
|
|
Jesse Frank
Oud Lover
Posts: 23
Registered: 9-17-2007
Location: North Florida
Member Is Offline
Mood: No Mood
|
|
looks lke a neat technique. I'm really interested to see how it works.
We have sturgeon down here that you have to watch out for..... they don't bite that I'm aware of, but they do jump, and they are really big fish!
boaters have been seriously injured by them on the Suwanee! It's mostly the jet skis that have to worry about it, though....
Anyway, thanks for letting us all benefit from your research.
|
|
|
Jameel
Oud Junkie
Posts: 1672
Registered: 12-5-2002
Member Is Offline
Mood: No Mood
|
|
Fantastic post John! I can't wait to see the results of your test.
By the way, I'd like to hear your thoughts on adapting the butt-joint and screw/nail joint for attaching necks.
|
|
|
jdowning
Oud Junkie
Posts: 3485
Registered: 8-2-2006
Location: Ontario, Canada
Member Is Offline
Mood: No Mood
|
|
I carried out the gluing trials this afternoon. The results were not quite what I had anticipated but I have something to report in my next
postings.
Jesse - Sturgeon are a primitive looking fish and can grow very large (if allowed to live!) but beautiful to my eye. There are sturgeon on the West
coast of Canada but these are now on the point of extinction with only about 500 individuals currently surviving as I understand it. It is now illegal
even to attempt to fish for them. I will have a look into the Australian species as they seem - from what you say - to be plentiful but I do not know
of Australian sturgeon isinglass (or caviar). Perhaps it is a different species with the same name?
Jameel - The nailed butt joint is the way it was done on early lutes where "speed was of the essence" in fixing the neck to neck block when hide glue
was being used. The nails used had large heads to apply maximum pressure to the glue joint and the nail also prevented the neck sliding out of
alignment until the glue set. This was particularly important on lutes of the late 16th C and 17th/18th C which had significantly sloping neck joints
- unlike earlier lutes and ouds where the joint is at a right angle to the fingerboard. Of course, the nail also added extra structural strength and
security to the neck joint assembly. Screws can be used if slower setting modern adhesives are employed for the neck joint. Screws would not have been
used for this purpose in earlier times as they were then individually hand made and would have been costly - as well as being too slow for fast
setting hide glue.
I very much like the traditional longitudinal dovetail joint (or the modern spline adaptation) used by oud makers today as this allows the set of the
neck to be accurately established in a 'dry run' before final gluing and would also allow use of either hide glue or modern adhesives. I am not aware
of this type of joint ever being used on early lutes. However, it would likely be a difficult joint to make accurately on a sloping, lute neck joint.
|
|
|
jdowning
Oud Junkie
Posts: 3485
Registered: 8-2-2006
Location: Ontario, Canada
Member Is Offline
Mood: No Mood
|
|
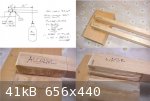
Gluing Trials - Test 1 to determine if scorched paper shrinks to pull a glue joint together.
The glue used was pearl hide glue prepared in the usual way. A sufficient quantity of glue was placed in a small, clean glass jar, covered with water
and allowed to soak overnight to absorb all of the water. The jar was then placed in a saucepan of boiling water to melt the glue for use at the
proper temperature of about 140 F (60 C) - above this temperature the glue loses strength. The glue is used hot and is of the correct consistency when
it runs off the glue brush in a steady stream making a slight 'spattering' noise as it falls back into the glue pot. If it is too thick, a little
water is added to bring it to the correct consistency.
A simple test rig was made up of two strips of wood (Hickory in this case - no particular reason, they were just handy). The strips were hinged at one
end with masking tape so that they were separated with a gap of about 0.025 inch (measured with feeler gages) at the other end and the gap could be
closed with light finger pressure. A strip of paper was first saturated with water, coated with glue and then laid across the gap - the paper
orientated with its cross grain across the gap for maximum shrinkage. The paper was then scorched in place with a hot iron causing the water in the
glue to instantly boil off and the paper to quickly set in place within a second or two. The glue on the paper turns to a "crustiness" as noted by
Mace.
The gap was measured after this operation but no significant closure was detected indicating that paper shrinkage (if any) is of no consequence in
closing the joint surfaces. The scorched paper strips simply quickly lock the joint firmly in place and do not draw the joint together. The grain
direction of the paper is. therefore, not important if this method of gluing is to be used.
|
|
|
jdowning
Oud Junkie
Posts: 3485
Registered: 8-2-2006
Location: Ontario, Canada
Member Is Offline
Mood: No Mood
|
|
Test 2 - does the glue from the scorched paper seep into a dry joint?
Arnault de Zwolle's treatise of the 15 th C does not mention glue being applied to the rib joints - only glued paper being applied over the joint (as
a temporary measure) and the ends of the ribs glued to the neck and end blocks while the bowl is being constructed. Does this mean that some of the
glue on the paper strip will seep into the rib joints when the paper is being scorched in place and that it is not then necessary to apply glue to the
rib joints prior to applying the paper strips?.
This was tested by joining two pieces of walnut with a strip of purfling between. The joint was left 'dry' and glued paper strips scorched over the
joint. Paper was placed under the joint so that any glue seeping through the joint would not cause the test sample to stick to the mounting block
underneath.
A small amount of glue did find its way into the joint but not sufficient to form a consistent strong joint so that the joint started to separate in
places as the sample was flexed.
Part of the problem also was that the purfling was made many years ago using modern PVA woodworkers glue. The glue started to degrade when the paper
strips were being scorched causing the purfling to delaminate. Had hide glue been used to make the purfling in the first place this would not have
been a problem as hide glue would have simply melted under the heat and reset again when the heat was removed.
Final test comes next.
|
|
|
jdowning
Oud Junkie
Posts: 3485
Registered: 8-2-2006
Location: Ontario, Canada
Member Is Offline
Mood: No Mood
|
|
Oops! Sorry Jesse, wrong country for sturgeon - Florida not Australia!
Nevertheless the Gulf sturgeon of Florida are also threatened with extinction and are listed under the Endangered Species Act 1991. Sounds like there
are too many boaters in that part of the world.
For the historical record, a very strong combination glue of hide and isinglass glues can be made using spirits of wine (i.e. ethyl alcohol) instead
of water when preparing the glue. A formula for this is given in "Cyclopedia of Useful Arts" London & New York, 1854.
" made by infusing common glue in small pieces with isinglass in spirits of wine, just sufficient to cover the mixture. Heat is then cautiously
applied and when melted powdered chalk is added making the whole of an opaque white"
Presumably this glue could be made without the chalk 'filler'.
The same book gives the following preparation of so called 'Diamond Cement' or white fish glue. "Isinglass is dissolved in dilute spirits of wine or
common gin. The two are mixed in a bottle loosely corked, and gently simmered in a vessel containing boiling water (i.e. a water bath); in about an
hour the isinglass will be dissolved and ready for use. When cold it should be an opaque, milk-white, hard jelly: it is remelted by immersion in warm
water (i.e. in a water bath while in the bottle) but the cork should be loosened. After a time a little spirit should be added to replace that lost by
evaporation"
Other sources recommend use of cheap brandy or common whisky in place of gin. No doubt vodka would also serve for making glue from Russian isinglass!
The alcohol content of these glues would, no doubt, help to preserve the glue from rotting and decomposition.
These strong glues would likely be useful for high strength joints on instruments - gluing bridges, neck joints etc. - joints that could presumably be
taken apart if required by application of moisture and heat.
|
|
|
jdowning
Oud Junkie
Posts: 3485
Registered: 8-2-2006
Location: Ontario, Canada
Member Is Offline
Mood: No Mood
|
|
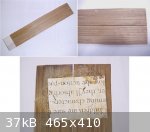
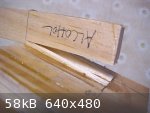
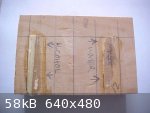
Test 3 - apply glue to the joint surfaces before scorching paper.
This test follows Mace's instructions to first "anoint" the joint surfaces all around with glue - otherwise it is a repeat of test 2.
This time - as expected - surplus glue was found to have soaked into the protective paper under the test piece indicating that the joint was properly
saturated with glue throughout (see image 2)
The paper strips were removed according to Mace's instruction, by dampening them with a moistened cloth to re-soften the encrusted glue and then
scraped off using a fingernail. The light glue residues remaining on the surface were then removed with a cabinet scraper.
The finished joint was destructively tested this morning, after the glue had dried overnight, by flexing the test piece. The joint separated (snapped)
cleanly along one side of the purfling strip but this time the purfling, unlike in test 2, remained intact. It should be noted that the thickness of
the walnut test pieces was 0.055 inch or 1.4 mm - a typical rib thickness for a lute. Also walnut is an opened grained wood so that the strength of
the joint may have been affected by the open pore structure of the joint surface further reducing the effective area of the joint.
Another test will be run using a close pored sample of hard maple 0.095 inch thick or 2.4 mm - with glue applied to the joint surfaces but without the
purfling strip to see if that makes any difference to joint strength.
It should be remembered that the rib joints in an oud or lute bowl are always reinforced from the inside of the bowl with paper strips permanently
glued in place.
Conclusions to follow after the final test.
|
|
|
jdowning
Oud Junkie
Posts: 3485
Registered: 8-2-2006
Location: Ontario, Canada
Member Is Offline
Mood: No Mood
|
|
Further comment about isinglass glue made using alcohol can be found in Volume 1 "Turning and Mechanical Manipulation" by Charles Holzapffel 1843.
deals in great detail with 'materials, their choice, preparation and various modes of working them'. It is a very useful reference on how to work
materials such as bone, ivory, tortoise shell, sea shell, horn etc and, as such, is of interest to the luthier as well as a turner. A modern facsimile
reprint of the book is available from The Astragal Press, Mendham, New Jersey 07945-0239.
Holtzapffel, in chapter VIII dealing with ivory, gives the formula for white fish glue or 'Diamond Glue' previously posted in this thread saying that
it is very often used for ivory work - for attaching ivory to ivory or ivory to wood. So this may well have been the glue used by early luthiers for
building instrument bowls with ivory ribs. He seems to confirm that the alcohol (in this case common gin) helped to preserve the glue as he states
that "When the isinglass is dissolved in water alone, it soon decomposes" Again this is mentioned for historical interest only as, hopefully, few
luthiers today would even contemplate building instruments from materials derived from endangered animal species.
It should also be mentioned that true isinglass glue should not be confused with a material called water glass which is also sometimes called
isinglass. Water glass (sodium or potassium silicate) was once used for preserving eggs that were immersed in a solution of the mineral. Water glass
can be made into a cement for repairing glass but is not recommended for use on wood.
As part of these on going gluing trials, I shall make up a glue from pearl glue dissolved in alcohol instead of water to investigate how that performs
(strength, shelf life etc.) compared with glue dissolved in water in the usual way. I shall use cheap brandy (40% alcohol by volume) for this purpose.
|
|
|
jdowning
Oud Junkie
Posts: 3485
Registered: 8-2-2006
Location: Ontario, Canada
Member Is Offline
Mood: No Mood
|
|
Due to a major power outage caused by adverse weather conditions the gluing trials could not be completed so instead the relative strength of pearl
glue prepared with water and with alcohol was investigated.
Test samples of pearl hide glue were made by covering the glue in water, in the usual fashion, and, for sample #2, by covering the glue in commercial
brandy of 40% alcohol by volume in strength. Both samples were allowed to soak for 24 hours to fully absorb the liquids. The glue samples were heated
in a water bath until melted and applied hot.
A simple test rig was made - comprising two rods of pine measuring 1/2 inch X 3/4 inch X 22 inches long, glued to a mounting block of pine clamped to
a bench. The glued areas measured 1/2 inch by 2 inches or 1 square inch. An increasing torsional loading was applied - by moving the load inch by inch
along each rod - until each joint failed. The load was simply a couple of 2 litre water bottles filled with water weighing in total 8.9 lbs.
Loading the glued joints in tension - perpendicular to the wood grain - was chosen for simplicity as wood is weakest when loaded in this manner.
Each glue joint failed when the load was positioned at
20 inches from the pivot point (at the edge of the mounting block). Both of the test joints failed due to structural failure of the wood and not the
glue joint although the alcohol based sample was marginal - probably because the glue was a too viscous when applied and should have been diluted a
little more. Nevertheless, the test indicates that both joints were of equal strength in tension perpendicular to the wood grain. Therefore, the use
of alcohol rather than water has no significant effect on joint strength although it may help preserve the glue from decomposing in storage.
Out of interest, a rough calculation of the stress at failure of the joints gave a figure of 267 p.s.i. which compares with the standard equivalent
stress limit of dry white pine of 280 p.s.i.
|
|
|
jdowning
Oud Junkie
Posts: 3485
Registered: 8-2-2006
Location: Ontario, Canada
Member Is Offline
Mood: No Mood
|
|
As the first test gave marginal results, the alcohol based glue trial was repeated using the same test rod inverted to provide a new test surface.
This time the glue was diluted further with a little brandy to make it of more fluid consistency when hot. The joint was then clamped and left to cure
for 22 hours before being tested to destruction.
With the load at maximum distance along the rod (22 inches), the glued joint remained firm. Failure of the rod itself was then achieved, at an
undetermined load in excess of this, by pushing down the end of the rod.
This limited test appears to indicate that the relative strength of the alcohol based glue is maintained (or possibly increased?) after the glue had
been reheated (usually hide glue weakens with each reheat so should be used fresh for maximum strength). However, a series of controlled tests would
be needed to confirm glue strength after repeated reheat cycles.
|
|
|
jdowning
Oud Junkie
Posts: 3485
Registered: 8-2-2006
Location: Ontario, Canada
Member Is Offline
Mood: No Mood
|
|
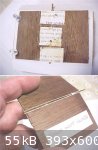
Test 4.
The final part of the gluing trials was to repeat test 2 and 3 using 2.4mm thick maple test pieces. The paper strips used for the previous tests were
found to be a bit fragile after soaking - tending to stick to the iron and tear apart when being scorched in place - so a slightly heavier grade of
paper of paper (about 40lb) was used and the glue applied without soaking the paper strips. This was more satisfactory. The strips were applied with
the grain of the paper running across the joint to take full advantage of any slight shrinkage that would pull the joint together before the glue
set.
The attached image shows the test piece with a dry joint - no glue being applied to the edges. Although the paper strips held the joint edges firmly
together, the joint remained dry with no glue seepage from the paper strips into the joint after scorching. This is not surprising as scorching the
paper causes the glue to set hard in a crust within a second or so.
A second test was made with glue applied to the edges of the joint. Scorching the paper strips in place caused the glue in the joint to re-melt and a
firm close fitting joint resulted. After the glue in the joint had cured overnight, the paper strips were easily removed by wetting and scraping and
the joint was then destructively tested by bending the test piece. The resulting joint was strong enough but failed along the glue line with a clean
fracture. It is possible that the glue may have been weakened due to overheating during the paper scorching process so prolonged scorching should be
avoided - only sufficient heat to set the paper in place should be used.
This method is for making a bowl using hide glue. Hide glue gels quickly and, therefore, must be remelted bit by bit as the ribs are joined. The use
of glued paper strips to temporarily hold the individual rib joints together, as well as the complete bowl assembly, is both viable and practical.
I shall use this method for my next project.
![Glue Test 4 comp [800x600] (369 x 600).jpg - 51kB](https://www.mikeouds.com/messageboard/files.php?pid=44195&aid=28675)
|
|
|
jdowning
Oud Junkie
Posts: 3485
Registered: 8-2-2006
Location: Ontario, Canada
Member Is Offline
Mood: No Mood
|
|
For completeness, another test was carried out to compare the relative strengths of hide glue prepared with water and with alcohol. This time both
glues had been reheated - the water based being subjected to two reheat cycles (with a little water added to achieve correct consistency) and the
alcohol based glue to three reheat cycles (without need to add more brandy).
This time both joints failed at a calculated stress of
240 lbs/square inch - that is 10% less than on the previous combined test. Although the tests are not statistically significant, the result is as
expected - indicating that hide glue becomes weaker on each reheat cycle and should, therefore, be used freshly made for maximum strength. It can be
seen that both joints failed marginally at the glue line and that the water based glue appeared to be slightly weaker and less tenacious than the glue
prepared with alcohol.
|
|
|
jdowning
Oud Junkie
Posts: 3485
Registered: 8-2-2006
Location: Ontario, Canada
Member Is Offline
Mood: No Mood
|
|
Mace gives the sizes of the pieces of paper for scorching over the glue joints "... then with with little pieces of paper (so big as pence or
two-pences, wet with glew)...."
Initially I was not able to establish dimensions of the coinage referred to by Mace - the English silver pence and two-pence coin of his time - but,
after a little research, have now been able to find the data. A complication is that the coinage of the period may have been made either by stamping
(hammered) or machine made (milled). The hammered coinage was not only uneven in diameter to start with but was also subject to fraudulent "clipping"
which made the diameter of a coin less than when originally minted. To cut a long story short, the diameter of a silver penny or two-penny coin of the
period was between 12 mm and 15 mm - a bit smaller than I first thought - so about 1/2 inch square was the size of the glued paper strips used by Mace
for his repair work.
As an aside, Mace also refers to the dimensions of a coin to describe the height at the nut of a lute - i.e. the distance between fingerboard and the
underside of the strings. In this case he says that it was the thickness of a half-crown. From the dimensions and weight of a half-crown coin of 1642,
I was able to calculate a thickness of about 1.5 to 1.8 mm which is about right for a (fretted) lute but might be a bit lower for an oud.
Although Thomas Mace in his "Musick's Monument" of 1676 was writing about the English and French lutes of his time - as well as other instruments like
the Theorbo, viol etc. - some of what he wrote is also relevant to the oud - because of the structural similarities between lute and oud. I have
quoted some of the relevant passages from Mace's work in this and other threads on the Forum.
For those interested in reading, first hand, about what Mace had to say in greater detail, there is an excellent, cloth bound, facsimile of his book
published by C.N.R.S. (Centre National de la Recherche Scientifique, Paris), now out of print but available through on line book sellers like Addall
books. The complete facsimile is Volume 1 of two volumes. Volume 2 is a commentary (in French) about the life and work of Mace and includes
transcriptions of the music.
An alternative source of the work is through 35mm microfilm or on line digital copies available at "reasonable cost" from many of the major libraries
such as the British Library or la Bibliotheque Nationale de France.
Mace originally published his work, unbound, in loose leaf, to subscribers at a cost of 12 shillings. He complained that - at this price - he could
not make a profit and was going to have to raise the price accordingly. Interestingly, the sum of 12 shillings sterling in1676 is today equivalent to
about $152 - according to
http://measuringworth.com/calculators.
|
|
|
jdowning
Oud Junkie
Posts: 3485
Registered: 8-2-2006
Location: Ontario, Canada
Member Is Offline
Mood: No Mood
|
|
I should add that the scorched paper strips that I used for the gluing trials measured roughly around 30X20mm so were about three times the area of
the strips used by Mace. The strips in my trials, therefore, required more scorching heat to set than those of Mace with the possible consequence of
potential overheating and weakening of the glue in the joints under test.
|
|
|
| Pages:
1
2 |


