| Pages:
1
2 |
Jameel
Oud Junkie

Posts: 1672
Registered: 12-5-2002
Member Is Offline
Mood: No Mood
|
|
Again, interesting tests and photos John. Thanks also for you opinions on neck joints. This is a lot of reading, and a lot of effort on your part.
Thanks very much. Incidentally, using alcohol for hide glue is new to me. Never heard of that before. Is it explosive? How does it not evaporate very
quickly?
|
|
|
jdowning
Oud Junkie
Posts: 3485
Registered: 8-2-2006
Location: Ontario, Canada
Member Is Offline
Mood: No Mood
|
|
Thanks Jameel - I suppose that the alcohol alters the chemical composition of the glue in some beneficial way so that any residual alcohol vapor
remaining is unlikely be a safety concern - although the early recipes recommend corking the glue container after use, loosening the cork when heating
the glue each time as well as adding more alcohol if necessary to make up for losses due to evaporation. This is no different from a water based glue,
however, as the water is, of course, also prone to evaporation.
Note also that I am only testing an alcohol based hide glue not the isinglass/hide glue combination recommended in the early recipes. The alcohol
based combination glue might prove to be significantly stronger.
At least the alcohol based glue is no weaker than the water based and may prove to have a longer 'shelf life'.
Note that only dilute ethyl alcohol is specified in the early recipes. This is most economically and readily available (as it was in the 19th C and
earlier times) as alcoholic spirit beverages like gin , brandy etc - usually sold at 40% alcohol by volume. Other commercial alcohols like methyl
alcohol (methanol) or propyl alcohol (rubbing alcohol) may not work but I don't know.
Interesting what can be found by exploring other early technologies.
|
|
|
jdowning
Oud Junkie
Posts: 3485
Registered: 8-2-2006
Location: Ontario, Canada
Member Is Offline
Mood: No Mood
|
|
I came across this reference the other day confirming use of alcohol based hide/isinglass glue for instrument making by luthiers Stephen Barber and
Sandi Harris. See under 'Glues' at
http://www.lutesandguitars.co.uk/htm/cat.htm
I am not clear from their website posting if they use an alcohol based combined hide/isinglass for all of their instrument building work or just for
specific purposes such as inlay work or perhaps high strength applications such as gluing bridges. Therefore, I have contacted them for more
information. If I get a response I shall report any further clarification on this thread.
Looking again at the video clip recently posted on this forum, showing Labib Habib in the process of making an oud, it is interesting to note that in
constructing the bowl he uses a solid mold but that the ribs are not assembled in contact with the mold except at the neck block and end block. In
effect, despite use of a solid form, he is building the bowl using the open, mold free, method recommended by DR. Oud in his book "The Oud
Construction and Repair". So why does he use a solid mold when a simple frame to hold the neck and tail blocks in position would do?
The video shows Labib Habib applying hot hide glue to the edge of a rib (using a wooden spatula - not a brush) and then a shot of him 'ironing' the
completed rib joint with a hot iron - presumably to remelt and consolidate the glue in the joint. Interestingly there is no sign of any paper strips
or other clamping devices (pins, nails, elastic bands etc) being used to hold the ribs in position until the glue sets.There are, however, what seem
to be numerous pin or nail holes in the surface of the mold indicating that pins may have been driven into the mold to temporarily hold the ribs in
place as bowl construction proceeds. The scene in the video may, therefore, have been 'staged' for the camera and does not represent the complete
assembly procedure? Has anyone seen Labib Habib (or other Arab luthier) at work to confirm this assumption?
Richard Hankey has posted another video clip of an oud maker at work on his website. The video quality is not very good but this time the luthier is
using an open bulkhead or 'toast- rack' style of mold and appears to be hot ironing the rib joints without use of any temporary paper strips or pins -
he just seems to be holding each rib in place until the hot iron causes the glue to quickly set? Again the ribs do not seem to be closely fitted to
the mold bulkheads - perhaps because this would avoid risk of the ribs becoming stuck to the mold?
|
|
|
jdowning
Oud Junkie
Posts: 3485
Registered: 8-2-2006
Location: Ontario, Canada
Member Is Offline
Mood: No Mood
|
|
I have been able to view the video clip of Labib Habib in finer detail by using a flash video player with a screen capture facility. (A nice free
viewer of this type is FLVPlayer4Free). Examining the still shots it is now clear that the Labib Habib drives nails into the mold along the edges of
the ribs so that the nails press against the ribs temporarily holding the joint together while being, fitted, 'ironed' to reheat the glue and until
the glue is fully cured and hardened.
|
|
|
jdowning
Oud Junkie
Posts: 3485
Registered: 8-2-2006
Location: Ontario, Canada
Member Is Offline
Mood: No Mood
|
|
Here is another reference to alcohol being used in preparing hide glue - from an earlier source than the 19th C.
In his book"Mechanick Exercises or the Doctrine of Handy-Works" London 1703, Joseph Moxon - in the section dealing with the art of Joinery, page 105,
section 34 'Of Chusing and Boiling Glew' describes the preparation of hide glue. He finishes by stating:-
" When (with often heating) the glew grows too thick, you may put more water to it; but then you must make it very hot, lest the glew and water do not
wholly incorporate.
Some Joiners will (when their glew is too thick, put small beer into it, thinking it strengthens it: I have tried it, and could never find it so, but
think it makes the glew weaker, especially if the small beer chance to be new, and its yest (i.e. yeast) not well settled from it, or so stale, that
it be either draggy, or whit mingled with the settlings of the cask".
"Small beer" in Moxon's day was a weak beer - a common drink for everyone, regardless of age, at a time when water was often polluted and dangerous to
drink. It was likely about 2% by volume of alcohol (or less) in strength so (being mostly water) it is perhaps not surprising that it had little
effect on glue strength compared to simply adding water. Nevertheless, it would appear that English woodworkers of the time believed that adding
alcohol to reheated hide glue made the glue stronger. Speculating, it is possible that these woodworkers were following a traditional method handed
down from an earlier period but had forgotten two critical details, in the passage of time - that the alcohol used must be distilled spirits of wine
(of much greater strength than that of small beer) and that addition of the alcohol acts not to strengthen reheated glue but prevents it getting
weaker with repeated reheating- alcohol being an effective sterilising agent preventing bacterial decay.
While historical record confirms that hide and fish glues were used for instrument construction since ancient times, we do not currently know if
alcohol modified glues were ever used for this purpose. Nevertheless - even in Muslim cultures where alcoholic beverages have always been forbidden -
ethyl alcohol has been prepared from wine by distillation since at least the 8th C - for medicinal use or employment as a chemical. It is, therefore,
quite possible that alcohol modified glues may have been in use since ancient times.
To divert a little, to complete the picture about early glues, Cennini in his book "Il Libro dell' Arte" of 15th C Florence, Italy mentions
preparation of a glue made from cheese used by woodworkers. Cennini does not say, however, that cheese glue was used for instrument work - as he does
for fish and hide glues.
An earlier reference to the making of cheese glue is recorded in the 8th C. "Kitab al-Durra al-Makmena (The book of the hidden pearl) - a book about
glass making by the Arabic alchemist Jabr ibn Hayyam.
A modern version of cheese glue - casein glue, made from milk protein - was used (with some unfortunate and deadly results) in the manufacture of
wooden aircraft frames during the first part of the 20th C. These glued joints were found to fail under load if exposed to moist conditions due to
bacterial decomposition of the glue. The solution was to treat the glue with an antibacterial agent to prevent this decay.
On the other hand, the cheese glue of the ancients, does not appear to have suffered from this problem. Perhaps these glues were treated with alcohol
as a sterilising agent to help kill any bacteria and perhaps this is the origin of alcohol based non synthetic glues? Just more speculation on my
part, however.
|
|
|
jdowning
Oud Junkie
Posts: 3485
Registered: 8-2-2006
Location: Ontario, Canada
Member Is Offline
Mood: No Mood
|
|
FISH GLUE - some more information.
It is important to note, in considering fish glue, that there are three main types - isinglass made from fish swim bladders, glue made from fish skins
and liquid fish glue. Liquid fish glue is made by boiling fish waste - skins, bones, heads etc - to produce a concentrated liquid. It is not comprised
of pure gelatin fibre like isinglass and consequently, is flexible and weaker. Like liquid hide glue, liquid fish glue - which is readily available -
is unsuitable for making or repairing instruments.
Early historical records about fish glue refer primarily to isinglass - made from the swim bladders of sturgeon or other fish - except where use of
fish skin is specifically mentioned.
Pliny the Elder in his 'Naturalis Historiae' of 76 AD mentions both types in Book XXXII Chapter 24.
Checking out other early technologies, the powerful and compact composite reflex bows used by the Turks, Persians and Mongols were made of layers of
wood/sinew/horn glued together. The ancient Mongol bows (used in warefare up until the end of the 18th C) used fish glue made from the swim bladders
of freshwater fish.
According to L.F. Salzman ("Building in England down to 1540", Clarendon Press, Oxford) fish glue was used by English woodworkers during the 14th C.
Records show that in 1348 the sum of 18 pence was paid..." for 100 soundes for making glue for the carpenter" and in 1352 the sum of
3 shillings was paid ... "for 100 greylyngsondes for joining boards". In 1358 the hefty sum of 2 shillings was paid for "25 fisshesounds". A 'sound'
is a fish swim bladder. A 'greyling' is a species of English freshwater fish. Perhaps the expensive swim bladders of 1358 were imported sturgeon
sounds?
Thorpe's Dictionary of Applied Chemistry of 1941, Longmans, London, Volume V under "Gelatin" states that isinglass could also be made from fish
species other than sturgeon - such as Cod or Hake. The article goes on to say "In preparing Russian isinglass, the bladders are first cleansed from
blood in hot water, cut open, washed and exposed to the air with the delicate silvery inner membrane turned upwards. This membrane (i.e. the
isinglass) is stripped off, kneaded in damp cloths and dried."
Presumably, the swim bladders of fish other than sturgeon may also be prepared in this straightforward manner to make isinglass?
Now to find a local 'ice fisherman'!!
|
|
|
jdowning
Oud Junkie
Posts: 3485
Registered: 8-2-2006
Location: Ontario, Canada
Member Is Offline
Mood: No Mood
|
|
Post script.
Csaba Grozer - a Hungarian bow maker - makes replicas of early composite reflex bows using traditional materials and techniques.
http://www.grozerarchery.com
From experience, he claims that isinglass glue is the best glue in the world for making this type of bow quoting the properties:
1- it is very strong.
2- it does not become brittle with time.
3 - it has a long "open time" - that is it stays fluid and workable without gelling quickly when being applied (this allows the bowmaker to thoroughly
saturate the sinew filament layers before the glue sets).
All properties that make the glue suitable for instrument making it would seem to me.
Incredibly, some 19th C researchers immersed many old and valuable bows in water so that they fell apart - allowing the method of construction to be
"investigated". Bad news for history but at least it confirms that isinglass glued joints are reversible like those of hide glue.
|
|
|
jdowning
Oud Junkie
Posts: 3485
Registered: 8-2-2006
Location: Ontario, Canada
Member Is Offline
Mood: No Mood
|
|
Post- post Script.
Continuing with my investigation into glues used in early Asian bow technology, the early 16th C Arabic treatise "Book on the Excellence of the Bow
and Arrow" translated to English by Faris and Elmer as well as a study in English of the early 15th C "Kitab ghunyat at-tullab fi marifat ramy
an-mushshab" are fascinating and detailed accounts of archery practice, bow construction etc. of the time.
For those interested, these and other texts can be freely downloaded from http://www.sacred-archery.com
Neither of the texts gives details of the glues used - with one exception. In Chapter XXXII of the 16th C treatise "On the Variations in the Length
and Construction of the Arab Bow", the anonymous author states that "Others have recommended that in countries of excessive heat the sinew should be
saturated with glue made of the best parchment, which is characteristically moist and, therefore, suitable for hot regions but not for those which are
cold and humid".
Hide (ie parchment) glue would , therefore, seem to be an exception to isinglass glue which would seem to be more suitable in cold and humid
conditions.
Not much to go on but every little piece of data can help in building a better understanding of the overall historical picture.
It is unfortunate that the surviving early texts about the oud do not go into the same immaculate, informative detail recorded by those who wrote
about weapons of war.
|
|
|
jdowning
Oud Junkie
Posts: 3485
Registered: 8-2-2006
Location: Ontario, Canada
Member Is Offline
Mood: No Mood
|
|
Just an additional thought on glues.
The early technology of Arab composite bowmaking was - like many early technologies - highly sophisticated. The ratio of materials used in the
construction of a composite bow - wood, sinew and horn, and quantity and type of glue - was adjusted by the bowmaker depending upon the climatic
conditions and season of the year when a bow would be used. So, for example, in regions where the climate tended to be cold and damp, "like Syria and
Andalusia", suitable bows were made with a greater proportion of horn, a moderate proportion of sinew and glue and a small proportion of wood.
It is interesting to speculate, therefore, if the bowmakers also mixed hide and isinglass glues in different proportions to arrive at an optimum glue
for a particular climate. Perhaps this could be the ancient origin of the hide/isinglass compound glue recommended by Mace as being best for lute
repairs in the cold and damp climate of 17th C England?
|
|
|
jdowning
Oud Junkie
Posts: 3485
Registered: 8-2-2006
Location: Ontario, Canada
Member Is Offline
Mood: No Mood
|
|
To change direction a bit - there has been some discussion about edge banding styles on the forum over the past year or so. Here are some rough
sketches to summarise the situation. The sketches represent sections at the edge of a soundboard and show five banding possibilities. There may be
others that I am not aware of.
Banding is not only decorative but reinforces the edge of the soundboard against damage and may also improve the response of a soundboard due to the
weakening at the edge due to the banding - just as the edge purfling on the violin family of instruments seems to, for example.
![Banding [640x480] dark.jpg - 23kB](https://www.mikeouds.com/messageboard/files.php?pid=45899&aid=28679)
|
|
|
jdowning
Oud Junkie
Posts: 3485
Registered: 8-2-2006
Location: Ontario, Canada
Member Is Offline
Mood: No Mood
|
|
Sketch A and B, of course, represent soundboards without banding.
A - is to be found on surviving lutes of the 16th C. so, no doubt at one time it was to be found on ouds as well. I have not found the lack of banding
to be a disadvantage on a lute as far as edge protection is concerned.
B - here the edge of the soundboard is protected by a thin strip of material glued in place which reinforces the glued joint and helps protect the
soundboard edge. This is found on lutes of the late 17th C/ early 18th C - known as a "lace" - and is mentioned by Thomas Mace as being made from thin
parchment or silk.
There is some evidence that a type of lace was also used on ouds - at least covering part of the sound board edge.
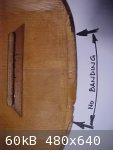
The attached image shows an old oud soundboard of unknown vintage where the banding does not - for some unknown reason - extend to the lowest part of
the soundboard, this area being covered by a narrow strip of 'leather cloth' glued in place (here the cloth strip has been removed). Ronny Andersson
has also recently mentioned coming across examples of this type of edge reinforcement.
|
|
|
jdowning
Oud Junkie
Posts: 3485
Registered: 8-2-2006
Location: Ontario, Canada
Member Is Offline
Mood: No Mood
|
|
C - here banding is glued into a shallow rebate cut around the edge of the soundboard. This type of banding arrangement can be found on surviving
lutes of the late 16th C and 17th C. - usually the rebate is cut to half the thickness of the soundboards or about 0.8 mm.
Dincer Dalkilic recently commented that he uses this method of banding and that it was traditionally used by some of the old oud makers. The depth of
the banding can be half the thickness of the soundboard - like a lute - or cut to almost the full thickness of the soundboard so that the banding
appears to be full depth.
The attached image of an old oud soundboard is an example.
D - here the edge of the soundboard is completely cut away to receive the banding which is the same thickness as the soundboard. A method used by
Richard, Jameel and, no doubt, many other makers today. Was this method used by oud makers before, say, the 20th C?
F- this is mentioned by Jameel as being used by one maker (if I have interpreted Jameel's description correctly) - so may be a unique modern
application?
Note that for examples C, D and E it may be impossible to determine - from an external examination alone, without removing a section of banding -
which method is being used.
![Old Oud Edge Banding [640x480].jpg - 34kB](https://www.mikeouds.com/messageboard/files.php?pid=45905&aid=28683)
|
|
|
jdowning
Oud Junkie
Posts: 3485
Registered: 8-2-2006
Location: Ontario, Canada
Member Is Offline
Mood: No Mood
|
|
Turning now to the oud 'tail block' - this is the block or plate to which the ribs are attached at the bottom or tail of the bowl usually made from
pine or other resinous soft wood. There would appear to be two possibilities which, because they occur in early lutes, are an indication that they
were likely also used in early oud construction.
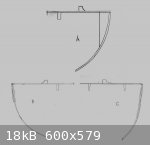
The attached images are some rough sketches - more or less to scale - showing vertical sections through the tail end of oud and lute bowls and
including the bridge and first bar above the bridge.
Sketch A - is the familiar Arnault de Zwolle lute of the 15th C which has a fairly massive tail block. The tail block forms part of the construction
mold to which it is temporarily attached. This form of construction is found in late 19th C ouds and is used today - although the thickness of the
block is usually, proportionally, about half that of the de Zwolle lute.
Sketch B - is a section through an early 17th C lute. There is no tail block. Instead, the bottom of the bowl is reinforced, on the inside, with a
fairly shallow, thin strip of wood glued in place - the end plate. The end plate extends over most of the circumference of the bottom of the bowl.
Further reinforcement is also provided with an 'end cap', glued to the outside of the bowl - covering approximately the same area as the end plate.
The end plate does not form part of the mold but is fitted and glued in place after the bowl has been removed from the mold. The thickness of end
plate and cap is typically about 1.5 to 2 mm.
Sketch C - for comparison, shows the construction of an old oud that I own - of unknown vintage - which has a lute like end plate that appears to have
been glued in place after the bowl had been removed from the mold. There is a semicircular end cap glued to the outside of the bowl. This cap is
primarily decorative.
|
|
|
jdowning
Oud Junkie
Posts: 3485
Registered: 8-2-2006
Location: Ontario, Canada
Member Is Offline
Mood: No Mood
|
|
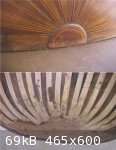
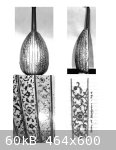
The attached images show the oud end plate and cap represented by sketch C. The end plate is about 2 mm maximum thickness (tapered at the ends), 72 mm
maximum depth and about 240 mm in length. Note that - unlike on a lute - the end plate does not extend to the top edge of the bowl so is not glued to
the soundboard.
The semicircular cap is 30 mm in diameter.
|
|
|
jdowning
Oud Junkie
Posts: 3485
Registered: 8-2-2006
Location: Ontario, Canada
Member Is Offline
Mood: No Mood
|
|
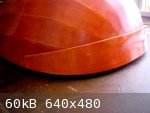
Just for comparison, the end cap on this replica of an early 16th C lute is 45 mm maximum depth.
|
|
|
jdowning
Oud Junkie
Posts: 3485
Registered: 8-2-2006
Location: Ontario, Canada
Member Is Offline
Mood: No Mood
|
|
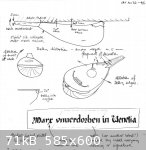
During 1980, while living in Scotland, I had the opportunity to examine in detail a number of early instruments in the Charles van Raalte collection
at Dean Castle, Kilmarnock. Instrument cat#32 in the collection is a 16th C ivory lute by renowned luthier Marx Unverdorben. Although converted to a
lute-guitar during the 19th C, the bowl and neck of the lute would appear to be original. The instrument is unusual in having a relatively narrow neck
- of oud like proportions - and ribs decorated with an 'arabesque' design in gold leaf.
|
|
|
jdowning
Oud Junkie
Posts: 3485
Registered: 8-2-2006
Location: Ontario, Canada
Member Is Offline
Mood: No Mood
|
|
Some distortion of the bowl and soundboard were recorded in my notes and sketches taken at the time the instrument was examined. In particular, there
was a noticeable 'dip' in the soundboard - amounting to about 6.5 mm at the bottom edge of the rose - measured from a straight edge laid across the
belly. At the time, this 'dip' was assumed to be due to distortion over time.
However, in "Historical Lute Construction", Robert Lundberg notes that this 'dip' is to be found in many surviving original lutes and was intentional
- the edges of the bowl being 'scooped' to cause the soundboard to deflect downwards when glued in place - the maximum deflection occurring at the
lower edge of the rose. Richard Hankey (DR. Oud) in "The Oud Construction and Repair" also mentions this as a feature of oud construction.
|
|
|
antekboodzik
Oud Junkie
Posts: 109
Registered: 5-24-2010
Location: north poland
Member Is Offline
|
|
May I refresh this topic and ask some questions even if it is nine years old?
Recently, I was taking hard time figuring out, what is going on with "paper strips method", and trying to reproduce it working to some of my work.
Every time when gluing lute ribs I found it difficult to have the edges of two ribs being joined perfectly levelled to each other along the lenght of
the joint (gluing line). These were very small unevenness, but hard to overcome even with stretching sellotape across the joint, or with putting
gently barrel pins at an angle along the joint line.
What I understood from this topic, is that those paper strips are literally "pinched" to the one rib, then the iron is rolled immidiately to the
second rib, putting the jointline as level, as it can be, and it "'pinchs" the strip to the second rib, holdig them together. Am I right? Please,
corrct me, if I got it wrong.
But what I got, it was paper strips glued every time to the sole of my iron, not to ribs even...
Please, help 
|
|
|
jdowning
Oud Junkie
Posts: 3485
Registered: 8-2-2006
Location: Ontario, Canada
Member Is Offline
Mood: No Mood
|
|
You will find details of an oud bowl being built step by step using this technique here, posts starting at 6-2-2009
http://www.mikeouds.com/messageboard/viewthread.php?tid=8488&pa...
Use heavy gauge paper and do not soak the paper, just apply glue to one side of the paper and allow to dry partially to identify grain direction -
otherwise soaking wet paper will tear and stick to the iron!
|
|
|
antekboodzik
Oud Junkie
Posts: 109
Registered: 5-24-2010
Location: north poland
Member Is Offline
|
|
Shall I wait some time for every strip to be set or proceed one by one, gluing and "patching" whole lenght of the joint at once?
|
|
|
jdowning
Oud Junkie
Posts: 3485
Registered: 8-2-2006
Location: Ontario, Canada
Member Is Offline
Mood: No Mood
|
|
As mentioned in the link - apply hot hide glue along the rib joint and glue the end of the rib to the neck block first. When working with hide glue
the glue will quickly gel so must be reactivated bit by bit as you work using a hot iron (it is the same situation when gluing a sound board in
place). Once the end of the rib is fixed to the neck block - as indicated in the thread - move along the rib joint bit by bit. Re-melt a short length
of glue in the joint, press the joint firmly together and hold in place with paper strip 'scorched' in place. Once the paper is scorched in place it
is already set and does not need to dry further so move on right away until the whole rib joint is completed (it takes just a minute or two) - covered
in paper strips along the whole length of the joint. The paper strips remain in position - covering the bowl outer surface as temporary reinforcement
when handling - until the finished bowl is removed from the mold and the usual internal paper strip reinforcement is glued in place.
Of course all ribs must be well fitted together and on the mold so that no forcing is required.
|
|
|
| Pages:
1
2 |


