| Pages:
1
2 |
jdowning
Oud Junkie

Posts: 3485
Registered: 8-2-2006
Location: Ontario, Canada
Member Is Offline
Mood: No Mood
|
|
Restoration of Egyptian Oud - part 2, pegbox and pegs
A happy, peaceful and healthy New Year to all.
One of my New Year resolutions is to pick up the threads of my oud restoration project that has been dormant for the past few months (see Restoration
of Egyptian Oud - part 1). Currently I am in the process of completing restoration of a mid 19th C keyboard instrument to playing condition for a
local museum but as this work draws to a close, I shall be able to pay more attention to the oud - as the spirit takes me - as I have many other
interests and projects vying for priority. Never a dull moment!
To recap, the oud that I have - purchased in Cairo, so is likely Egyptian (?), may date from around the 1920's. It has had a hard life and is
currently in pretty rough condition having been damaged and subject to past repairs - some of dubious quality. It is likely not in its original state
- the belly, for example, being a possible later addition and the neck having been shortened by about 4 mm.
My objective is, to the best of my ability as a craftsman, to restore (and preserve) this instrument to playing condition but in doing so, to make the
absolute minimal structural and material changes to the instrument - as it now stands - to achieve this objective. My repairs - like the repairs of
others before me - will become part of the history of this instrument.
I also hope that the details that I shall provide as work progresses might in some small way add to the common data base regarding the historical
structure of the oud.
As work proceeds I welcome any comments and suggestions from all those interested. Lets make this a project for the oud community as well!
So - down to action!
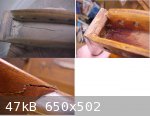
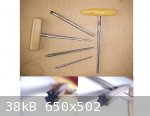
Today I began work on the pegbox - no particular reason why - I just felt like it. The pegbox is in poor condition and is partially detached from the
neck. The pegs are a motly collection of different styles and poorly fitting - however, I shall deal with the pegs later as a separate issue.
The partial detachment of the pegbox has caused flexing and splitting of the pegbox backplate. Repairs had been in the past by regluing the crack and
by a (failed!) attempt to secure the pegbox by pouring glue into the cavity below the nut.
Fortunately, hide glue had been used to effect these "repairs" so the poured glue was softened by moistening with water overnight and then scraped
out. This action also softened the glue in the repaired crack in the backplate which then 'opened up'. Removing the pegbox from the neck - using a
hair drier for heat - proved to be impossible. I could have used a fine razor saw to cut this joint but decided to cut the pegbox backplate instead -
as I figured that it would be best to replace this anyway.
Having removed the pegbox in this manner it can be seen that the pegbox itself does not have an integral end block but is seated directly into a
rebate in the neck - hence the difficulties in removing the pegbox and making repairs! This would seem to be a weakness in the original structure?
Note the marks made by a file or rasp at the glue joint - presumably in an attempt to increase the glue joint area for strength?
Is this method of joining the pegbox to neck a feature of traditional oud construction?
Here are some images of the pegbox prior to removal.
|
|
|
jdowning
Oud Junkie
Posts: 3485
Registered: 8-2-2006
Location: Ontario, Canada
Member Is Offline
Mood: No Mood
|
|
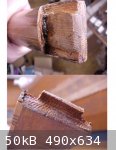
...... and here are some images of the pegbox joint after removal but before clean up.
|
|
|
Hosam
Oud Junkie
Posts: 180
Registered: 12-6-2005
Member Is Offline
Mood: No Mood
|
|
Hello jdowning, glad that you resumed working on this project. Looking forward to follow your progress. Good Luck!
|
|
|
Dr. Oud
Oud Junkie
Posts: 1370
Registered: 12-18-2002
Location: Sacramento, CA, USA
Member Is Offline
Mood: better than before
|
|
I have not seen an oud peg box attached in this way. Another weak feature is how the backplate seems to stop at the neck's outer profile. Usually the
backplate extends into the notch which would make a much stronger joint. I would replace the back plate with one that continues to the full depth of
the notch. Whether you use a separate block in the pegbox or utalize the notched flange in the neck shouldn't make any structural difference, although
it looks harder to fit, and so possibly further weakening the pegbox. A separate end block allows you to clamp the side walls snugly, then overlap the
backplate, making the pegbox more robust.
|
|
|
jdowning
Oud Junkie
Posts: 3485
Registered: 8-2-2006
Location: Ontario, Canada
Member Is Offline
Mood: No Mood
|
|
Thanks for your commments and suggestions Richard.
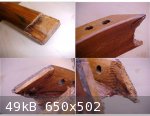
Here are another couple of closeup images showing the pegbox mounting arrangement in the neck. As you can see from the end grain direction and
continuity there is no doubt that there never was a separate end block for the pegbox. The pegbox backplate did extend part way into the notch but as
there was so much residual glue in that area, I was unable to release that last part of the joint so decided to cut it free in order to preserve the
inlay on the back of the neck from possible damage at the joint. The remains of this bit of the backplate - which can be seen in the picture - will be
cleaned out later.
It does seem to be an unusual and somewhat complicated way to fit a pegbox. Nevertheless, in keeping with my objective to retain as much of the
original structure of the instrument as possible I shall attempt to repair the notch and refit the pegbox as it was before.
|
|
|
jdowning
Oud Junkie
Posts: 3485
Registered: 8-2-2006
Location: Ontario, Canada
Member Is Offline
Mood: No Mood
|
|
I have now cleaned out the pegbox notch in the neck - removing the remains of glue residues and wood fragments using hot water and a fine spatula - so
can now better assess the situation prior to repair.
The neck of this oud appears to be made from pine or similar resinous softwood with the pegbox glued to an integral, wedge shaped block (which forms
part of the notch into which the pegbox fits - apparently an unusual detail of oud construction). At some time in the past, the oud appears to have
been subject to significant damage resulting in a split neck block at one end and the neck being forced backwards resulting in splitting of the pegbox
mounting block (if we can call it that) and partial separation of the pegbox to neck joint. A past, unsuccessful, repair attempt to secure this
joint,by simply pouring glue into the pegbox cavity below the nut, is in evidence.
Unfortunately, the previous separation of the pegbox to neck joint has resulted in significant splintering of the pegbox mounting block which will
entail cutting away and patching a good portion of what remains in order to reach sound material if I stick to my original plan. I have, therefore,
decided to cut away the remains of this block entirely, fit a spruce end block to the pegbox and instal the repaired pegbox to the notch in the neck
as an integral unit in the usual manner.
Before proceeding with that, I need to plan work required for refitting the pegs which might best be done with the pegbox still detached. I have the
choice of making and fitting a new set of boxwood pegs with slightly oversized shanks and with heads made in the fashion of the originals or to
'recycle' the existing mixed set - reshaping the heads of the mismatched pegs, cutting a new taper on the shanks and plugging and re- reaming the
existing pegbox holes to fit. At present I prefer the latter course of action as I will preserve the original pegs - despite all of their
imperfections - but I have yet to measure the shanks of each of the old pegs to determine if recutting to a consistent 'standard' taper is feasible. I
plan to check that out tomorrow.
|
|
|
jdowning
Oud Junkie
Posts: 3485
Registered: 8-2-2006
Location: Ontario, Canada
Member Is Offline
Mood: No Mood
|
|
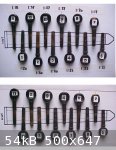
The question of the mixture of pegs and variable sizes of the peg heads on this oud was discussed in an earlier thread "Oud Pegs - Another Question"
posted in September last year. It concluded that generally all ouds are fitted with pegs of equal peg head size with the shanks protruding an equal
distance from the side of the pegbox.
The pegs in my oud are a mixture of a number of styles and different sizes of heads. Furthermore they are all cut with different tapered shanks and
the pegholes in the pegbox are also cut to different tapers - not necessarily matching the taper of the pegs.
The top image shows the different peg styles. The two similar pegs on the left - one with large head the other small and with the face of the pegheads
shaped concave - are in the majority so may be the original style (?). The central peg shown is an odd violin style peg and the two pegs on the right
of simlar style - have large and small heads but with the peghead faces shaped convex.
The bottom image shows the now splintered holes cut in the pegbox.

|
|
|
jdowning
Oud Junkie
Posts: 3485
Registered: 8-2-2006
Location: Ontario, Canada
Member Is Offline
Mood: No Mood
|
|
While it would not be a problem for me to make up a new set of oversized boxwood pegs for the oud, I am trying to preserve as much of the original
instrument as possible consistent with restoring the instrument to playing condition. I plan, therefore, to reshape the heads of the "mismatching"
pegs so that I end up with a set of pegs of the same style and to rearrange the location of the pegs in the pegbox so that the peg head sizes run
consistently from large at the nut to small at the 'tail end' of the pegbox. The peg shanks will be cut to a standard taper. The peg holes in the
pegbox are to be opened up in diameter to eliminate any splintered areas and the holes filled with boxwood plugs glued in place. The pegbox will then
be redrilled and reamed and the pegs precisely fitted so that they work properly.
The following two images show the original arrangement of the pegs in the pegbox at the time the oud was purchased (upper image) and the rearrangement
proposed below. The upper image also indicates the taper of each peg measured using dial calipers. These measurements are approximate because the peg
diameters are not all completely circular due to unequal shrinkage across the wood grain over time. Recutting the peg shanks will eliminate this
fault.
The peg shanks are to be cut to a "standard" violin peg taper of about 1:30 nominal taper. The reshaping of the shank will reduce peg shank diameters
a little from the original size which will be beneficial for tuning.
The pegs will finally have the original black stained finish restored.
|
|
|
jdowning
Oud Junkie
Posts: 3485
Registered: 8-2-2006
Location: Ontario, Canada
Member Is Offline
Mood: No Mood
|
|
Now to talk a bit about the tools needed for this work. This will be common knowledge to luthiers - amateur or professional - but I thought that the
information might be of interest to those less familiar with the details of how these instruments are made.
The shanks of the wooden tuning pegs of ouds, lutes, and other stringed instruments such as violins, are tapered to fit a hole of matching taper in
the pegbox. This arrangement provides sufficient friction for the peg to resist string tension yet operate smoothly (if correctly fitted) when tuning.
It is an arrangement that also automatically takes up any wear between the peg shank and peghole.
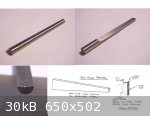
The tool for cutting the peghole is called a peghole reamer and these can be purchased from luthier suppliers as violin peg reamers - with a cutter
length of about 135 mm, small end diameter of about 9.5 mm tapering to about 5.5 mm that is with a nominal taper of 1:30 - for about $35 to $100
dependent upon quality.
I have experimented with other forms of tapered reamers - mainly morse taper engineering reamers that can often be found cheaply at flea markets.
These reamers have six equaly spaced cutters that tend to "chatter" leaving a less than perfect hole. They also have a shallower taper than a violin
reamer that is less satisfactory - the pegs tending to wear more quickly. A standard violin reamer (on the right hand side of the attached image) has
only three cutters set only on one half of the diameter - the rest of the reamer being solid. This arrangement allows for a smoother, more accurate
cut.
The image shows the cutter arrangement of a violin peg reamer and engineering morse taper reamer for comparison.
|
|
|
jdowning
Oud Junkie
Posts: 3485
Registered: 8-2-2006
Location: Ontario, Canada
Member Is Offline
Mood: No Mood
|
|
....... and here are some of my peg reamers (see previous post). The reamer on the right is a standard violin peg reamer and the one on the left is a
morse taper reamer that has been reground to a steeper taper (at a time when I had access to engineering toolroom facilities)- together with an
assortment of morse taper reamers picked up at flea markets for a few dollars.
If you have a metal turning lathe then it is a relatively simple matter to make your own smooth cutting reamers. Just machine some carbon steel 'drill
rod' to the required taper and then accurately file or mill the length to half its diameter. For occasional use in wood, this form of tapered reamer
does not even require hardening and tempering.
|
|
|
jdowning
Oud Junkie
Posts: 3485
Registered: 8-2-2006
Location: Ontario, Canada
Member Is Offline
Mood: No Mood
|
|
....... the attached images show the way in which a tapered steel blank- turned in a lathe - is hand filed to an exact semicircular cross section
along its full length. The completed reamer may then be hardened and tempered, if required, using a propane torch as a source of heat. The finished
flat must then be honed on an oil stone to produce a good cutting edge. As this form of reamer has only one cutting edge it cuts slowly but leaves a
well formed hole free of "chatter" marks.
Another home made reamer can be made entirely by hand without use of a lathe by filing a thin steel plate to the required taper and then gluing a
wooden backing plate to the steel with epoxy glue. The whole assembly is then carefully filed and sanded to an exact half round section - as indicated
in this sketch. I have not made a small reamer in this manner before but it should work as it is similar in construction to larger tapered reamers
used by woodwind instrument makers for boring out their pipes.
|
|
|
jdowning
Oud Junkie
Posts: 3485
Registered: 8-2-2006
Location: Ontario, Canada
Member Is Offline
Mood: No Mood
|
|
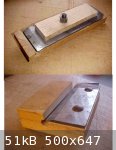
The other special tool required for making pegs is the peg shaper or shaver. This tool works like a giant pencil sharpener to shave a rough formed peg
shank to an exact taper - matching the taper of the reamer that is used to cut the peg holes.
Peg shapers are commercially available from luthier suppliers, ranging in cost between about $45 to $115 US. While these are no doubt tools of
excellent quality I have never used them, preferring to make my own shapers for a fraction of the cost (if I do not count the cost of my own labour!).
The advantage of making ones own shaper is that it is made with the peg reamer used to cut the peg holes - so that peg shank tapers will exactly fit
the taper of the peg holes. My violin peghole reamer is sold as having a nominal taper of 1:30 but in fact has a taper of 1:31.6 - which may not
exactly match the tapers of the commercial peg shapers. This can make a difference when it comes to accurately matching peg shank to peg hole.
Here are a couple of my home made peg cutters - made slightly differently but working on the same principle - simply made from a block of hardwood and
fitted with a rigid, cutting blade of suitable width. Not pretty to look at but they work. Rigidity and good fit of the blade to the body of the peg
shaper is important for smooth cutting action.
|
|
|
jdowning
Oud Junkie
Posts: 3485
Registered: 8-2-2006
Location: Ontario, Canada
Member Is Offline
Mood: No Mood
|
|
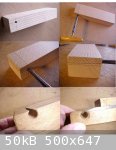
The following images show the stages in making a peg cutter. A block of hardwood (here I am using a piece of ash wood) is drilled through with a hole
of diameter equal to the minimum diameter of the peg reamer. The reamer is then used to cut the hole to a taper. The cut is made slowly, for accuracy,
and the reamer is frequently drawn from the hole to clear wood shavings clogging the reamer flutes as the cut is being made.
The wood above the completed reamed hole (shown as crosshatched in the photos) is then carefully planed down - using a hand plane - until the plane
just cuts through the top of the hole along its entire length. As the reamed hole is tapered this means that the top surface must be planed at a
slight angle to the horizontal. The bottom left hand image shows how the top of the block should appear after planing. The slot above the hole
provides clearance for shavings cut from the peg shanks when the peg shaper is in use. It is important that the planed surface should be absolutely
flat - to fit exactly with the cutting iron - and that the iron itself be absolutely rigid - otherwise it will "chatter" and not cut smoothly. As can
be seen from the images, I use heavy bolts to clamp the cutters in place and with an additional block of wood over the cutter to improve rigidity.
The cutting iron should be set with the cutting edge just protruding into the slot above the reamed hole so that it just takes a fine cut from the peg
shank as it is inserted into the peg cutter and rotated. A few trial and error cuts will find the best blade position.
The cutter, of course, must be sharpened and honed to razor sharpness. If it will shave the hairs from the back of your hand then it is sharp
enough.
There are a range of possibilities for the cutters. I use old plane irons and cutters from woodworking jointer machines purchased at flea markets for
a few dollars. The old fashioned plane irons from wooden planes are very rigid and made from laminated steel. The cutters from Makita hand planers are
also good as they are also of laminated construction with a high speed steel cutting edge, over 3 inches wide and thick.
I hope that these images and descriptions are clear enough but if anyone has any questions for clarification don't be afraid to ask.
|
|
|
Hosam
Oud Junkie
Posts: 180
Registered: 12-6-2005
Member Is Offline
Mood: No Mood
|
|
Very interesting, thanks for sharing this with us.
|
|
|
jdowning
Oud Junkie
Posts: 3485
Registered: 8-2-2006
Location: Ontario, Canada
Member Is Offline
Mood: No Mood
|
|
Ooops!
The measured peg shank tapers previously posted on the 11 January were incorrectly calculated by me. The correct values range between 1:17 and 1:37
that is with the angles of taper ranging between about 3.3 degrees and 1.5 degrees. I have, therefore, edited the images posted on the 11th January to
reflect the correct figures.
Hope that I have got it right this time. Apologies for any confusion this may have caused.
|
|
|
Peyman
Oud Junkie
Posts: 496
Registered: 7-22-2005
Member Is Offline
Mood: Mahoor
|
|
Thanks for posting the pegshaver tutorial. Very useful.
|
|
|
jdowning
Oud Junkie
Posts: 3485
Registered: 8-2-2006
Location: Ontario, Canada
Member Is Offline
Mood: No Mood
|
|
Having checked the variation in peg shank taper and maximum shank diameter, I selected one of my peg shapers that is pretty close to the size
required, therefore, saving having to make up a custom peg shaper for this job. The first part of the work is to re-cut the peg shanks to close to the
final taper.
The cutter blade must be checked for sharpness. I always regularly hone the blades of all cutting tools that I use - between sharpening on an oil
stone - in order to maintain optimum sharpness. The peg shaper cutting blade, initially, must be lapped and sharpened absolutely flat on the back face
with the cutting edge sharpened straight over its full length (otherwise the peg shank taper will be curved along its length). I hone the blades on a
leather strop (hard leather glued to a flat wooden block) treated with a fine honing compound - I prefer the 'Veritas' blade honing compound sold by
Lee Valley (catalogue number 05M08.01) which cuts fast and leaves a razor sharp edge.
Setting the blade on the shaper is fairly critical as it must be adjusted to take the finest possible cut to avoid tearing the wood grain of the peg.
However, this is easily done by first leaving the blade lightly bolted to the peg shaper, inserting a peg to be cut and rotating the peg (towards the
cutting edge). If the blade is set too 'heavily' the peg will automatically push it back until fine shavings are starting to be produced. At this
point the blade is bolted tightly in place. Note that the edge of the blade is also set at a slight angle following the taper of the peg. After a peg
has been cut with this approximate setting for about 60% of its length. The blade is then loosened and reset as before but this time checking that the
fine shavings are being produced evenly along the full length of the cut.
Note that the entrance to the hole in the peg shaper is countersunk - made in the shape of a funnel - so that at the end of the cut the decorative
collar under the peg head is protected from accidental damage by the cutter. Note also that the leading edge corner of the cutter is lightly dressed
to an angle for the same reason.
The objective at this point is to cut the peg shanks close to the finished taper but that the final finishing operation - prior to later fitting the
pegs to the pegbox - will be to burnish the shanks - that is compress the cut fibres of the wood - to a more dense, polished surface.
|
|
|
jdowning
Oud Junkie
Posts: 3485
Registered: 8-2-2006
Location: Ontario, Canada
Member Is Offline
Mood: No Mood
|
|
Preliminary re- cutting the shanks of the pegs with the peg shaper is a fairly quick operation.
The shaper size used was not quite sufficient to remove all of the irregularities of the original pegs - there are still a few 'flat spots' remaining
on some of the pegs - but is close enough for this part of the operation.
The cutting operation revealed the wood from which the pegs are made - not the best quality unfortunately. Those pegs that I believe may be original
to the pegbox - pegs number 2, 3, 4, 5, 6, 9, 10, 11 - all seem to be made from a species of Beech wood, judging from the 'flecked' wood grain. (Peg
number 11 is made from a darker coloured wood, however). The sides of the peg box are made from two layers of wood - the outside being walnut and the
wood of the inside surface having a similar grain pattern to that of the pegs.
The other four pegs have a different style of peg head - Number 7 and 8 are made from a type of boxwood, and numbers 1 and 12 again from a kind of
Beech wood.
Beech wood is not a good wood for pegs - it is too soft and will wear quickly. True boxwood is good. Nevertheless, I shall continue with what I have
in the 'original' pegs.
Here is an image of some of the re-cut pegs.
The next stage will be to re-shape the peg heads to match.
Thank you for your interest everybody.
|
|
|
jdowning
Oud Junkie
Posts: 3485
Registered: 8-2-2006
Location: Ontario, Canada
Member Is Offline
Mood: No Mood
|
|
The reshaping of the 'mismatched' pegheads ( pegs #1 ,5, 7, 8 and 12) is in progress. The objective here is to reshape the peg heads from a convex
face to concave, matching - as closely as possible - the shape of the original (?) pegs - # 2, 3, 4, 6, 9 10, 11.
To produce the concave surface, I used a rubber drum sander 11/2 inches (38 mm) in diameter which matches the curvature of the original pegheads. The
sander was mounted in a drill press and each peghead held against the rotating sander, frequently checking progress of material removal to ensure that
everything remained square and symmetrical. The sander was also used to roughly round off the edges of each peghead prior to final shaping - which was
done with needle files and fine sandpaper.
Two pegs - # 7 and 8 - had a solid decorative collar below the peghead. These were grooved by hand to match the collars of the original pegs. This
operation was accomplished by holding each peg in a block of wood (drilled with a suitable sized hole and tapered with a peg reamer), using a fine
razor saw to produce a shallow cut which, in turn, helped to guide a knife edged 'needle' file to cut the groove. The peg was rotated in the holder
during the filing operation.
The attached images show the low cost drum sander used to shape the pegheads.
The bottom left image shows pegs # 1 and 5 after rough shaping. Note the flecked grain of the wood revealed by the drum sanding operation judged to be
Beech wood but may be another species - common to Middle Eastern countries - that I am unfamiliar with.
The bottom right image shows reshaped, and almost finished, peg # 7 against original peg #6 for comparison (these are the two smallest pegs in the
set. These seem to be made from a soft species of boxwood.
|
|
|
jdowning
Oud Junkie
Posts: 3485
Registered: 8-2-2006
Location: Ontario, Canada
Member Is Offline
Mood: No Mood
|
|
... note, for purposes of comparison - before and after - the image of the pegs posted previously on 14th Jan shows peg number 7 (first on left), peg
number 12 (fifth from left), peg number 1 (sixth from left) and peg number 8 (seventh from the left)
|
|
|
jdowning
Oud Junkie
Posts: 3485
Registered: 8-2-2006
Location: Ontario, Canada
Member Is Offline
Mood: No Mood
|
|
Before moving on to plug, re-drill and re-cut the peg holes it will be necessary to instal the new integral pegbox endblock in order to stabilise the
pegbox as a unit. The original mounting arrangement for the pegbox in the neck is represented in the top left hand sketch. Due to the amount of damage
and splitting of the original mounting block it has been decided to remove the block entirely and, alternatively, provide an end block integral with
the pegbox - as shown in the top right hand sketch. This - as Richard pointed out earlier in this thread - provides a stronger and easier to
instal/maintain arrangement. It also allows me to undertake the peg installation work with the pegbox detached from the neck - for convenience. The
original mounting block is less than 3/16 inch deep and is tapered - to provide a snug glue joint in the original assembly.
The inner cheeks of the pegbox were cleaned up to remove old wood rasp marks and old glue. Seatings for the new end block were then prepared by filing
(bottom left image). The new end block is made from sitka spruce (to match the softwood material of the original mounting block) - with grain cut on
the quarter - and is made 1/4 inch thick for added strength. The bottom right hand image shows the end block blank in place before, gluing and
trimming to size. (the untrimmed blank is made much longer than required in order to provide sufficient length required to facilitate accurate hand
planing and fitting of the tapered end block to the pegbox).
Part of the split pegbox backplate were cut away to provide clear access for the above operations. The split section of the backplate will eventually
be completely cut away and replaced with sound material - preserving as much of the original mahogany backplate as possible. As it will be impossible
to exactly match the grain of the original backplate, I plan to later splice in a new section of contrasting walnut wood.
|
|
|
jdowning
Oud Junkie
Posts: 3485
Registered: 8-2-2006
Location: Ontario, Canada
Member Is Offline
Mood: No Mood
|
|
One problem with living in Northern climates is that the relative humidity of the air can drop to quite low levels in winter - becoming as dry as the
Sahara Desert inside heated buildings.
I planned to glue the pegbox end block in my kitchen two days ago, this being the warmest room in the house which is heated with a woodstove.
Unfortunately, I left the peg box in the kitchen overnight when the temperature outside dropped to minus 25 Centigrade. Under these conditions, the
relative humidity in the kitchen dropped into the low 40's per cent and a split in the pegbox backplate appeared. This was probably just a hairline
crack opening up in the section of the backplate that I intended to cut out and replace anyway. There are repaired splits in the backplate visible on
either side of this crack - damage caused by the pegbox being subject to considerable backwards force some time in the past.
I have decided, therefore, not to cut out this damaged section of the backplate and splice in a new section but to completely replace the backplate.
The original backplate is mahogany but I do not have any true mahogany in my stock of woods but I do have quite a lot of walnut that is at least 100
years old so will make the new backplate from this material instead (the bowl of the oud is made from mahogany and walnut so this material
substitution is acceptable).
Just for information - I also occasionally restore and repair
19th C keyboard instruments so have quite a collection of parts and casings collected from instruments that are otherwise beyond repair (I never throw
out any wood until it has reached the stage of being good only for lighting the woodstove - nothing is wasted!). Most of these instruments have been
made from walnut which is a very useful source for repair work.
The attached images show the cracked backplate and the walnut backplate blanks that I have cut on a bandsaw. These will be allowed to dry out in the
house for a few days before use.
|
|
|
jdowning
Oud Junkie
Posts: 3485
Registered: 8-2-2006
Location: Ontario, Canada
Member Is Offline
Mood: No Mood
|
|
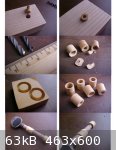
....... in the meantime I have prepared the plugs required for plugging , redrilling and reaming of new peg holes in the pegbox. The plugs are made
from old boxwood that I purchase for lute peg making over 30 years ago - a stock of spindle turning blanks that had been stored in a warehouse for
many decades before then - so should be well seasoned by now! Boxwood is hard and fine grained so should wear well in this application.
I have cut the plugs using a 3/8 inch tapered plug cutter manufactured and sold by Lee Valley (cat# 05J05.02 "Snug-Plug" cutter). The taper of the
plugs happens to match the taper of the standard violin peg reamer that I use and also matches the diameter of the reamer. I shall be using the peg
reamer to cut the holes for the plugs.
When cutting the plugs from the boxwood blank the operation must be done in a drill press, at low speed with the blank firmly clamped to the drill
table. The cutter is set so that it does not quite cut through the blank. The plugs are then freed from the blank by sawing away the remaining
material, at the back of the blank, in a band saw. Otherwise, if the plug cutter is allowed to cut right through the plank each plug then will jam in
the cutter and must be individually driven out by hand.
The advantage of using a plug cutter is that the wood grain of the plug can be made to align with the grain of the sides of the pegbox. The plug
diameters are all of equal size and a little larger than the peg shanks, so will become a decorative feature of the pegbox once complete.
|
|
|
jdowning
Oud Junkie
Posts: 3485
Registered: 8-2-2006
Location: Ontario, Canada
Member Is Offline
Mood: No Mood
|
|
My intent is to pre-drill the plugs before gluing them into place in the pegbox and reaming to size. This will avoid having to re-drill the pegbox and
will ensure the original alignment of the pegs is maintained. In fact these will be more like peg bushings rather than pegbox plugs. As I have not
tried to make and instal peg bushings before I decided to run some tests on the boxwood plugs already cut (i.e. on the side grain).
A plug holder was made by drilling a vertical hole through a block of wood in a drill press and then reaming the hole to the correct size and taper
with a peg reamer. Each plug to be drilled was simply pressed into the holder and the centre of the plug marked by eye. A pilot hole was then drilled
through the centre of the plug using a standard 3/16 inch diameter brad point wood drill. Each drilled plug was then knocked out of the holder with a
piece of wooden dowel.
The side grain plugs were found on test to be unsatisfactory as they all partially fragmented as the drill broke through the plug.
|
|
|
jdowning
Oud Junkie
Posts: 3485
Registered: 8-2-2006
Location: Ontario, Canada
Member Is Offline
Mood: No Mood
|
|
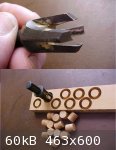
As plugs cut on the side grain will not work I then tested some plugs cut on the end grain. Slabs 1/2 inch thick were cut from the end of a block of
boxwood and plugs were cut in a drill press - as before - using the tapered plug cutter. For safety each block (measuring about 1 1/2 inches square)
was held securely during the cutting operation with 'vicegrip' locking pliers. Each plug was mounted in the plug holder, the centre marked by eye and
then drilled through with a 3/16 inch brad point drill. This time there was no fragmenting of the plugs and I was able to increase the diameter of the
pilot hole using standard metal cutting drill bits without problem. I then tried reaming out the drilled plugs (let's now call them bushings) to size
with each bushing held in the plug holder. This operation was successful and I was able to reduce the bushing wall thickness to under 1/32 inch or 0.8
mm without the bushings breaking in the process. Some of the test bushings were found to be bored a little off centre but this is minor fault that can
be improved with practice when making a batch of bushings. In practice, the bushings - bored to the minimum diameter of the peg reamer - will be glued
in place in the peg box before finally being reamed to size with the peg reamer.
The bottom images show the reamed test bushings in place on an unfinished peg - just for demonstration.
|
|
|
| Pages:
1
2 |


