jdowning
Oud Junkie

Posts: 3485
Registered: 8-2-2006
Location: Ontario, Canada
Member Is Offline
Mood: No Mood
|
|
Build an 'Authentic' Oud Case
Under the recent topic "18th C Egyptian Oud" in the forum 'Ouds, Ouds, Ouds' I posted images of an oud recorded during the
18th C by Napoleon's expedition to Egypt. Of particular interest is the engraving of the case of the oud which appears to be constructed in a similar
fashion to those of lute cases of the
16th C and 17th C in Europe. Surviving instrument cases from earlier times are a rarity so I thought that it would be of interest for me to explore
this subject matter further and then to describe how I have constructed custom fitted lute cases in the past which, in turn, may encourage oudists -
who have some basic woodworking skills - to make their own 'authentic', historically accurate style of case.
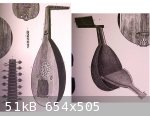
The attached images show the engraving of the 18th C oud case together with two lute cases depicted in paintings of the 16th C. The only significant
difference is that the oud case is shown to have a hinged lid at the pegbox end of the case. This feature constitutes a potential weakness in the case
design and is an unnecessary complication as it is an easy matter to provide sufficient clearance for the pegbox. Note that all of the cases are of
built up construction - in the form of the instrument they are designed to protect - and have top opening lids, hinged at the maximum width of the
case, and that the edges of the lids are rebated to provide rigidity and seal the case when closed.
|
|
|
jdowning
Oud Junkie
Posts: 3485
Registered: 8-2-2006
Location: Ontario, Canada
Member Is Offline
Mood: No Mood
|
|
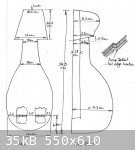
...... and here is a rough dimensioned sketch that I made some years ago of the surviving case for the little 18th C lute or mandola that I included
also as part of the topic "18th C Egyptian Oud". This is of interest in showing a bit more detail of authentic case construction.
The case is built up from thin wooden staves - like an oud or lute.The case is covered with black leather with decorative tooling around the edge of
the lid and with linen reinforcement visible below the leather. There are two silver strapwork hinges, with embossed decoration, held in place with
six silver nails. There is an iron hook at the pegbox end of the case with silver scutchion plate to fasten the lid in the closed position. The
interior of the case has an orange/red plush lining.
|
|
|
jdowning
Oud Junkie
Posts: 3485
Registered: 8-2-2006
Location: Ontario, Canada
Member Is Offline
Mood: No Mood
|
|
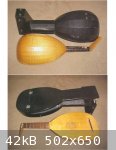
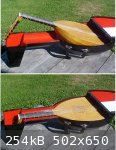
Moving on to details of how to construct a case I shall be using the case shown in the attached image as an example to illustrate the method used
which, of course, applies equally to fabrication of an oud case as it does for a lute case.
This case was built to accommodate the lute shown alongside. The lute (a copy of a surviving 16th C instrument) is currently down for maintenance so
is stripped of pegs, frets and nut in preparation for replacing the fingerboard in order to lower string action. At the same time I shall be relining
the case because the urethane open cell foam sheet that I originally used to line the interior of the case is deteriorating badly - turning to a soft,
sticky 'putty like' consistency in places. I used the foam because I was in a hurry to use the case and did not want to spend the extra time to instal
a proper cloth lining. Never use unprotected plastic foam to line an instrument case - it may not last and could cause damage to the instrument if it
sticks to the varnish. Use plush velvet cloth with a thin felt backing instead. Stripping off the deteriorated foam for this repair will give me the
opportunity to show more detail of the construction for information.
|
|
|
jdowning
Oud Junkie
Posts: 3485
Registered: 8-2-2006
Location: Ontario, Canada
Member Is Offline
Mood: No Mood
|
|
While I have made lute cases from fibreglass in the past, the work involved in making the molds etc lends this type of case more for commercial
manufacture rather than custom building. Besides, I do not like working with fibreglass and the finished cases, while being very strong are also quite
heavy.
The alternative 'low tech' solution to build cases in traditional materials is more suited to those wanting to build a custom fitted case for a 'once
off' instrument.
The case that I am using, as an example of the method and construction, was built using cheap Meranti plywood 4 mm thick. I used plywood for
convenience (I needed to build the case at the time as quickly as possible) and to test how plywood would bend with heat. Any other type of 3 ply
plywood should also work or alternatively use solid wood panels cut and planed to about 1/8 inch thickness.
The case is constructed in an inverted position using much the same technique as for making the bowl of an oud or lute i.e. by heat forming, shaping
and gluing ribs together. The entire case is made up of three basic sections - the 'bowl', 'neck' and 'box' (for the pegbox) - the whole assembled
together on a baseboard. The glue used throughout may be wood workers glue for convenience.
For simplicity, the bowl is made half round in section so that all of the ribs can be made the same width - with the exception of the two outer ribs
that must be made wider by the depth of the lid - i.e. by an extra inch or so. This extra material for the lid depth must also be added to the neck
section and box as the lid joint is cut after final assembly of the case to ensure a perfect match for the lid to the body. The whole of the case
must, of course be made somewhat larger than the oud to allow for the thickness of the soft case lining and provide sufficient clearance so that the
oud can be comfortably removed from the case. The dimensions of the case are best worked out using paper and pencil and drawing full size. It is best
to be a bit generous with the finished dimensions as there is nothing more frustrating than to build a case and then find that it is just a bit too
small for the instrument to fit - believe me, I have done it!
The number of ribs used for the body can be kept to a minimum for simplicity - seven in number is probably the minimum but more can be used if
preferred.
The rib pattern can be established by cutting two plywood half sections of the case body profile then joining these together into a 'V' using wooden
blocks cut to angle a in the attached sketches. The rib profile is then traced on a flat piece of card - marked with a centreline for reference - as
the 'V' assembly is carefully rolled over the card from tip to tail. The final pattern will be a close approximation to the rib dimension required -
the final fit being achieved after bending and planing each rib to size.
The first step is to build the tapered 'box' from plywood around a pine bottom block using glued but joints for the sides and with a semicircular cut
out on the 'neck' side to match the cavity in the 'neck' section. The 'box' is then inverted and secured to the base board in such a way that it can
be freed later (temporary blocks held by screws from underneath the base board). Two half round thick plywood rings of correct dimension for the
'neck' are then cut with flats to accommodate the strips making up the neck section. One of these is glued to the 'box' for support and the other
temporarily secured to the base board with a block and screws - as for the 'box'. The strips of the 'neck' section are the individually cut and planed
to fit - being glued along their edges and to the 'neck' support rings which become part of the case structure.
The bowl of the case is built separately from the neck/box assembly and they are joined together afterwards. The mold for the bowl is made in the form
of a typical oud or lute 'toast rack' mold with fixed bulkheads of correct profile to guide correct fitting of the ribs (I show just a single bulkhead
(B)in the attached sketch - more are preferable). The neck end of the body is glued to a half round ring of plywood (C) in the same way as the neck
section. The ribs at the bottom end of the case are temporarily nailed to the support block (A) at that location as assembly proceeds. (remember to
leave sufficient of each nail head protruding so that the completed body can later be removed from the mold!). The nail holes will be later covered
with a capping strip glued to the outside of the completed bowl for additional reinforcement and strength. The ribs are cut from plywood with
direction of grain of the outer veneers running across the width of each rib i.e. with the grain of the core of the plywood running along the length
of the rib. Each rib is then bent to the correct curvature of the mold by wetting the inside face and bending over a heated bending iron. My bending
iron is a heavy duty affair made from thick wall brass tube heated inside with a propane torch so I am able to raise the temperature sufficient just
to scorch the inside face of the rib. This way the ribs can be bent without a problem and the plywood laminations will remain intact. The edges of the
formed ribs are then planed to the correct angle on an inverted jointer plane in the usual manner. The process is most likely already described in
some detail by Jameel, the Doc and others in their excellent tutorials posted on this Forum so I will not go into any further detail here. After the
bowl is glued to the neck/box assembly, the completed assembly is removed from the base board and cloth strips glued to all of the interior joints for
reinforcement.
The attached sketches should make things a bit clearer - apologies for my poor draughtsmanship.
Good time to take a break before moving on further.

|
|
|
Jameel
Oud Junkie
Posts: 1672
Registered: 12-5-2002
Member Is Offline
Mood: No Mood
|
|
You're too kind j. This is a very interesting topic. Too many things to make, and not enough time to make them!
|
|
|
jdowning
Oud Junkie
Posts: 3485
Registered: 8-2-2006
Location: Ontario, Canada
Member Is Offline
Mood: No Mood
|
|
Tell me about it Jameel. My wife is still wondering when I am going to complete the promised rebuilding of the cellar door of our house after five
years of having a temporary curtain draped over the frame! Other matters do tend to get in the way! Once I get started it will only take a couple of
days from start to finish - but I need to think about and plan these things carefully!! In the meantime - among other things - I have an oud to
restore that I intend to use later this year as part of a lute lecture/recital for a local museum. Never a dull moment!
Regards
John
|
|
|
jdowning
Oud Junkie
Posts: 3485
Registered: 8-2-2006
Location: Ontario, Canada
Member Is Offline
Mood: No Mood
|
|
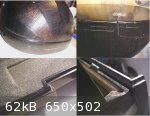
With the assembled bowl, neck and box removed from the mold, the end clasp is cut to size from plywood - again with the grain of the outer veneers
running across the width of the clasp - and the edges tapered to a sharp edge. The clasp is then hot bent to fit the contour of the bottom of the bowl
and glued in place. The top left hand image shows the end clasp in place. It is not necessary for the end clasp to extend all the way to the widest
point of the bowl - this is a lute feature but one that does also add significant strength to the case. A more oud like end clasp in the form of a
semicircular disc might be used as an alternative.
The whole of the top edge of the case is now made flat and level with a hand plane and finished on a sanding block (made by gluing sandpaper or garnet
paper onto a flat sheet of particle board). The hinge joint for the lid of the case is located at the widest point of the bowl. Before proceeding
further the two vertical joint on both sides of the hinge line must be cut with a handsaw down as far as the cut line for the lid. This cut can be cut
straight down or at an angle as shown in the top right hand image. The top of the case is then cut from two pieces of plywood that butt together
forming the hinge joint of the lid. The grain of the outer veneers of the plywood runs across the width of the case. Trace around the inverted case to
obtain the correct profile and cut the two components of the top slightly oversize so that they can then be trimmed exactly to the case profile later.
Glue the two pieces of the top to the open joint of the case (leaving the hinge joint unglued!) and clamp in place using strips of masking tape until
the glue sets. At this point the case will be totally enclosed.
Trim the edges of the top to match the case profile and smooth the sharp edges of the top with sandpaper. When trimming plywood care must be taken to
avoid splintering or tearing out of the plywood veneers. Use razor sharp cutting tools for this operation.
To create the lid, carefully mark a line around the edge of the case - at the required depth of the lid and up to the lid hinge line - using a marking
gauge or compasses. Then using a hand saw carefully cut along the cut line to release the lid of the case. This procedure ensures that the lid is an
exact match to the body of the case. Smooth the sawn joint with sandpaper.
To ensure that the lid is properly held in place when in the closed position and that the joint is watertight, a 'rebate' must be fitted either around
the inside edge of the lid or alternatively around the inside edge of the body. (The latter seems to have been the preferred arrangement historically
judging from the early paintings of cases but, in this example, I chose to fit the 'rebate' to the lid to give the lid a bit of extra strength - see
the bottom left hand image). The 'rebate' is formed by a strip of plywood, glued in place - about an inch wide and projecting no more than about 1/4
inch above the joint line. The projecting edge should be smoothed and rounded slightly so that the lid will fully close without jamming. The 'rebate
also continues beneath the hinge joint of the lid as can be seen in the lower right hand image. It will be found necessary to trim back the outer
edges of the interior support rings of the case to provide clearance for the 'rebate' strip.
The completed case after sanding may be covered with leather or vinyl cloth or simply varnished or painted. I chose to varnish the case to save time
and keep down the overall weight (and cost!) to a minimum. I did not even bother to fill the wood grain prior to finishing as I reckon that instrument
cases should be utilitarian - designed to take all of the hard knocks and not made too fancy - but that is just my excuse!.
The hardware for the case - hinges, handle, locks, rubber feet etc. will need plywood reinforcement pads glued inside the case at locations where the
hardware components are to be screwed.
The case may be lined with velvet cloth and/or felt. (avoid good quality wool felt - if you can find it these days - as moths love to eat it!). The
cloth lining in the bowl will have to be glued in segments matching the rib profiles. This can be done by first mounting the cloth onto cardboard
backing cut to the correct profile required - the edges of the cloth being glued underneath each backing piece. Each segment may then be glued in
place inside the case to leave joints with a neat appearance.
That's it!
|
|
|
jdowning
Oud Junkie
Posts: 3485
Registered: 8-2-2006
Location: Ontario, Canada
Member Is Offline
Mood: No Mood
|
|
I recently completed repairs to the lute shown earlier in this thread (lowered string action by planing back the neck, fitting new ebony fingerboard
and bone nut and fitting graduated gut frets) so decided to refurbish the case also. This work has just been completed so am posting a few notes on
how I did the work together with a few images that may be of some interest to other would be case makers.
The old deteriorated foam lining was stripped out and replaced with a lining of thin synthetic felt - in eye catching 'Italian Renaissance' style. The
felt is low cost and can be obtained from craft suppliers or fabric stores in a wide range of colours.
To line the lid I made a close fitting three piece template of thin card. The felt was first glued directly to the card and then the templates were
glued into the lid. The glue that I used was white PVA bookbinders glue. This has a high initial 'tack', dries quickly and the dried glue is
transparent. Try not to use too much glue as this can soak through the thin felt causing 'dark' spots. Other fast drying fabric glues may also be
suitable for this work.
For the body of the case I first cut a card template of the interior rib profile - slightly oversize - so that the felt panels overlapped a bit. High
precision butt jointing is not required here as any slight discrepancies in the overlapped joints cannot be readily noticed - and it is only an
instrument case after all. To simplify lining the body a semicircular piece of felt - about 12 inches in diameter - was first glued into the end of
the case and the ends of the rib panels glued to that. The felt can easily be formed over curved surfaces. The white rib panels were first glued to
the body - the glue being applied directly to the body (using a long handled artists paint brush) covering only the edges of each panel. The red rib
panels had glue first applied along their edges before being fitted in place with edges slightly overlapping the white panels. The remainder of the
case interior was covered with felt panels glued in place - a card template of each panel being made first and the felt then cut to the shape of each
template.
The whole lining job took about half a day but went a lot easier than expected.

|
|
|
revaldo29
Oud Junkie
Posts: 418
Registered: 6-24-2004
Location: Atlanta, Georgia, USA
Member Is Offline
Mood: inspired
|
|
Very cool. What is the reasoning for the top opening along the horizontal axis of the oud? Doesn't this just require more clearing room to open the
case? It seems to make more sense to have it open along the vertical axis.
adnan
|
|
|
SamirCanada
Moderator
Posts: 3404
Registered: 6-4-2004
Member Is Offline
|
|
hey John very neat pictures!
and I can see you enjoyed that beautiful weekend weather.
cheers
|
|
|
jdowning
Oud Junkie
Posts: 3485
Registered: 8-2-2006
Location: Ontario, Canada
Member Is Offline
Mood: No Mood
|
|
All early paintings that I have seen that show lute/oud cases indicate that the cases were made with top opening - not with side opening as you often
find with modern case design. The top opening arrangement makes for a much stronger case - resistant to lateral crushing - and, therefore can be made
of lighter construction. The design does not really present any problem with the placing of the instrument in the case - it is just slid into the case
at a shallow angle and rotated into place, the back of the instrument being curved. Sufficient depth at the pegbox end of the case must be allowed
for the pegbox to just clear the edge of the case when the instrument is inserted or removed. The attached images show how it is done.
An even more compact arrangement is possible as shown in the engraving of the 18th C oud case where the pegbox end of the case is also provided with a
hinged lid. This complication, however, makes for a weaker case design and is not really necessary.
Top opening lid cases like this were also used for flat backed instruments such as guitars in the 19th C. Alternatively,guitar cases of the 17th C,
for example, were often made end opening - the instrument being slid into the case pegbox first. Again, this arrangement makes for a much stronger
case than one where the lid opens to one side.
Hi Samir - well we needed a sunny spell after all of that rain at the end of last week. Good for the U20 soccer final as well.
Now I guess we will have the usual high Summer humidity to look forward to - bad news for instrument playing.
|
|
|
Jameel
Oud Junkie
Posts: 1672
Registered: 12-5-2002
Member Is Offline
Mood: No Mood
|
|
Very nice John. As I said before, another project.....(sigh...)
|
|
|
jdowning
Oud Junkie
Posts: 3485
Registered: 8-2-2006
Location: Ontario, Canada
Member Is Offline
Mood: No Mood
|
|
Thanks for your comments and interest everyone.
|
|
|
Lintfree
Oud Junkie
Posts: 171
Registered: 2-9-2007
Member Is Offline
Mood: No Mood
|
|
Very cool.
Now that's a good thing. Looks strong too. Good work.
|
|
|
jdowning
Oud Junkie
Posts: 3485
Registered: 8-2-2006
Location: Ontario, Canada
Member Is Offline
Mood: No Mood
|
|
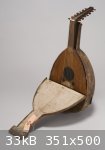
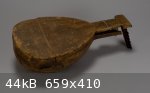
In the course of some recent work analysing the geometry of the old (late 18th C ?) 7 course oud #0164 in the Brussels Musical Instrument Museum,
Curator Saskia Willaert kindly sent me the attached images of the oud's original, leather covered protective case that survives intact apart from the
missing pegbox enclosure. Surviving instrument cases are quite rare and in any event are usually never are put on display in museums so this is
valuable information for those luthiers interested in making historical replicas.
Oud #0164 and its case are very similar in appearance and proportion to the oud and case engraving in Napoleon's "Description de l'Egypte' giving rise
to speculation that the Brussels oud may have been the original model for the engravings.
The case shown in the engraving (see the initial posting on this thread) has an 'unusual' feature (compared to old lute cases) in that the peg box
enclosure has a hinged lid that allows the case to be made more compact. This feature, however, introduces a structural weakness which may be the
reason why this part is now missing from the surviving case.
|
|
|
jeffsoud
Oud Admirer
Posts: 7
Registered: 1-7-2021
Member Is Offline
|
|
OUD Case
Wow, very nice thread,....anyone making other interesting cases?
|
|
|


