| Pages:
1
2
3
4
5
..
8 |
jdowning
Oud Junkie

Posts: 3485
Registered: 8-2-2006
Location: Ontario, Canada
Member Is Offline
Mood: No Mood
|
|
A solid mold might be better and likely easier to make with greater precision than the 'toast rack' or 'bulk head' alternative. This would be made by
gluing together slabs of pine or limewood (say an inch thick) each cut to the exact section profile and then carving away and blending in the 'steps'
to finish the mould. A solid mold would also facilitate more accurate fitting of the ribs given such a complex bowl shape.
The only case of an integral neck and neck block that I have encountered is in guitars built in the Spanish style which has many constructional
advantages for the luthier but is unlikely to prevent a neck being pulled up over time due to string tension.
In the case of the oud some kind of extended neck would be necessary to provide a solid foundation for the rib ends along the edge of the fingerboard.
This arrangement would likely be much more resistant to pulling up of the neck over time compared to a conventional oud neck block. However, carving
such a neck/neck block(s) from a solid piece would have no advantage over one built up from blocks glued together.
From a practical instrument making point of view it might be better to eliminate the undercutting created by the curvature of the ribs as they meet
the underside of the fingerboard (this is the cut away or hollowing out that I was referring to earlier - not the cut away design of the bowl). This
would require only a slight change to the theoretical profile along the edge of the fingerboard and might simplify construction somewhat.
|
|
|
oudipoet
Oud Junkie
Posts: 190
Registered: 1-3-2006
Location: los angeles
Member Is Offline
Mood: No Mood
|
|
hi everybody
i have to say i really like the design but i know that as a fact even the cutaway guitars are not desirable for pro guitar players cos of losing so
much sound on cutaways so bye designing an oud like that i think we would lose a lot of volume and sound ofcourse that s my oppinion i might be wrong
too.
|
|
|
jdowning
Oud Junkie
Posts: 3485
Registered: 8-2-2006
Location: Ontario, Canada
Member Is Offline
Mood: No Mood
|
|
I have no experience or information about guitars or other instruments that have bodies with a 'cut away' design. It would be interesting to know how
existing instruments of this profile are barred. Is the barring assymetric? Are the soundboards arched or carved (like a violin)?
ALAMI, can your analysis give a possible optimum theoretical barring arrangement for this particular geometry - maybe with complex curved bars with a
radial placement as a starting point? The design seems to beg for an assymetric barring geometry - but where to begin?
|
|
|
ALAMI
Oud Junkie
Posts: 643
Registered: 12-14-2006
Location: Beirut
Member Is Offline
Mood: No Mood
|
|
When designing something without having a practical experience in the real life making, it is easy to misjudge the priorities. I've always thought
that it is important for the luthier to be able to reach the inner side of the rib he's working on, all the mold I've seen were hollowed, now I am
learning that it is possible to work on a solid mold and it is a great news, solid mold is easier to do. I know that usually people start bt fitting
the middle axis rib, for this model I think that it should start from the lower one (the shortest rib)
Thinking from a structural point of view I was working on an unusual neck block but I was afraid that a luthier would laugh at me when seeing it, and
that's exactly what jdowning is suggesting (see picture), another great news. It is great to have comments and suggestions from the experienced guys,
thanks a lot.
Now for the bracing: I agree that to keep a consistent logic, the barring should be asymmetric. The base idea is to take the upper half of the face
(the bigger one) and start by considering it as a normal symmetric big soundboard, then put the plan for the ideal straight bracing for this kind of
normal face (and I am not sure how it should be).
The second step is to apply to those braces the same progressive and continuous asymmetry factor used for the bowl and the face, they will become
curved (probably an arc of spiral), the distance on the lower part will shrink.
Step three is to keep only those needed for the integrity of the structure, taking into consideration the solid neckblock.
My problem with this method is that I am not sure of the initial configuration (braces for the normal face) it is the most well kept secret and nobody
wants really to talk when it comes to bracing. I found only very few detailed infos on this subject.
|
|
|
Peyman
Oud Junkie
Posts: 496
Registered: 7-22-2005
Member Is Offline
Mood: Mahoor
|
|
You come up with cool graphics Alami.
As far as the construction goes, I was also thinking starting from the sides is the best option. The persian setar is always built from the side ribs,
then at the end, the last ribe is fitted by taking a piece of paper, putting it on the gap and making indentations, to get the shape of the rib. Then
the rib is cut and sanded to fit.
I don't know much about bracing but a good approach is to divide the face into 7 or 8 parts... Lutes have different bracing patterns. They usually
have bass/treble braces and have thinner soundboards. I remember reading about Arafati (Iranian oudmaker, Dr. Oud vistied him) and he mentioned that
his ouds have 5 "complete" braces and 6-8 "incomplete" ones. Unfortunately, there were no pictures in the article but I am guessing the complete ones
touch run accross the face and the incomplete ones don't. He also said he could control bass/trebel response.
Some cool cutaway guitars I have seen had synthetic material on the cut away, obviously for strengthening reasons.
|
|
|
jdowning
Oud Junkie
Posts: 3485
Registered: 8-2-2006
Location: Ontario, Canada
Member Is Offline
Mood: No Mood
|
|
The design of extended block could be made from a light wood any surplus material trimmed away to keep the weight down. The neck could be fitted with
a spline for gluing to the neck block.
The most basic barring arrangement for symmetrical instruments such as guitars, ouds, lutes etc would normally be a single full bar located just above
and just below the rose running across the belly and with the bar ends glued to the side ribs.Bars across the area above the rose may not be required
with the extended design of neck block? The bridge seems to be quite close to the rose and offset to the bass side so with this relatively 'tight'
arrangement maybe only two bars are required - at least as a starting point - with the belly made a bit thicker than usual? Fan bracing and a thinner
belly might also be another possibility - as already suggested?
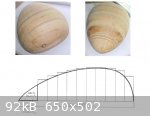
Here is how I made a solid mold for a lute. The geometry of the bowl is symmetrical but is of flattened cross section rather than semicircular. The
end block is shown in position and shaped to the exact profile required after screwing in place on the mold The ribs, therefore, are not all of equal
size and geometry (as they would be if the cross section was semicircular) so require some judgement to fit as work progresses. Also - because of the
flattened section - the ribs cannot be made to meet at the end of the bowl but 'run off' the bottom edge.
Not sure how rib fitting would work out for this oud but it will certainly be more complex requiring twisting as well as bending of the ribs. Computer
generated profiles would be of some help in visualising the approximate shape required for each rib. A greater number of ribs than shown in the
graphical representation might be required in order to match the mold profile as closely as possible. Also a dark wood fillet between each rib might
help to disguise any inevitable slight discrepancies in the jointing of the ribs.
The advantage of starting with the central rib on a symmetrical instrument is that small adjustments can be made to the rib widths as construction
proceeds in order to maintain visual symmetry of the bowl. This would be much more difficult to judge if working from one edge due to the
accumulation of errors but in the case of the asymmetrical oud - where there does not seem to be a central rib - perhaps this method would be feasible
also.
Impressive graphics ALAMI and a potentially challenging but interesting project.
|
|
|
excentrik
Oud Junkie
Posts: 291
Registered: 5-19-2004
Location: Refugee Status...
Member Is Offline
Mood: Now Here, Nowhere...
|
|
wow. again- you've truly impressed the eyes of this entire forum- habibi!
I want one by the way- send it to multiple makers for a competition- best one wins the rights to the design... haha- haha-
tarik
|
|
|
ALAMI
Oud Junkie
Posts: 643
Registered: 12-14-2006
Location: Beirut
Member Is Offline
Mood: No Mood
|
|
Many thanks for the suggestions guys, really helpful.
Tarik, shukran habibi for your nice words, I hope to be able to announce a great news very soon, From a sentimental point of view I am trying to make
this oud in Lebanon from concept design to the real finished oud, it has nothing to do with any patriotic #!^, it is only that we've been "exporting"
so many bad news in the last years that a tiny good one would be a nice change, the kind of "resistance" zalzal wrote very nicely about once.
Now just a funny story about the project: Today I've met the face of horror and you can imagine my face when I suddenly discovered that in my solid
mold-neckblock design:
THE FINISHED BOWL CANNOT BE TAKEN OUT FROM THE MOLD !!  ))) )))
They would be stuck together and it is so obvious that we all missed it.
Probably it would have been the biggest and most ridiculous error in the history of oud making (not exactly what I am hoping)
OK it is fixed now and I hope that I will not get this kind of surprises in the end
|
|
|
jdowning
Oud Junkie
Posts: 3485
Registered: 8-2-2006
Location: Ontario, Canada
Member Is Offline
Mood: No Mood
|
|
Hi ALAMI - I don't see why the neck block - as represented by your previous graphics - would be a problem as there are no re-entrant curves to cause
any difficulties. The interior sides of the neck block are all vertical so that when the neck block is unscrewed from the mold the bowl may then be
lifted out (complete with neck block in place, of course). It is essentially no different from a 'standard' solid mold in this respect despite its
complexity.
|
|
|
Jameel
Oud Junkie
Posts: 1672
Registered: 12-5-2002
Member Is Offline
Mood: No Mood
|
|
| Quote: | Originally posted by ALAMI
Many thanks for the suggestions guys, really helpful.
Tarik, shukran habibi for your nice words, I hope to be able to announce a great news very soon, From a sentimental point of view I am trying to make
this oud in Lebanon from concept design to the real finished oud, it has nothing to do with any patriotic #!^, it is only that we've been "exporting"
so many bad news in the last years that a tiny good one would be a nice change, the kind of "resistance" zalzal wrote very nicely about once.
Now just a funny story about the project: Today I've met the face of horror and you can imagine my face when I suddenly discovered that in my solid
mold-neckblock design:
THE FINISHED BOWL CANNOT BE TAKEN OUT FROM THE MOLD !! )))
They would be stuck together and it is so obvious that we all missed it.
Probably it would have been the biggest and most ridiculous error in the history of oud making (not exactly what I am hoping)
OK it is fixed now and I hope that I will not get this kind of surprises in the end |
Just make the mould in 2 separate piece that bolt together with a removable shim between. When the bowl is finished, remove the bolts, slip out the
shim (maybe 2cm thick or so) and pull out the mould pieces. I did this on my latest mould, since it returns past 90 degrees. The shim is behind the
neck end block and works very well. In this pic you can see the gap where the shim/neck block support gets bolted.
|
|
|
ALAMI
Oud Junkie
Posts: 643
Registered: 12-14-2006
Location: Beirut
Member Is Offline
Mood: No Mood
|
|
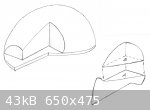
Jdowning you're absolutely right but one thing is missing :that the mould blocks overlap OVER the neckblock, they are not cut like the neckblck on
the vertical, and once the ribs glued on the neck...this will make it the strongest oud ever.
As Jameel is suggesting, I think that the solution is to cut the mold in 2 pieces (btw Jameel, your mould is as beautiful and well finished as an
oud)
I am thinking of making the bowl in 2 separate pieces (Lower pic)
Once the base holding them togreher is unscrewed, the blue part can be removed like from a normal oud bowl making room to the yellow part to be pushed
to the wide area and then removed and leaving the neck and tail blocks in their place.
I am not sure if the wood will agree to play the puzzle role, or may be a break is due.
|
|
|
jdowning
Oud Junkie
Posts: 3485
Registered: 8-2-2006
Location: Ontario, Canada
Member Is Offline
Mood: No Mood
|
|
Yes, you are right - I can better visualise the problem now with your latest graphics ALAMI.
Another solution - if I am thinking straight - might be just to extend the height of the neck block with a loose dummy piece carved to the correct
profile - temporarily screwed to the neck block to provide support for the ribs in that area but which could be released after the bowl had been
lifted from the mold?
|
|
|
Ararat66
Oud Junkie
Posts: 1025
Registered: 11-14-2005
Location: Portsmouth, UK
Member Is Offline
Mood: mellow yellow
|
|
two sections
Hi Alami
I used to make molds in a bronze casting foundry years ago making sulpures and artworks. We had to deal with undercuts all the time. Simply make
your mold in two parts, one attached to the other. The first part will be the undercut area, the second part the main 'open' area. One attaches to
the ther with screws, to take out simply unscrew, lift out the main open section, then the smaller section in the undercut will easily slide out. If
there is a problem because the depth of the undercut section cannot be removed, then make this in two parts with a lateral cut so one can be removed
then the other.
Hope this makes sense - if you like I'll post a diagram later.
Best wishes
Leon
|
|
|
jdowning
Oud Junkie
Posts: 3485
Registered: 8-2-2006
Location: Ontario, Canada
Member Is Offline
Mood: No Mood
|
|
This is a rough sketch of the solution I had in mind. The mold would first be made completely solid, built up from slabs of the correct cross section,
and then carved and finished to the required 3D profile.
The section to be occupied by the extended neck block would then be cut out on a band saw and the mold mounted on its baseplate. The upper part of the
piece removed would then be cut horizontally on the band saw to create filler piece B. Some shimming would be required to compensate for loss of
material in the saw cuts. This piece would be temporarily mounted on top of the blank for neck block A (by means of screws from underneath so that
they can be removed after the bowl is completed - in order to release and remove block B). The neck block blank would then be carved and finished to
blend into the mold contours. The ribs, of course, would only be glued to the neck block. If there is a slight overhang remaining along the neck block
edge of the mould the completed bowl could still be removed by lifting and rotating it slightly.
This solution (if viable!) might be a bit simpler and easier to make than the split in half mold alternative? Either way, a cut out in the mold for
the extended neck block must somehow be provided.
|
|
|
ALAMI
Oud Junkie
Posts: 643
Registered: 12-14-2006
Location: Beirut
Member Is Offline
Mood: No Mood
|
|
What a great brainstorming, thanks guys.
The solution is now clearly a solid mold cut in blocks.
John you're right that cutting along the length is not practical nor elegant, I think we have it, like in your sketch but with 3 parts for the molds
instead of 2 and for two resons: first the area just behind the extended neckblock might be risky the second one is the weight of the big block which
would make very difficult to handle, btw any recommendation for the mold wood ?
Jameel, what's the wood of your mold?
After yesterday's panic I decided to foolproof the procedure (the fool being me and the virtual world in which this oud is still stuck)
So i ran a previsualisation animation for the mold assembly then for how to take the mold out of the bowl, the animation revealed the risky area
behind the neck block.
Please give a look to the movie and let me know what you think
(mpeg4 video - opens with Quicktime player)
|
|
|
Microber
Oud Junkie
Posts: 853
Registered: 1-20-2006
Location: Belgium - Liège
Member Is Offline
Mood: No Mood
|
|
Dear Alami, jdowning, Ararat66, Jameel and the others,
Thank you very much for this thread.
It's a real thriller for me.
And your final movie, Alami, it's "2007 A Special Oudissey" !!!

|
|
|
jdowning
Oud Junkie
Posts: 3485
Registered: 8-2-2006
Location: Ontario, Canada
Member Is Offline
Mood: No Mood
|
|
Nice animation ALAMI that is very helpful in visualising the concept - not always obvious! Not foolish either!!
I still wonder if it is really necessary to divide the mold into an extra third part (with all of the potential attendant problems of precise
registration and alignment of the two parts of the main mold). The small overhang area just behind the extended neckblock might not be an obstacle if
the completed bowl is rotated as it is lifted and removed from the mold? If the slight amount of overhang is a problem then modifying the geometry in
that locality to eliminate the overhang might be another way to go? Not theoretically perfect but close enough for all practical purposes?
You show an end block in your virtual image. This additional complication can be practically eliminated - replaced by a lute like end plate ( or oud
like end plate in the oud that I am currently restoring!) fitted in place after the bowl is removed from the mold.
Very interesting and challenging project.
|
|
|
ALAMI
Oud Junkie
Posts: 643
Registered: 12-14-2006
Location: Beirut
Member Is Offline
Mood: No Mood
|
|
From Virtual to Real: first step
The oud is most probably going to be constructed by Nazih Ghadban. Nazih loves the design and believes that it is going to be a great oud.
We still have to solve his busy schedule and the fact that he is a 100km far from Beirut, and I really would like to be around as often as
possible.
The mold is my part of the work.
This weekend I started working on the mold.
The pieces were cut on a router, it took 2 weeks instead of the 2 days promised and 15 pieces are still missing.
I've never worked wood before, In fact all the work I've done in my life ends in digital form, nothing to touch or smell or makes every muscle in your
body complain (which is the case this evening). So I reviewed some old threads and talked to a carpenter I know and got myself a set of
Made-in-China-tools (at the actual rate of the euro, it was an obvious decision for what could be a one shot): a chisels set, some clamps, some sews,
sanding paper, rulers, some other stuff and a noisy monster called electric die grinder with all kind and shapes of stones.
The main mold pieces were cut staight on a router from 10mm thick mdf (50 pieces), I use the grinder to taper them to the correct profile for each
piece, my reference is real size ploted drawings.(is tapering the right word ?)
I cut also 21 pieces of wood modeled to the profile of the mid axis of every rib, I call them "Initial pre-benders", they will help to bend seperately
each rib to the correct shape along his longitudinal axis, the main mold will guide the transversal rotation bending of the ribs, I thought it would
make the work easier to have the rib already pre-bent before they go to the main mold. But what I don't know is that if it is OK from "wood point of
view" to have the wood going throudh 2 cycles of water-heat bending.
I am really excited that the oud is finally going out of the computer, a nice sensation.
|
|
|
Jameel
Oud Junkie
Posts: 1672
Registered: 12-5-2002
Member Is Offline
Mood: No Mood
|
|
I'm really looking forward to seeing this take shape. What a challenging project!
|
|
|
Ararat66
Oud Junkie
Posts: 1025
Registered: 11-14-2005
Location: Portsmouth, UK
Member Is Offline
Mood: mellow yellow
|
|
This is great stuff Alami - now you have a master luthier to realise this it is so exciting.
Brilliant
Leon
|
|
|
jdowning
Oud Junkie
Posts: 3485
Registered: 8-2-2006
Location: Ontario, Canada
Member Is Offline
Mood: No Mood
|
|
Bravo ALAMI - and welcome to the wonderful world of wood! The accurate shaping of the mold will not be a quick and easy task so take it slowly.
The question of pre- bending the ribs, and the method used is one that should be determined with the luthier who will be making the oud. The computer
generated rib profiles will, no doubt, be of assistance to the maker but - at the end of the day - each rib will have to be hand fitted to its
neighbour which will be no simple task as some of the ribs (on the treble side) will be twisted, as well as bent to a curve, and the rib joints
consequently will vary in angle along their length. This means that the conventional method used to accurately join the ribs of a symmetrical, half
round oud bowl (i.e. inverted jointer plane) cannot apply ( except on part of the 'bass' side of the bowl).
Likewise the method used to bend the ribs will be up to the luthier - i.e. dry bending or soaking and heating. No doubt the more difficult ribs to fit
will require a number of heating cycles to obtain perfection but I don't imagine that this will result in any adverse degradation of the wood.
Just my opinion, though, as I have never made an instrument bowl of this geometry(!).
Good luck and every success with your project.
|
|
|
SamirCanada
Moderator
Posts: 3404
Registered: 6-4-2004
Member Is Offline
|
|
my best wishes too for this outstanding project.!!
|
|
|
Raby
Oud Maniac
Posts: 53
Registered: 11-3-2007
Location: Québec, Canada
Member Is Offline
Mood: No Mood
|
|
Very Nice project ! Your oud look like a shell ! Just take care with your pegbox lines . Do you look if the strings touch the pegs ? I am curious to
see and hear to result! Good luck !
|
|
|
oudipoet
Oud Junkie
Posts: 190
Registered: 1-3-2006
Location: los angeles
Member Is Offline
Mood: No Mood
|
|
hey alami
how you been?
it s been a long time since your last post so i was wondering how is your project going on? i am looking forward to hear about the new devolopments.
|
|
|
Melbourne
Oud Junkie
Posts: 354
Registered: 10-9-2006
Location: Mlebourne, Australia
Member Is Offline
Mood: راحة الأرواح
|
|
The Frank Ghery model . Very exciting project Alami.
|
|
|
| Pages:
1
2
3
4
5
..
8 |


