| Pages:
1
2
3
..
5 |
jdowning
Oud Junkie

Posts: 3485
Registered: 8-2-2006
Location: Ontario, Canada
Member Is Offline
Mood: No Mood
|
|
Old Project - New Lute
With many interests and projects vying for attention, I am reluctant to start any new instrument building work until I have finished what is already
in hand.
This is a project that has been 'on the back burner' , gathering dust, for a few years now so I am hoping that by posting on this forum I may gain
renewed motivation (and prodding from other friends on the Forum!) to complete the work. Although it is a lute that I am building, the way I go about
it may be of interest to oud makers as construction methods for oud and lute are very similar.
I do not know how long it is going to take me to get into the project because, for reasons I need not go into here, I shall likely be (temporarily)
visually unable to do detailed work for the next couple of months - but we will see. In the meantime lets get started.
The lute is an example of a "Liuto Attiorbato" - a small extended neck lute used from the end of the 16th C as primarily a solo instrument in Italy.
There are a number of fine surviving instruments from the early 17th C that fit the description of a "Liuto Attiorbato". I am basing this instrument
on a lute in the Victoria and Albert Museum in London, England,
(Cat# 7756-1862), by Christofolo Choc, Venice, detailed on Museum working drawings by Stephen Barber in 1978. The instrument had been converted to a
wire strung instrument at some time in its past so is not in its original state and has some other peculiarities of detail that I did not want to
copy. I am, therefore, only reproducing the overall geometry, barring etc. for this project.
The lute will have a total of 13 courses.With a stopped string length of 570 mm (six double courses with a single top string) and six single diapason
or open bass strings measuring 839 mm in length.
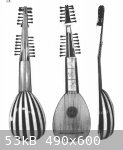
The attached image is of a liuto attiorbato by Matteo Sellas, Venice, 1638 in the Paris Conservatoire, Musee Instrumental No E 1028 C 1052 which
appears in the definitive work on extended neck lutes " Chitarrone, Theorbo and Archlute" by the late Robert Spencer, published in "Early Music"
October 1976. For those interested in this important article, it can be obtained as a free download (courtesy Oxford University Press) at
http://www.vanedwards.co.uk/spencer/html/spencer.htm
|
|
|
jdowning
Oud Junkie
Posts: 3485
Registered: 8-2-2006
Location: Ontario, Canada
Member Is Offline
Mood: No Mood
|
|
I have now prepared some images in order to take stock of where the project currently stands after all of these years.
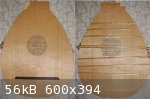
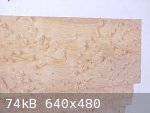
The belly is essentially complete and fully braced but is oversize requiring final trimming when finally fitted to the bowl (yet to be built).
It is made from two pieces of 'bookmatched' Sitka Spruce with a pronounced "Bear Claw" cross silk figuring. I purchased the spruce - in days when it
was much more difficult to obtain luthier wood - from the Kirby Glider Co. in Yorkshire, England. They used the high quality spruce for building -
well - glider air frames. They were a great company to deal with and very kindly allowed me to select material from their kiln dried stock of heavy
timbers which measured about 9 inches X 4 inches by about 12 feet long (as far as I can remember). Only two pieces of timber were selected from their
whole stock as being judged suitable for instrument soundboards. These timbers were then quarter sawn to required thickness at a local mill (a large
power fed bandsaw was used for this operation)
The selected pieces for the soundboard were first 'jointed', in the usual way, using a 'shooting board' and jointer plane. After gluing, the belly was
then thicknessed to about 1.5 mm thick using a smoothing plane (worked at an angle to the grain to avoid 'tear out') followed by final finishing with
a scraper plane.
NO sanding allowed!
The barring is spruce - from the same stock - with the grain - unlike on ouds and modern guitars - traditionally running across the bar, not
vertically.
I have essentially followed the barring arrangement of the Choc Liuto Attiorbato with the exception of the double bar across the rose.
|
|
|
jdowning
Oud Junkie
Posts: 3485
Registered: 8-2-2006
Location: Ontario, Canada
Member Is Offline
Mood: No Mood
|
|
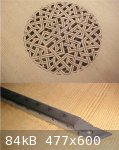
Here are images of the rose and bridge.
The original Choc attiorbato has an inset wood and parchment rose that may be a replacement for an original rose carved directly into the soundboard
in the lute tradition. Inset roses were used on early wire strung instruments so this alteration may have been done when the original lute was
converted from gut to wire strings?
I have cut a traditional lute rose design into the soundboard in place of an inset rose. The soundboard, where the rose is located, is first reduced
in thickness to about 1 mm, to facilitate the piercing process. A paper pattern of the rose design is glued to the underside of the soundboard and the
front of the soundboard over this local area is varnished with shellac to harden the surface to make carving easier. The rose is then cut directly
through from the back using a fine, razor sharp chisel with the soundboard supported on a piece of 'hardboard'. ( I will post an image of the chisel
design that I use a bit later). This gives a sharp, clear cut definition to the rose design. Jewellers saws are not used. When the 'piercing'
operation is completed the front of the rose is carved in relief with a scalpel. This 'brings out' the design of the rose.
The other image shows some detail of the bridge. This has been made from African ebony. The grey material coating the front of the bridge is dust
accumulation of the past 10 years or so!!
|
|
|
jdowning
Oud Junkie
Posts: 3485
Registered: 8-2-2006
Location: Ontario, Canada
Member Is Offline
Mood: No Mood
|
|
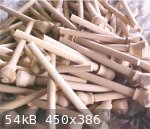
Peg blanks for this instrument have been cut ready for finishing and tapering with a peg shaper. Made from boxwood - the original pegs were made from
ivory!
I need a total of 19 pegs - more than enough here! (see separate posting on 'More Making Pegs' to see how these were made)
|
|
|
jdowning
Oud Junkie
Posts: 3485
Registered: 8-2-2006
Location: Ontario, Canada
Member Is Offline
Mood: No Mood
|
|
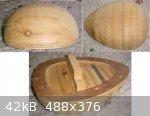
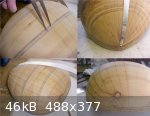
This style of lute has a significantly flattened profile - that is the depth of the body is less than half the width of the soundboard. This makes the
construction of the bowl a bit more difficult than for a lute (or oud) which has a (more or less) semi- circular section because the ribs are not
geometrically equal and symmetrical and do not run to a central point at the end of the bowl. For this reason, a solid mold was constructed from pine
hand carved to the required geometry. I have provisionally marked out the rib profiles in pencil for a 15 rib construction - just to get an idea of
the rib geometry. However, I may decide to increase the number of ribs dramatically (possibly up to 35?) and deeply scallop the ribs by hand scraping
after assembly - just to try out the technique. After all, I am not trying to make an exact copy of an original lute so I am allowed some freedom of
expression as to the detail of construction.
|
|
|
Jesse Frank
Oud Lover
Posts: 23
Registered: 9-17-2007
Location: North Florida
Member Is Offline
Mood: No Mood
|
|
Hey, that's pretty cool. I was thinking about starting a baroque lute somewhat like that after the oud I started.... I had seen that on lutes, the
grain on the braces is like you said, do you know why that is?
I for one am really looking forward to seeing this progress!
|
|
|
jdowning
Oud Junkie
Posts: 3485
Registered: 8-2-2006
Location: Ontario, Canada
Member Is Offline
Mood: No Mood
|
|
Difficult to say exactly. Perhaps because lute braces were originally cut from soundboard stock that was split on the quarter grain? Lute bars are
generally only about 4 mm or so thick. Also, shrinkage of wood - being mostly along the grain - would be less in bars with the grain running across
the brace with consequent greater stability during humidity changes. Also end grain - as in the case of bars with the grain running vertically -
presents an inferior gluing surface than crosswise grain does. But in all likely hood it doesn't make a lot of difference either way. If that is how
the master luthiers did it in the past then that is good enough for me to follow!
As you know the baroque lutes of the 18th C were quite a bit larger and tuned differently to the liuto attiorbato. Oddly enough the baroque makers
reverted to an early 16th C geometry for the bowls of their lutes (i.e. a long, almond shaped profile but with a deeper section than semi circular)
and often highly prized early lutes of this shape were converted to baroque lutes.
|
|
|
ALAMI
Oud Junkie
Posts: 643
Registered: 12-14-2006
Location: Beirut
Member Is Offline
Mood: No Mood
|
|
What an elegant and graceful instrument !
I was curious of hearing the sound, I found only one clip one you tube with the tag Liuto Attiorbato
http://www.youtube.com/watch?v=YLx8LLChuG4
I found also a highly decorated one with an amzing number of ribs (35?) on this link (down to mid page)
http://home.hetnet.nl/~sebas-vero/Other%20makers%20for%20sale.htm
Looking to this design, I was wondering of how much tension the neck is sustaining with so much strings and the fact that the neck is slanted in angle
on the upper side with the bass strings from one side which adds a substantial rotational stress on the neck joint, how this kind of neck is set ?
Another question: is there any structural or acoustic benefit in having the rosette carved directly on the soundboard ?
It is not common on ouds (I've seen it once) and I wonder why it was not tried on ouds.
Good luck with the project (and everything else)
|
|
|
jdowning
Oud Junkie
Posts: 3485
Registered: 8-2-2006
Location: Ontario, Canada
Member Is Offline
Mood: No Mood
|
|
I should hasten to add ALAMI that I will not be spending a lot of time making the instrument highly decorated as many of the surviving examples are
(that is probably part of the reason that they survive today no doubt). Much of the surviving music for liuto attiorbato in tablature is of high
quality as well.
Building the instrument will be a learning experience for me (all instruments are) - although I did make an extended neck lute many years ago that was
reasonably successful - but I will not have all of the answers until I go through the process of making the lute.
Both of the pegboxes are mounted on a single extension which is canted to the bass side so that the bass strings clear the fingerboard (the bass
strings are not stopped but are played 'open' like the strings of a harp) allow the bridge to be located more or less centrally on the soundboard. The
extension is also canted backwards somewhat so that the bass strings can be set more or less in the same plane as the stopped strings on the
fingerboard to minimise any twisting forces due to string tension. The upper pegbox also has quite a high nut to allow adjustment of the bass strings
so that the desired setting can be maintained over time as the neck takes a 'set' under tension. This setting helps to minimise any twisting or
rotational forces but which, nevertheless, no doubt will tend to affect tuning stability somewhat. Individual string tensions for my lutes tend to be
relatively low - in the range 2.0 to 3.5 Kg increasing from bass to treble - but I will have to experiment to find the optimum tensions on the
completed instrument. I also have chosen to fit single rather than double courses for the basses (both historically correct) so I am not too concerned
about the twisting forces on this instrument - which is compact and robustly barred as well.
Larger extended neck lutes - which can be up to about 2 metres in overall height - will be much more sensitive to the effects of these asymmetrical
forces I would guess.
I don't imagine that there would be any relative acoustic benefit between 'cut in' or 'set in' rosettes - the traditional 'set in' rose of the oud is
quite thick and stiff but so is the thin 'cut in' rose of the lute which is reinforced with a multitude of small bars as well as a continuous bar
across the rose centre.
I wonder if - at some time in the past - oud roses were 'cut in' and the lute is an example of this tradition being carried on. Certainly the early
lute rosettes are very 'Arabic' in design (at least to my eye). More on that next
|
|
|
jdowning
Oud Junkie
Posts: 3485
Registered: 8-2-2006
Location: Ontario, Canada
Member Is Offline
Mood: No Mood
|
|
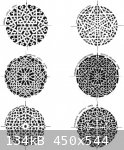
..... a slight diversion but, continuing with the question of lute 'cut in' rosettes, here are a few designs taken from surviving lutes (except for
the Costa which I derived from a painting of a lute by that artist). To my eye, the 'Arabic' influence in many of these designs is apparent so I have
to wonder if they originated from rosettes of early ouds which may have been 'cut in'? It is a shame and a historical loss that no early ouds from the
16th and 17th C survive to confirm (or deny) this speculation.
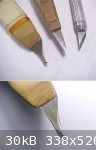
Next, some images of the tools that I use to cut lute rosettes.
|
|
|
carpenter
Oud Junkie
Posts: 248
Registered: 8-30-2005
Location: Eugene OR
Member Is Offline
Mood: brimming with hope
|
|
Man, that's some gorgeous project! I eagerly await progress photos.
<< It is a shame and a historical loss that no early ouds from the 16th and 17th C survive to confirm (or deny) this speculation.>>
I was reading somewhere that in the past there was an especially tough winter in Paris - wolves in the streets and so on - and a lot of furniture and
musical instruments, notably harpsichords, got chopped up for fireplaces, explaining the gap in examples of harpsichord history.
Could be true. I just know that music and the arts are the first to go in many circumstances (including funding today). Who knows where the
ouds went?
|
|
|
jdowning
Oud Junkie
Posts: 3485
Registered: 8-2-2006
Location: Ontario, Canada
Member Is Offline
Mood: No Mood
|
|
Rosette designs for lutes were often 'standardised' - the same basic pattern appearing in the lutes of many different makers. This fact might suggest
a 16th C lute component industry - soundboards made in workshops specialising in this product to be sold to luthiers for assembly into completed
lutes.
I prefer the 'Gerle' pattern - it is an elegant, well balanced, design and easier to cut than the delicate tracery evident in the Tieffenbrucker/
Harton rosettes. I have chosen this design for my liuto attiorbatto.
As this pattern involves straight cuts, I use a small chisel, made from a broken hacksaw blade set into a wooden handle. This blade is ground thin and
with a curved edge so that a partial cut is made first by piercing directly downwards with the blade point and then with a rotation of the blade. This
method minimises the risk of breaking the fragile rose during the piercing operation - particularly at places where there is cross grain. I always
work from the centre of the rose outwards. I do not bother to try to 'clean up' the cuts afterwards with needle files as that can spoil the clean cut
definition of the rosette. The front face of the rose is then cut in relief using a scalpel. Tools must be kept razor sharp to cleanly cut the soft
wood which must be kept well supported at all times with a backing surface of 'hardboard'.
It is not current practice to cut oud rosettes directly into the soundboard but a rosette made in this fashion could just as easily be made separately
and fitted to an oud in the conventional way.
|
|
|
Raby
Oud Maniac
Posts: 53
Registered: 11-3-2007
Location: Québec, Canada
Member Is Offline
Mood: No Mood
|
|
HI !
Your project are realy interesting ! I have already saw the first pattern in a book about islamic art . that's why I use it on my 2 first ouds. I
project to built luth me too in futur.
|
|
|
SamirCanada
Moderator
Posts: 3404
Registered: 6-4-2004
Member Is Offline
|
|
hello John,
what your building ressembles this instrument very much
http://www.youtube.com/watch?v=lF4GKIILF_U
|
|
|
jdowning
Oud Junkie
Posts: 3485
Registered: 8-2-2006
Location: Ontario, Canada
Member Is Offline
Mood: No Mood
|
|
Thanks for the links ALAMI - I have just checked them out. I only have a dial up connection so downloading stuff from Youtube is pretty hopeless for
me. I cannot be certain from the brief images that I did manage to download but the lute being used for the recital seemed to have a much longer neck
extension than a 'typical' liuto attiorbato. Also the piece being played was by Giovanni Zamboni the 18th C Italian composer for archlute (?). I am
not sure if the liuto attiorbato was used much beyond about 1670 - so this might be an 'archlute' of some kind - but I am not sure about that as 18th
C lute music is not really in my field of interest. I could not check your link Samir - was it the same as that given by ALAMI?
I suspect that the destruction of instruments that you refer to Jim was very real and likely occurred during "The Reign of Terror" in 18th C France at
the time of the Revolution where a lot of the material belongings of 'upper class society' was simply destroyed by the mob. Happy days!
I am now not so sure about a 35 ribbed bowl having checked out the images on the above link. The lute in question seems to have about 35 ribs and
although it is a beautifully made and a finely decorated instrument, somehow the multi rib construction does not seem 'right' as a characteristic of
the original surviving instruments seems to be fewer ribs of contrasting materials. I will have to give it further thought.
|
|
|
jdowning
Oud Junkie
Posts: 3485
Registered: 8-2-2006
Location: Ontario, Canada
Member Is Offline
Mood: No Mood
|
|
What is really strange is that until yesterday I was unaware of the existence of the 35(?) ribbed 'liuto attiorbato' - now up for sale in Europe - let
alone have any knowledge about the construction of the bowl or the number of ribs!! E.S.P perhaps!
I have looked at the images of the instrument again and note that it was once owned by renowned lute and guitar player Toyohiko Satoh. I also note
that this instrument is quite a bit larger than the original V&A Choc instrument, with a stopped string length of 635 mm and diapason length of
905 mm (compared to 570 mm and 839 mm) - so is not exactly a liuto attiorbato for this reason.
I am a bit concerned that the relatively small size of the original that I plan to 'copy' may result in an instrument lacking in the sound projection
of a larger instrument. Perhaps this is a reason that the original was converted from gut to metal strings - to produce a greater volume of sound from
the instrument? Too late to turn back now though as the instrument is half made! Time will tell.
At this string length of 570 mm the completed instrument will have a nominal pitch of 'g' at A415 - which was likely the original pitch of the
instrument when fitted with gut strings.
As I make preparations to continue the project I find that the museum working drawings are now quite badly faded so I will have to do some work on
those with magnifying glass and fine pencil to restore some of the more important, less distinct, detail. I have two working drawings and thought that
there was another giving details of rib geometry etc. but I cannot find it - so perhaps my memory is playing tricks on me. I also have a set of museum
photographs of the original instrument which will help.
|
|
|
jdowning
Oud Junkie
Posts: 3485
Registered: 8-2-2006
Location: Ontario, Canada
Member Is Offline
Mood: No Mood
|
|
My memory was playing tricks on me - there are only two museum drawings of the instrument. I was able to confirm this by checking the list of museum
historic instrument drawings published by CIMCIM (International Council of Museums). The list is available for free download at:
http://www.music.ed.ac.uk/euchmi/cimcim/index.html#iw
Unfortunately there are no oud drawings listed. There are, however, other instrument related articles available that may be of general interest.
|
|
|
jdowning
Oud Junkie
Posts: 3485
Registered: 8-2-2006
Location: Ontario, Canada
Member Is Offline
Mood: No Mood
|
|
I spent a bit of time today checking out material that I have in hand for making the bowl. The original instrument was made from ivory and snakewood.
I have none of those materials in stock (!) so my choice must be much more modest and less exotic. Of the hardwood species I have available in some
quantity, I looked at ash, hard and soft maple (plain or highly figured), walnut, yew, Indian rosewood and Macassar rosewood. I have now decided to
make the bowl with 15 ribs, like the original instrument. Due to the relatively small size of the bowl, I figure that dense, close grained woods would
be best for optimum sound projection which narrowed my choice of available woods down to hard maple and yew - with Macassar rosewood as another
possibility. At present, I am favouring unfigured hard maple and yew - with ebony 'lines' between the ribs. This will provide a more subtle
"dark/light" contrast between the rib woods than is usually found on surviving instruments of this type but it should work visually. Another option
would be to use only highly figured hard maple with ebony lines or, alternatively only yew with ebony lines but these options would create an
instrument without the contrasting ribs, characteristic of surviving liuto attiorbati.
The decision to make the bowl from 15 ribs means that the mold must be further modified by filing flat the areas where the ribs will be located on the
mold. However, this additional work on the mold should make the building of the bowl a bit easier in the long run. I may also cut the rib blanks a bit
thicker than 'normal' so that they may be given a shallow 'scallop' with a scraper after completion of the bowl.
|
|
|
jdowning
Oud Junkie
Posts: 3485
Registered: 8-2-2006
Location: Ontario, Canada
Member Is Offline
Mood: No Mood
|
|
I found some more suitable rib material yesterday among my stock of woods. It is a piece of dense, very hard, close grained maple with a small
pronounced 'bird's eye' figuring - measuring 1 3/4 inch square by 6 ft long. I decided to cut it on a bandsaw into 2 sets of rib blanks, 2 ft long,
and managed to obtain 19 ribs - a generous 3/32 inch or so thick rough sawn and cut with the end grain at about a 45 degree angle. Cutting the blanks
revealed a number of small "flaws" often found in maple due to the high sugar content of its sap that can cause staining during seasoning if not
controlled. These can be worked around or bleached out if I decide to use the wood - so not a problem. Working highly figured maple is difficult
because of the danger of "tear out" of the irregular grain.
This beautifully figured wood would likely be best used alone with ebony lines but without another contrasting dark wood
So this is another contender for bowl material. Decisions, decisions!!
|
|
|
Jesse Frank
Oud Lover
Posts: 23
Registered: 9-17-2007
Location: North Florida
Member Is Offline
Mood: No Mood
|
|
Wow. That would look outstanding as rib stock. Thanks for sharing this. It's a huge inspiration to see it.
|
|
|
jdowning
Oud Junkie
Posts: 3485
Registered: 8-2-2006
Location: Ontario, Canada
Member Is Offline
Mood: No Mood
|
|
Now that it has been decided to make the bowl with 15 ribs, like the original instrument, the rib profiles must be laid out on the mold as accurately
as possible in pencil. The areas between the pencil lines, where the ribs are seated on the mold, must then be made flat. This is not an essential
operation but removal of the mold curvature at these locations should make rib fitting a little easier and more controllable.
First task is to locate the centre of the mold at the widest point. This was done by trial and error using dividers. At the widest point, the rib
widths should all be approximately equal with the exception of the first and last ribs on each side (next to the soundboard) that are made a little
wider than the rest. The positions of the edges of the ribs at the widest point of the mold was marked by 'walking' the dividers across the mold
surface.
A flexible metal straightedge was made up with a hole for a screw on the centreline. This device was temporarily screwed to the pointed end of the
neck block so that the straightedge could be rotated around the form of the mold. Pulling the straightedge tightly over the mold surface, straight
lines were drawn through each point marked by the dividers to produce the rib profiles. Hopefully the ribs, when assembled to this layout, will have
relatively straight edges also - which should help the rib fitting operation. Note that because the bowl of the lute has a flattened profile the ribs
do not converge to a single point at the end of the mold but 'run out'.
When building this type of bowl, care must be taken to fit the ribs as closely as possible to the mold - without any forcing - to avoid accumulated
small errors that can cause 'ballooning" of the bowl and consequent unintentional enlargement of the designed profile - particularly at the transition
between the flattened area and the sides of the mold.
|
|
|
Jesse Frank
Oud Lover
Posts: 23
Registered: 9-17-2007
Location: North Florida
Member Is Offline
Mood: No Mood
|
|
I like the look of that mould.... Man, this is a neat project.
|
|
|
jdowning
Oud Junkie
Posts: 3485
Registered: 8-2-2006
Location: Ontario, Canada
Member Is Offline
Mood: No Mood
|
|
To respond to Samir's earlier posting - I have just managed to download part of the YouTube link. The lute in question does look similar to a liuto
attiorbato but is more likely to be a somewhat larger arciliuto - an instrument that appeared after the liuto attiorbato - but I cannot be sure about
that from the video clip. This concerto for lute by Vivaldi ,RV 93, was probably written around 1730 - originally written for lute, 2 violins and
basso continuo - not an orchestra as presented. The orchestra, however, is very professional and plays with great energy and gusto but the painful
expressions on the faces of the string players bothers me a bit!!
|
|
|
jdowning
Oud Junkie
Posts: 3485
Registered: 8-2-2006
Location: Ontario, Canada
Member Is Offline
Mood: No Mood
|
|
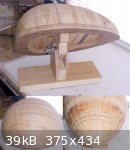
The rib profiles have now been marked in pencil on the mold surface ready for filing flat. To make both the filing operation and future rib fitting
easier, the mold has been mounted on a simple wooden support that will be clamped to the bench and allow me to rotate and clamp the mold in any
position around a horizontal axis as well as allowing rotation and clamping about a horizontal plane.
The neck block, at this stage, remains untrimmed (running to a point). After filing the rib locations flat it will be removed and the angled neck
joint cut prior to the rib fitting operation.
|
|
|
Jesse Frank
Oud Lover
Posts: 23
Registered: 9-17-2007
Location: North Florida
Member Is Offline
Mood: No Mood
|
|
What is the angle that you cut for the neck joint, if you don't mind me asking.
Also, I was wondering if most modern guys use a nail for the neck, or if they end up screwing it on. Would you glue the nail in place?
I'm hoping to get a copy of Lundbergs book soon, so please forgive me all of the basic questions.
|
|
|
| Pages:
1
2
3
..
5 |


