| Pages:
1
2 |
jdowning
Oud Junkie

Posts: 3485
Registered: 8-2-2006
Location: Ontario, Canada
Member Is Offline
Mood: No Mood
|
|
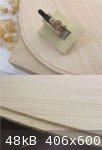
The prototype plane has been made with a depth gauge of
0.81 mm fixed depth and a guide measuring 4.7 mm wide. This combination should give a rebate measuring 4 mm wide by 0.81 mm deep in section.
(For a rebate measuring 2.5 mm X 0.81mm, the guide would be replaced by one measuring 7.7 mm wide).
The plane worked reasonably well in producing a rebate of the intended dimension. The cross grain cuts (around the bottom diameter of a sound board) -
as expected - were the most demanding and required a scribing cut (with a purfling or binding cutter of the kinds described in other threads on this
forum) whereas the cut along the grain direction did not strictly require this pre treatment.
Shavings tended to jam in the outer corners of the throat but were regularly cleared with a wooden toothpick and small brush. Some small adjustments
to the throat of the plane might help to improve this situation.
The current baseplate dimension of about 38 mm X 40 mm does not seem to be over large in practice as it helps in maintaining better handling and
control of the tool. So, the corners and sharp edges of the baseplate will just be rounded over to make the tool more comfortable to handle.
The test results are encouraging enough for me to spent a bit more time in finishing the tool to final dimensions and making further fine adjustments
to improve cutting action.
|
|
|
SamirCanada
Moderator
Posts: 3404
Registered: 6-4-2004
Member Is Offline
|
|
BRAVO!!

|
|
|
Jameel
Oud Junkie
Posts: 1672
Registered: 12-5-2002
Member Is Offline
Mood: No Mood
|
|
Niiiiiiiiice. I'm saving this post on my hard drive. Gotta make me one! Keep us posted.
|
|
|
jdowning
Oud Junkie
Posts: 3485
Registered: 8-2-2006
Location: Ontario, Canada
Member Is Offline
Mood: No Mood
|
|
Thanks for your interest everyone.
I am in the process of putting the finishing touches to the prototype and also making an alternative guide that will be used to cut a narrower rebate
about 2.5 mm wide. In light of the number of design changes made as work has progressed I shall conclude the thread later with a summary of the final
design of the prototype for the benefit of those who would like to make their own half binding tool.
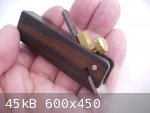
In the meantime, I could not resist purchasing the inexpensive Lee Valley mini chisel plane (mentioned earlier in this thread). This is a good
quality, very nicely made ebony bodied plane that could just as easily be adapted as an alternative to the Busy Bee plane used for the prototype.
Of course the half binding tool could be built 'from scratch' - it is just that adapting a mini chisel plane as a starting point for the project saves
a bit of time and effort.
|
|
|
jdowning
Oud Junkie
Posts: 3485
Registered: 8-2-2006
Location: Ontario, Canada
Member Is Offline
Mood: No Mood
|
|
To make the alternative guide (Guide #2) for cutting a rebate of about 2.5 mm width, an oversize blank, measuring about 8 mm in width, was first filed
square and parallel. the top surface inked with a felt tip permanent marker pen, and the centre line scribed with compasses.
To make the guides interchangeable the two screw holes must be accurately aligned. The front hole was drilled first. The position of the hole was
lightly marked (dimpled) exactly on the centre line with a centre punch and a pilot hole - 1.5 mm diameter - was drilled through the blank. The hole
was then drilled to the required screw clearance diameter.
Guide #1 was then used as a template to accurately locate the second screw hole in Guide #2 blank . Placing Guide #1 over the blank, the drill shank
(used to drill the screw clearance hole)was positioned through the guide and the blank. Rotating Guide #1 so that it aligned with the marked centre
line of the blank, the centre of the second hole was marked with a transfer punch. Guide #1 was then removed from the blank and a pilot hole drilled
followed by drilling a screw clearance hole as for the first hole. (Transfer punches are a useful tool for both metal and woodworkers and a set can be
purchased at the very reasonable cost of around $15 from tool suppliers like Lee Valley, Busy Bee, Princess Auto and others).
Before proceeding further the unfinished blank was fitted to the baseplate with the mounting screws to confirm proper alignment of the screw holes.

|
|
|
jdowning
Oud Junkie
Posts: 3485
Registered: 8-2-2006
Location: Ontario, Canada
Member Is Offline
Mood: No Mood
|
|
Guide #2 being correctly fitted has been trimmed to length and finished. An important detail of both guides is a shallow relief slot filed below the
cutting edge of the blade to allow the blade to project slightly beyond the surface of the depth gauge - necessary for the blade to cut.
Guide #2 gave a rebate width of 2.5 mm as designed. This guide was metal stamped with number '2.5' for future reference, and Guide #1 stamped with
number '4' indicating a rebate width of
4 mm.
The problem of shavings jamming in the corners of the throat was resolved by filing a narrow relief slot at the sides of the throat next to the
cutting edge. This provided clearance for the shavings while still maintaining a close clearance for the blade further back from the cutting edge -
necessary for accurate side registration of the blade in the throat.
It should be noted that as the tool is designed for cutting curved soundboard edges on oud and lutes, contact with the guide occurs only at a single
point (just in front of the cutting edge of the blade). The guides have been made the same length as the baseplate (or sole) of the plane only because
it is easier to make and fit them accurately than it would be for shorter guides.
By the way, a handy, low cost, readily available 'tool' for smoothing these shallow soundboard rebates (if necessary) is an emery board intended for
manicuring finger nails. These 'nail files' are about the same thickness as the depth of the rebate and are made with sharp, safe edges to get into
the rebate corner and come with a coarse grit on one side and fine grit on the other.
|
|
|
jdowning
Oud Junkie
Posts: 3485
Registered: 8-2-2006
Location: Ontario, Canada
Member Is Offline
Mood: No Mood
|
|
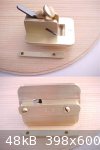
So here is the completed prototype tool and accessory guide - finished with corners rounded and all sharp edges relieved for comfort in handling.
The final dimension of the sole measures 33 mm wide by 43 mm in length.
I suppose if I had to make another it would take about a day's work without having to rush.
Now, perhaps a small fitted wooden case for the plane and the accessory guides .........
|
|
|
ALAMI
Oud Junkie
Posts: 643
Registered: 12-14-2006
Location: Beirut
Member Is Offline
Mood: No Mood
|
|
Never thought of a tool as a work of art.
I live in a world (professionaly speaking) where "art" has to be expensive, where 3 different languages in a sentence are needed to meaninglessly
talk about it and where the only "manual tool" known is the iphone.
I kept looking to the photos of this tiny beautiful tool... and I felt calm.
your tool can do more than "half binding".
Thanks John,
|
|
|
Jameel
Oud Junkie
Posts: 1672
Registered: 12-5-2002
Member Is Offline
Mood: No Mood
|
|
What Alami said...
I say you outdid Lundberg. Now all you have to do is make one with an angled blade to cut the "ramped" rebate.
You are a valuable member here. 
|
|
|
jdowning
Oud Junkie
Posts: 3485
Registered: 8-2-2006
Location: Ontario, Canada
Member Is Offline
Mood: No Mood
|
|
Thanks for your kind comments ALAMI and Jameel. This little project was a low risk, low cost adventure and fun to develop and make.
Oddly enough Jameel I did wonder about the 'ramped' form of rebate when initially pondering the design and imagined that if a luthier were to
reference the guide of a tool like this not to the edge of the soundboard but to the face of the rib (ie with the plane canted at an angle to the
soundboard) then this might have been how the ramp style of rebate came about in the first place? Not sure how this would work in practice, however,
and it probably would better apply to lutes with flat rather than the rounded rib sections usually found on ouds? But this was just a passing thought.
|
|
|
jdowning
Oud Junkie
Posts: 3485
Registered: 8-2-2006
Location: Ontario, Canada
Member Is Offline
Mood: No Mood
|
|
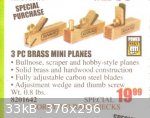
For those who may have missed purchasing the mini planes when offered on sale by 'Busy Bee Tools' - 'Princess Auto' now currently has them on sale
until July 13 (while quantities last), a set of 3 for $20. These are a special purchase item so it looks as though the company will not be holding
them as a regular stock item. So, once they are gone they are gone!
They can be ordered by phone at 1-800-665-8685 or from their stores across Canada. Not sure if they will ship outside Canada.
Web site is http://www.princessauto.com
I should emphasise that it is not absolutely essential to adapt one of these planes to make a half binding tool - I used one to save a bit of time but
could just as easily have started from 'scratch'.
|
|
|
Clayton
Oud Maniac
Posts: 52
Registered: 10-24-2008
Location: On the ranch... California
Member Is Offline
Mood: Calm
|
|
Wow... reading your tool thread was like listening to an incredible piece of music... I really enjoyed it.
Harbor Freight has a cheap set here:
http://www.harborfreight.com/cpi/ctaf/displayitem.taf?Itemnumber=97...
$11.99
These need new blades as the ones that come with them are really not worth using... but... the price!!!

|
|
|
jdowning
Oud Junkie
Posts: 3485
Registered: 8-2-2006
Location: Ontario, Canada
Member Is Offline
Mood: No Mood
|
|
Thank you Clayton. Glad that the topic was of interest.
Those are certainly good prices from Harbor Freight.
The prices at Busy Bee now seem to be heading in the wrong direction. They are currently offering a set of the three mini planes plus a mini square
and bevel gauge in a wooden box (but maybe a plastic box?) - normally $49.99 Can. on sale at $39.98 Can.
As noted earlier in the thread, the superior, thicker, high speed steel blade from a Lee Valley mini chisel plane will fit so can be used as a
replacement for the original blade if necessary.
|
|
|
jdowning
Oud Junkie
Posts: 3485
Registered: 8-2-2006
Location: Ontario, Canada
Member Is Offline
Mood: No Mood
|
|
Yet Another Alternative
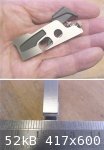
With a Lee Valley gift certificate 'burning a hole in my pocket' I decided to purchase one of the latest additions to their catalogue - a Veritas
Miniature Shoulder Plane (Cat# 05P80.01 - $31.50 Can.) as I was curious to find out if it might be adapted for use as a 'ready made' half binding
tool.
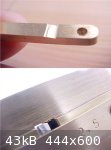
This low cost, quality precision tool is made from stainless steel and comes in a fitted box. Overall length is 63.5 mm and width 6 mm (2.5 inches X
0.24 inches). It is a scaled down miniature version of the Lee Valley Medium Shoulder Plane.
The first task - as with every new edge tool - is to hone the blade. The blade is of hardened steel with a fine ground finish so took only about 15
minutes work on an oil stone and leather strop to remove all traces of grinding marks to bring the back of the blade to a mirror finish and produce a
razor sharp cutting edge.
The blade is 0.25 inches (6.35 mm) wide so projects a little beyond the sides of the plane - so a bit more work on the oil stone was required to bring
the blade flush with the sides.
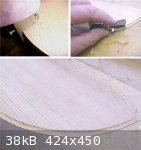
The plane was tested on a piece of quarter sawn Sitka Spruce, the edge shaped to a sound board profile. After scribing the width of the banding rebate
to 1 mm deep, with a purfling cutter, the plane was worked freehand around the edge of the test piece to remove the waste material down to the depth
of the purfling cut.
The plane was easy to control and did a pretty good job even across the grain of the wood (sharp blade essential!)
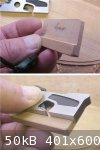
One improvement is to add a guide to eliminate any risk of the plane cutting beyond the scribed line.
No need to modify the plane. A small piece of hard maple with a rebate cut to fit against the side of the plane is all that is required - the guide
being held in place with finger pressure alone. The depth of the rebate determines the width of cut.
So, it works and is a ready made alternative way to cut a half binding rebate if one doesn't have the time or skill to make the tool described earlier
in this thread.
Neat!
|
|
|
jdowning
Oud Junkie
Posts: 3485
Registered: 8-2-2006
Location: Ontario, Canada
Member Is Offline
Mood: No Mood
|
|
BTW - if you need to make your own purfling cutter do a forum search - keyword 'purfling cutter'
|
|
|
Yaron Naor
Oud Junkie
Posts: 275
Registered: 1-24-2009
Location: Bat Hefer, Israel
Member Is Offline
Mood: Happy
|
|
Wow, very nice work! I think that building your own tools is an amazing skill and feeling
Thanks for shearing
Yaron Naor.
|
|
|
Jameel
Oud Junkie
Posts: 1672
Registered: 12-5-2002
Member Is Offline
Mood: No Mood
|
|
John, I bought one of these immediately with the same thing in mind. Great little plane at am amazing price.
|
|
|
Yaron Naor
Oud Junkie
Posts: 275
Registered: 1-24-2009
Location: Bat Hefer, Israel
Member Is Offline
Mood: Happy
|
|
Hi John.
Can you please show how you sharp this tiny blade on a stone?
I find it difficult to hold on a stone and also to hone
If you have something for a Tormek sharpening system please show a picture if it is ok with you
Thanks in advanced
Yaron.
|
|
|
Jameel
Oud Junkie
Posts: 1672
Registered: 12-5-2002
Member Is Offline
Mood: No Mood
|
|
Yaron, I just freehand it on waterstones or abrasive paper. After polishing the back I hone the bevel by putting pressure just behind the bevel with
my index finger and pull back only on the stone, don't push. It's so small that it polishes up quickly. Just pull back, dont swirl around or push
forward.
|
|
|
jdowning
Oud Junkie
Posts: 3485
Registered: 8-2-2006
Location: Ontario, Canada
Member Is Offline
Mood: No Mood
|
|
I use the same technique as Jameel except that I prefer to use oil stones and a hard leather strop dressed with Lee Valley 'green' compound for final
honing.
I find the correct bevel angle by feel - first gently rocking the blade on the stone until it is felt to 'lock' on the surface. Then the blade is
drawn backwards in a single movement while maintaining this correct angle.
The blade is already finely ground as received from the manufacturer so only light pressure is required. No need to create any burrs on the cutting
edge.
It is, of course essential to remove all of the original grinding marks from the back of the blade (for the wider) spade shaped part only and from the
front edge of the bevel - other wise a weak, saw tooth cutting edge will be the result.
|
|
|
Yaron Naor
Oud Junkie
Posts: 275
Registered: 1-24-2009
Location: Bat Hefer, Israel
Member Is Offline
Mood: Happy
|
|
Thank you both
Thanks Jameel and Jdowning,
for shearing the info, I learn so much from you!
I have a very good Japanese water stones, I will try it by hand.
Regards
Yaron.
|
|
|
jdowning
Oud Junkie
Posts: 3485
Registered: 8-2-2006
Location: Ontario, Canada
Member Is Offline
Mood: No Mood
|
|
Thanks for your input Yaron and Jameel
Japanese water stones should do the job even faster (and cleaner!) than oil stones. I have used both.
My hard leather strop is glued to a wooden block that can be held in a vice for ease of handling. The Lee Valley 'green' compound cuts aggressively to
a finish that probably exceeds that of the finest oil stone/water stone grits.
Good luck.
John
|
|
|
| Pages:
1
2 |


