| Pages:
1
2
3
4
5
..
16 |
Peyman
Oud Junkie

Posts: 496
Registered: 7-22-2005
Member Is Offline
Mood: Mahoor
|
|
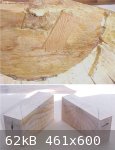
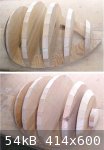
Here are some dates according to the author:
Bottom right 1539-1543.
Bottom left: 1482.
Top right is from a plate, probably 17 or 18th century. The book isn't clear. The Top left, I am not sure about. It's not in the book but it looks
like bottom right.
|
|
|
Peyman
Oud Junkie
Posts: 496
Registered: 7-22-2005
Member Is Offline
Mood: Mahoor
|
|
I'll probably scan the frets section later on. I'd like to read through it before hand and see if I can figure anything out.
|
|
|
jdowning
Oud Junkie
Posts: 3485
Registered: 8-2-2006
Location: Ontario, Canada
Member Is Offline
Mood: No Mood
|
|
Interesting - beautiful pictures. Do you have the approximate dates for when these illuminations were painted?
Note also that three of the instruments do not have any obvious sound holes represented - so perhaps they did not have any - just decorative inlays on
the sound boards?
The artist who created the bottom left picture went so far as to represent the grain of the sound board (?) and the soundboard banding but there is no
evidence of sound holes (or strings!) whatsoever.
So what are sound holes for? Well," to let the sound escape" I suppose might be the answer but is that their purpose acoustically? I suspect that if
the instruments in the paintings did not have 'sound holes' that they would 'work' quite well without them?
|
|
|
Peyman
Oud Junkie
Posts: 496
Registered: 7-22-2005
Member Is Offline
Mood: Mahoor
|
|
I posted the dates right after the picture. I am not sure if the bottom left has wood grain. It might be the print quality but I agree it doesn't look
like it has soundholes. In some instruments (at least around Iran), they usually don't put soundholes; only tiny holes are drilled on the soundboard.
That might be the case.
|
|
|
jdowning
Oud Junkie
Posts: 3485
Registered: 8-2-2006
Location: Ontario, Canada
Member Is Offline
Mood: No Mood
|
|
As work progresses on the mold construction, work has started on the neck block.
The neck will be fitted to the neck block with a dovetail joint as is still the practice today so was probably the ancient method as well. The
dimensions of the dovetail have been copied from an old Egyptian oud that I am currently restoring.
The neck block will be made from Sitka spruce that has been in stock for about 30 years so it should be well seasoned. Initially a block was laid out
copying the same grain direction as that of the Egyptian oud - that is with the growth rings running vertically through the block. However, as spruce
tends to split more easily radially across the growth rings (rather than along the growth ring direction) a second block has been cut with the growth
ring direction running parallel to the top face of the block. My concern is that the first block may be more prone to splitting - a fault that can be
seen in the Egyptian oud where the neck block has cracked across at the base of the dovetail. The second block should be less prone to this kind of
failure. However, a sample of the spruce was split both along and across the growth ring direction with a chisel and there did not seem to be any
noticeable difference in ease of splitting either way.
Nevertheless, on balance, the second block would seem to be the better choice although there is likely not a big difference.
|
|
|
jdowning
Oud Junkie
Posts: 3485
Registered: 8-2-2006
Location: Ontario, Canada
Member Is Offline
Mood: No Mood
|
|
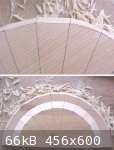
The final step in shaping the mold bulkheads is to cut the 'flats' for the rib locations. These are cut using a wide paring chisel - to remove most of
the waste - followed by a small block plane to make each 'flat' level and at the correct angles.
It is important to have good incident lighting for accurate work- progress in judging the material to be removed being aided by the light reflected
off the freshly cut surfaces.
|
|
|
jdowning
Oud Junkie
Posts: 3485
Registered: 8-2-2006
Location: Ontario, Canada
Member Is Offline
Mood: No Mood
|
|
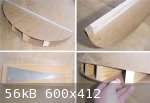
This oud will have an end plate - as dictated by the geometry - rather than the more common end block found on modern ouds (and the Arnault de Zwolle
lute). This is a feature invariably found on surviving European lutes but can also (rarely?) be found on old ouds - as, for example, in this Egyptian
oud. The end plate is fitted after the bowl has been removed from the mold so provision must be made for temporarily anchoring the ends of the ribs
during assembly on the mold. Here a small block of pine has been shaped to the correct profile (using a metal template) and will be screwed to the
mold baseplate as part of the bulkhead system.
The mold is now nearing completion with some small adjustments first to be made to ensure accurate alignment and levelling of the bulkheads on the
baseplate.
|
|
|
jdowning
Oud Junkie
Posts: 3485
Registered: 8-2-2006
Location: Ontario, Canada
Member Is Offline
Mood: No Mood
|
|
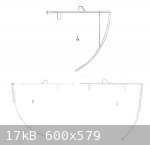
Just for information and to illustrate different tail block/end plate configurations, image A shows the Arnault de Zwolle end block in section -
similar to a modern oud but deeper. Image B - drawn to the same scale - shows the end plate, in section, of an early 17th C European lute and image C
shows the end plate, in section, of the Egyptian oud previously mentioned. Note that the end plate of the Egyptian oud does not extend as far as the
soundboard (it always does in early lutes) so to compensate for the lack of support in this area below the bridge, there is no half banding around the
edge of the sound board over the end plate - only the full sound board thickness. As well, the Egyptian oud has a below bridge bar (invariably found
on ouds?) that is located approximately at the inside edge position of the Arnault tail block. Clearly, sound board stiffness in the area below the
bridge - no matter how it is achieved - is important.
In this oud reconstruction, the end plate will extend to the soundboard and will be of sufficient thickness to fully support the sound board in the
area below the bridge - i.e. it will provide a surface area wider than the sound board half banding. There will also be a below bridge bar to provide
the necessary additional soundboard support.
|
|
|
jdowning
Oud Junkie
Posts: 3485
Registered: 8-2-2006
Location: Ontario, Canada
Member Is Offline
Mood: No Mood
|
|
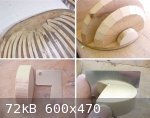
In order to layout the rib profile as precisely as possible a simple jig has been made. The bowl of the oud is semi circular in section so all of the
ribs are identical in geometry (except for the two outside ribs that are to be made a little wider than the remainder and then trimmed to size).
The jig is made from two side plates of 3 mm thick hardboard - the required outline being traced from the mold base plate. The two plates have been
joined with a cloth strip glued with flexible fabric glue (available from craft shops) so that they are hinged. The joined side plates were then
smoothed down to match the exact profile of the base plate.
Several pine spacers have been cut to the required angle (using a metal template made from the bulkhead layout template) and glued between the side
pieces - after checking that the gap between the side plates at each bulkhead location is correct (using dividers).
The correct rib profile is given by the inside edges of the jig and represents the inner profile of each rib (the finished outside dimension )will be
a little larger.
After using the jig for making a rib template, additional wedges will be fitted and finished flush with outside edges of the side plates. This will
then be used as a convenient jig for achieving the required profile of each rib during the bending operation.
|
|
|
jdowning
Oud Junkie
Posts: 3485
Registered: 8-2-2006
Location: Ontario, Canada
Member Is Offline
Mood: No Mood
|
|
To create the rib profile, a strip of paper is taped in place over the jig and rubbed against the edges of the jig with a finger. A clearer definition
of the profile may be achieved using a little graphite powder (from a pencil lead).
The paper strip is then carefully removed from the jig, taped to a strip of card and the profile cut using scissors.
The card rib outline - with centre line marked - is then placed back on the jig to check for accuracy (paper and card are flexible so absolute
accuracy cannot otherwise be guaranteed). In this case one side of the card template was found to be more accurate than the other so has been chosen
for making a permanent rib template in thin sheet metal.
This template will give a rib profile that is slightly oversize so is just a convenient guide. Precise jointing of the ribs (with a plane) will be
done during the final bowl assembly.
|
|
|
jdowning
Oud Junkie
Posts: 3485
Registered: 8-2-2006
Location: Ontario, Canada
Member Is Offline
Mood: No Mood
|
|
The neck block is to have a dovetail joint so this will be cut before the neck block is cut to shape - it will be a lot easier done now than later. As
the centre line location of the block will be lost once the dovetail is cut, the block is first mounted on the mold baseboard with screws and register
marks made with a knife so that the completed neck block may be later refitted in the correct alignment.
Interestingly, the neck block thickness, derived from the geometrical layout, is 1.5 inches (38 mm) which conforms nicely with modern day oud
construction practice.
|
|
|
jdowning
Oud Junkie
Posts: 3485
Registered: 8-2-2006
Location: Ontario, Canada
Member Is Offline
Mood: No Mood
|
|
I have decided to use neck block #1 after all as the grain direction of #2 does not seem quite right.
After removing the block from the base plate, the waste material in the dovetail was removed by successive cuts on a bandsaw.
The sides of the dovetail were then trimmed to size with a chisel and finished with files - the end grain of the spruce being difficult to work
cleanly even with a sharp chisel. The three sides of the joint were checked for straightness and squareness to the neck joint face with small
engineer's square.
Finally the contour of the block was roughly cut on a bandsaw with the table set at 45 degrees. Ready for final carving to profile - but not today.
|
|
|
jdowning
Oud Junkie
Posts: 3485
Registered: 8-2-2006
Location: Ontario, Canada
Member Is Offline
Mood: No Mood
|
|
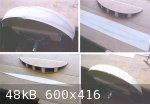
The completed bulkheads have been attached to the base plate using drywall screws that are thin so can be screwed into the soft pine without need for
pilot holes. The bulkheads will not be glued just in case any ribs become inadvertently glued to the mold during assembly. The mold can be easily
dismantled to remove it piece by piece if that occurs.
The alignment of the bulkhead centre lines was verified with a 'chalk line'.
All that needs to be done now is to shape the neck block in preparation for the bowl construction process.
|
|
|
jdowning
Oud Junkie
Posts: 3485
Registered: 8-2-2006
Location: Ontario, Canada
Member Is Offline
Mood: No Mood
|
|
Rough shaping of the neck block is being done using a sharp paring chisel and a metal template of the required finished curvature as a guide. The main
problem is holding the block firmly while carving. I hold the work in the vise or clamped to the bench and take light paring cuts with the chisel.
Pretty time consuming and a way to go yet before it is finished.

|
|
|
Peyman
Oud Junkie
Posts: 496
Registered: 7-22-2005
Member Is Offline
Mood: Mahoor
|
|
If I may jump ahead, I am curious to see how you will make cut the neck for a precise fit. I have touble sawing evenly on all sides while cutting the
tenon.
|
|
|
jdowning
Oud Junkie
Posts: 3485
Registered: 8-2-2006
Location: Ontario, Canada
Member Is Offline
Mood: No Mood
|
|
The neck cannot be finally fitted, aligned and shaped until the bowl is complete and the sound board fitted (but not glued) in place. However, the
neck blank can be prepared and the dovetail tenon cut close to final dimensions - this work must be done sooner or later so I will go through this
process now for information. The neck blank will then be stored in a heated room to ensure that it is completely dry.
The neck is to be made from a piece of Sitka Spruce. This stock was purchased, kiln dried, about 25 years ago. The grain of the wood is cut on the
quarter - grain vertical - for stability of the neck - with minimum run out of the longitudinal grain.
The back of the neck will be veneered to protect it against damage from the fret knots when the frets are tied and slid into place.
I have a quantity of Lilac tree wood that is very hard (it is good for making pegs) so will plan to use that for veneering the back of the neck.
Interestingly the heartwood is a pale lilac in colour (with white sap wood). I cut this about 25 years ago so it should be well seasoned.
|
|
|
jdowning
Oud Junkie
Posts: 3485
Registered: 8-2-2006
Location: Ontario, Canada
Member Is Offline
Mood: No Mood
|
|
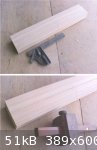
To allow for later adjustment and trimming to size of the neck, the neck blank has been cut well oversize and longer than required.
The blank is first prepared by planing the upper surface (the 'face') flat and straight. Using the face as a reference, one side (the edge) is planed
flat and straight and at right angles to the face. The angle is checked with an accurate engineer's square. Both face and edge are marked with pencil
for reference. The opposite edge was then planed at right angles to the face and parallel to the reference edge (this is not absolutely essential,
just nice to have, as all measurements for layout will only be made from the two marked reference surfaces). The back face of the blank has been left
with a sawn finish.
The centre line of the blank is next marked with a marking gauge and highlighted with sharp pencil point run in the 'groove' left by the gauge.
Accurate preparation of the blank is important.
|
|
|
jdowning
Oud Junkie
Posts: 3485
Registered: 8-2-2006
Location: Ontario, Canada
Member Is Offline
Mood: No Mood
|
|
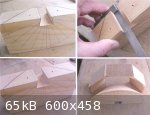
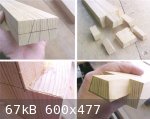
Finally, the dovetail tenon is marked out using a square and marking gauge - the lines all being cut with a sharp knife and filled in with a pencil
for clarity.
The waste material is cut out with a hand saw leaving a small amount of surplus for final clean up and finishing.
Here, only the face of the neck joint has been finished. A wide paring chisel is used, freshly sharpened to a razor edge, to cut cleanly across the
end grain. The knife cut layout marks serve as an indicator to guide the precise removal of material for accurate finishing.
|
|
|
Peyman
Oud Junkie
Posts: 496
Registered: 7-22-2005
Member Is Offline
Mood: Mahoor
|
|
This is the same way I approach it but I use denser woods, like walnut which can't be cleaned up around easily. I am talking about the edge of the
neck that will touch the block, not the tenon itself. That's difficult to even out with the other side.
|
|
|
jdowning
Oud Junkie
Posts: 3485
Registered: 8-2-2006
Location: Ontario, Canada
Member Is Offline
Mood: No Mood
|
|
I'm not sure if Walnut would be more difficult to clean up than Spruce. Spruce has hard and soft areas across the end grain so tear out can easily
happen if the chisel is not maintained very sharp. The chisel also should be as wide as possible and lapped flat on the back so that it can cut
straight and flat.
I don't anticipate having a problem fitting the neck tenon or neck joint with everything made square and perpendicular and working carefully. I do not
plan to have a 'bracelet' covering the neck joint as found in modern ouds so the joint will be exposed and have to be a pretty close fit.
In order to progress this project, a decision needs to be made about the wood to be used for the bowl. Woods that may have been used in the 13th/14th
C have been discussed in "Wood fit for a king" on the forum but nothing absolutely conclusive has been so far determined. Two woods seem to be better
candidates than others. 'Dardar' - that can be translated as Elm but in the period under consideration meant Ash (information provided by ALAMI) is
one choice as Ash was certainly used in 16th C lutes so may also have been the choice for ouds and lutes of an earlier period. Beech (zan) is the
other alternative.
I do not have any Beech in stock but I do have a quantity of Ash in the form of floor joists (about 160 board ft) recovered from a 19th C building -
so it is over a century old. This is very close grained (for Ash) so is likely be 'first growth' timber from the original forest that once covered
this area before being cleared during the 19th C to create farm land (no concerns about destruction of the environment in those days). The joists are
sawn and measure 2 inches by 8 inches (50 mm X 200 mm) in lengths up to 12 ft (3.7 metres). Most of this stuff is only suitable for reuse as
structural timbers but a couple of lengths may yield some good rib blanks.
I shall cut a slab for testing today. The ribs will be quarter sawn and each blank will have to be about 2 inches wide (50 mm). I do not expect to
find any 'figure' in the grain - but it would be nice if some could be found!
|
|
|
jdowning
Oud Junkie
Posts: 3485
Registered: 8-2-2006
Location: Ontario, Canada
Member Is Offline
Mood: No Mood
|
|
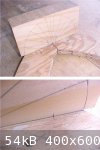
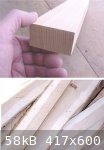
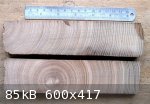
One promising Ash timber examined measures 1.9 inches thick by 7.75 inches wide (48 mm X 197 mm) rough sawn and about 12 ft (3.7 metres) long. It had
been sawn with the heart 'boxed in' so is mostly quarter sawn. The growth rings vary in width from under 1 mm near the centre to about 2 mm at the
outside edges.
A growth ring count indicates that the tree was at least 150 years old when felled but was likely much older..
The density of the wood, calculated by measuring the volume and weight of a sample, is 56 grams/c.c. i.e. the specific gravity is about 0.56
The attached images show slices cut from each end of the timber to show the end grain. It can be seen that the heart runs out to one side over the
length of the timber.
|
|
|
Peyman
Oud Junkie
Posts: 496
Registered: 7-22-2005
Member Is Offline
Mood: Mahoor
|
|
Thanks for the tips. I need to work on my patience with the joint!
Also, I remember reading in the KT book that they boil the wood in milk. I thought that was interesting.
|
|
|
jdowning
Oud Junkie
Posts: 3485
Registered: 8-2-2006
Location: Ontario, Canada
Member Is Offline
Mood: No Mood
|
|
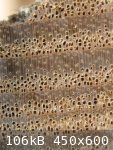
A macro examination of the cell structure (at the upper right hand edge of the top sample in the image previously posted) indicates that the species
is Black Ash (Fraxinus nigra).
Selected sections of the timber will be cut into rib blanks tomorrow. One problem with reclaimed timbers like old floor joists is that they may
contain hidden nails. The old iron nails have been removed but fragments of nail may still remain. The selected sections will, therefore, be cut
longitudinally - to reveal the location and depth of old nail holes - using a carbide tipped saw blade before being re-sawn into rib blanks on a band
saw.
The ribs of the bowl will be made about 1.5 mm thick so the bowl will be faceted or slightly fluted - like a 16th C lute bowl - rather than finished
to a smooth exterior like a modern oud. Early Arabic/Persian texts indicate that the wood of an oud bowl should be thinner than the sound board.
The bowl could be made with a smooth exterior, with ribs finished to 1.5 mm thickness, if thicker ribs were used and the interior of the bowl was then
thinned down by scraping after assembly. However, the rib blanks would initially need to be about 4.5 mm (3/16 inch) in thickness for a bowl of this
size with 11 ribs. Not an impossible proposition but a lot more work. Perhaps some other time!
|
|
|
jdowning
Oud Junkie
Posts: 3485
Registered: 8-2-2006
Location: Ontario, Canada
Member Is Offline
Mood: No Mood
|
|
Thanks Peyman. Interesting that milk may have been once used to 'marinate' wood - prior to bending (?). Do you have more details - bowl or sound board
wood? The milk from which animal - goat, sheep etc? Soaking for what period of time?
Worth testing in my series of trials on marinated wood and fluted ribs if you have more information. The solids in milk might have prevented cell wall
collapse of the wood at the high temperatures required for bending ribs?
I was wondering if the neck joint fitting question might be simplified by first making the joint as close a fit as time (and patience!) permits - but
not perfect - and then running a fine toothed saw into the assembled joint so that both surfaces would then match exactly?
|
|
|
Peyman
Oud Junkie
Posts: 496
Registered: 7-22-2005
Member Is Offline
Mood: Mahoor
|
|
Actually I misunderstood. The milk boiling was done for carved instruments (like robab) and it's not mentioned for the oud.
But since I was reading the book, I looked at the oud section again. It's said that "Shah Choob" (from around coastal areas). Shah Choob translates as
king wood. But the book has an end note which states that perhaps Shah Choob is the same as "Shah Derakht", which translates as king tree. King Tree
can refer to oak or spruce and fir. The author also recommends cedar (if king tree can't be found). It's not clear if these wood choices are refering
to the body or the top. I think it's probably the top.
|
|
|
| Pages:
1
2
3
4
5
..
16 |


