| Pages:
1
..
9
10
11
12
13
..
16 |
jdowning
Oud Junkie

Posts: 3485
Registered: 8-2-2006
Location: Ontario, Canada
Member Is Offline
Mood: No Mood
|
|
It is clear from the early Arabian and Persian texts about the oud (see "The Structure of the Arabian and Persian Lute in the Middle Ages" by Dr H.G.
Farmer) that the strings were made from silk as well as sheep's gut - sometimes all silk strings were used, sometimes all gut and sometimes a
combination of silk and gut.
The string gauges for gut and silk were the same or nearly so.
The texts provide some information on the structure and manufacture of the strings. In the case of gut strings the information is not very helpful
(gut being a coarser material than silk filament).
However, for the silk strings, sufficient information is provided to allow calculation of the string gauges for each string.
The 14th C Persian work "Kanz al-Tuhaf' is particularly informative giving the number of silk threads for each kind of string - 'Bamm' 64 threads,
'Mathlath' 48 threads, 'Mathna' 32 threads, 'Zir' 24 threads and 'Hadd' 16 threads. The number of threads per string agrees closely with data given in
the earlier
10th C work "Ikhwan al-Safa".
The silk threads were twisted into a uniform cylinder and bound together with gum paste which also added additional mass to a string.
The first step is to try to determine the cross sectional area of the silk thread used to make these early strings.
The string length of the project oud is 56 cm which determines the maximum pitch of the 'Hadd' string (to avoid frequent breakage). For a simply
twisted gut string made from modern gut this would be g' (at A440 pitch) so it might be assumed that this upper limit will apply to a silk string as
well - at least for this preliminary assessment. Assuming a string diameter of 0.44 mm for the 'Hadd' string, it is then a simple matter to calculate
the diameters of the other strings. The attached notes show the procedure for information.
The results are 'Bamm' 0.88 mm diameter, 'Mathlath' 0.76 mm diameter, 'Mathna' 0.62 mm diameter, 'Zir' 0.54 mm diameter and 'Hadd' 0.44 mm diameter -
all these dimensions seeming reasonable at first glance.
However, there is a potential problem.
|
|
|
jdowning
Oud Junkie
Posts: 3485
Registered: 8-2-2006
Location: Ontario, Canada
Member Is Offline
Mood: No Mood
|
|
To complete the picture on early oud strings here is a summary of the additional information concerning gut and silk strings.
Ziryab (9th C) was the first to use silk strings but preferred all gut stringing. He also was first to introduce the fifth string that was originally
placed between the 'Mathlath' and Mathna' strings.
Al-Kindi (9th C), for a four course oud, used gut for the 'Bamm' and 'Mathlath' strings and silk for the 'Mathna' and 'Zir' - silk strings being finer
in tone than gut and could withstand a higher tension than strings made from 1 or 2 strands of gut.
For the four strings Al-Kindi says that the first string 'Bamm' was made from 4 strands of thin gut firmly twisted together to form a string of equal
gauge throughout. Likewise, the second string 'Mathlath' was made from 3 strands of gut. The third string 'Mathna' was made from silk of the same
gauge as if made from 2 strands of gut and the 'Zir' was made from silk the same gauge as if made from 1 strand of gut.
From the 10th C Ikhwan al-Safa we learn that the strings were all made from silk the 'Mathna' being one third thicker than the 'Zir', the 'Mathlath'
being one third thicker than the 'Mathna' and the 'Bamm' being one third thicker than the 'Mathlath'.
From 'Kanz al-Tuhaf (14th C), gut strings were made from sheep's intestines. If fine gut was used, the 'Bamm' was made of three strands but only two
strands if coarse gut was used. The 'Mathlath' should be made of one strand less than the 'Bamm' (This implies that gut was only used for the two
bottom courses with silk for the remainder?)
With this information it is possible to make an estimate of the string gauges using the same calculation procedure previously posted.
For Al-Kindi's four course oud, assuming a 'Zir' string diameter of 0.44 mm, the remaining string diameters work out to be 'Mathna' 0'62 mm diameter,
'Mathlath' 0.76 mm diameter and 'Bamm' 0.87 mm diameter.
For the Ikhwan al-Safi strings - again assuming a diameter of 0.44 mm for the 'Zir' - gives 0.59 mm diameter for the 'Mathna', 0.78 mm diameter for
the 'Mathlath' and 1.04 mm diameter for the 'Bamm'.
|
|
|
jdowning
Oud Junkie
Posts: 3485
Registered: 8-2-2006
Location: Ontario, Canada
Member Is Offline
Mood: No Mood
|
|
Returning to the traditional oud tuning of Al-Kindi et al. as previously posted. The string length of an oud (or lute or vihuela etc.) strung in gut
or silk dictates the maximum pitch of the treble string and the design pitch of the instrument. 16th C lute and vihuela practice was to tension the
top string as high in pitch as it would go without frequently breaking and to tune the remainder of the strings accordingly. Why?
Taking the project oud as an example and tuned in fourths would give a tuning of B e a d' g' - g' tone being the upper limit for the top string (in
gut or silk) at International concert pitch standard A440. (Note that the modern pitch standard was established in 1939 - prior to that there was no
commonly agreed standard, certainly not in the 14th C - as far as we know).
Assuming the instrument to be strung in 'Pyramid' plain gut and using the 'Pyramid' string slide rule (a low cost, handy tool) for convenience we find
that string tension for the 'Hadd' string, 0.44 mm diameter, g' tone is 3.7 Kg (or 37 Newtons), for the 'Zir' string, 0.54 mm diameter, d' tone - 3.3
Kg, for the 'Mathna' string,
0.62 mm diameter, a tone - 2.3 Kg, for the 'Mathlath' string, e tone - 2.1 Kg and for the 'Bamm' String, 0.88 mm diameter,
B tone - 1.6 Kg.
So here the problem is that the string tension of the 'Bamm' string is too low for the string to sound well.
Tuning according to the Ibn Sina alternative tuning of fourth, fourth, major third, fourth would give a tuning of c f b d' g' would increase the
respective string tensions - bass to treble - to 1.8 Kg. 2.3 Kg, 3.1 Kg, 3.4 kg and 3,7 Kg - the tension of the 'Bamm' being just about at the limit
for bowed stringed instruments never mind plucked stringed instruments.
The strong revival of interest in the European lute began during the 1960's. Lutenists attempting to string their lutes with modern gut strings (that
worked reasonably well for bowed instruments) were to be greatly disappointed with the results - the trebles sounded well but the bass strings were
totally hopeless.
Marin Mersenne in the early 17th wrote that " the sound of the largest diameter lute strings of the lute can be heard to last for a sixth or third of
a minute - that is to say for the time that the pulse of a healthy man at rest beats 10 or 20 times". The lute of Mersenne's time had 10 courses. The
performance of these thick gut strings would appear - astonishingly - to match or exceed the performance of modern nylon, metal overspun, bass
strings. To ensure that there would be no mistake about what he meant, Mersenne gives two reference datum points.
(Also Parisian males of the early 17th C would seem to be a pretty healthy bunch of guys!)
This has been the dilemma facing modern researchers and makers of 'historical' instrument strings - how to construct the bass (gut or silk) strings of
a plucked string instrument like an oud, lute, vihuela, guitar etc. so that they sound well.
Time out! - more to follow.
The attached image is a scan of the original Mersenne text - hopefully my translation renders the meaning correctly.

|
|
|
jdowning
Oud Junkie
Posts: 3485
Registered: 8-2-2006
Location: Ontario, Canada
Member Is Offline
Mood: No Mood
|
|
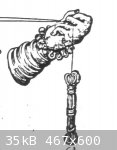
The gut lute strings of Mersenne's time were sold bound up in 'knots' - so were very flexible (like bootlaces). The attached image, an engraving of a
lute string knot from Mersenne's 'Harmonie Universelle', is an indication of the flexibility of the string. Modern (non historical) gut strings could
not be wrapped up in this fashion without being damaged so are, supplied wound up in coils.
Recent research by historical string makers like Eph. Segerman (Northern Renaissance Instruments) and Mimmo Peruffo (Aquila) has gone a long way to
developing an understanding early string technology as it relates to gut strings.
For silk strings much promising research and development work has been undertaken by Alexander Rakov of New York State on a non commercial basis.
For those interested in exploring the subject matter in detail, informative research papers are available for free download from N.R.I. ('A Primer on
the History and Technology of Strings') at
http://www.nrinstruments.demon.co.uk/StrPrim.html
and from Aquila (see 'Our works') at
http://www.aquilacorde.com/indicemusicaclassicaing.htm
Briefly, the tonal range of the thicker gut strings can be extended by increasing the amount of twist of the gut strands during manufacture or by
constructing the strings like a yarn or a rope for an even greater extension of the tonal range.
Mimmo Peruffo has also produced strings 'loaded' with materials to increase the linear mass of a string and reduce the diameter accordingly.
Whether or not these methods were the same as those used by the early string makers is impossible to determine as no original strings survive and the
written historical evidence is scanty and (frustratingly) incomplete.
Silk strings might have been made by just simply twisting the filaments together (like a plain gut string), the whole structure then bound together
with 'gum' (It is assumed by some that 'gum' means 'Gum Arabic'. However, Alexander Rakov has made successful strings using the natural gum (sericin)
attached to raw silk filaments).
Alternatively they might have been made like a yarn or rope. Early Chinese strings of great antiquity were made like ropes, some with a smooth outer
wrapping of silk and a roped silk core. Although traditional silk strings have generally been replaced by those made from nylon (or even metal) for
instruments like the Chinese zither (Ch'in) there has, in recent years. been a revival to try to manufacture silk strings the 'old way'.
It is likely that the silk strings first used on early ouds came from China. Later, Moorish 'Spain' may have been a centre for instrument silk and gut
string manufacture - sericulture and wool being important, flourishing agricultural industries prior to their demise brought about by government
punitive restrictions in the latter half of the 16th C.
For the project oud with five courses, it is anticipated that if gut strings for the 'Bamm' and 'Mathlath' are to be used a 'high twist' gut string
should be sufficient to give reasonable acoustical results - but some experimentation, in an effort to obtain optimum results with different string
combinations - silk or gut - will be necessary
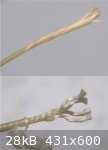
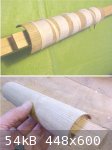
For information, the second image attached shows a medium twist gut string compared to a modern reconstruction of a wrapped silk string made for a
Chinese Ch'in - the latter illustrating the flexible roped construction of the string core.
|
|
|
jdowning
Oud Junkie
Posts: 3485
Registered: 8-2-2006
Location: Ontario, Canada
Member Is Offline
Mood: No Mood
|
|
Checking back on the estimated Helmholtz resonance of the project oud with its three sound hole configuration - posted earlier - the frequency comes
out at around 'E' (at A440) and the traditional tuning in fourths, with the 'Hadd' string at maximum pitch for a 56 cm string length, gives an open
string tuning of
B e a d' g'.
In other words, the e string #2 should get a volume boost from the Helmholtz effect - like the A string #2 of the test guitar.
It will be interesting to see how this all turns out with the finished oud!
|
|
|
jdowning
Oud Junkie
Posts: 3485
Registered: 8-2-2006
Location: Ontario, Canada
Member Is Offline
Mood: No Mood
|
|
Metal overspun instrument bass strings - made by winding metal wire over a flexible core - so widely used today, were not invented until the late 17th
C and likely did not come into general use until later in the 18th C. Instruments such as ouds and guitars then commonly used gut trebles with silk
cored metal overspun basses until about 1960 when nylon strings became generally available. A set of oud strings that I purchased in Cairo in the
early 60's were all gut trebles with silk cored metal overspun basses.
Clearly, use of this type of string is not an option for an instrument that is to represent a 14th C oud or lute. Of the two authentic alternatives,
high twist gut strings from one of the historical string makers are readily available today and should provide a satisfactory performance.
To my knowledge, historically accurate silk oud strings are not commercially available - so part of the work of this project will be for me to make my
own silk strings (hopefully!)
Sericulture and use of silk filament to make fabric is an important industry going back thousands of years in China and so the technology is well
documented - much of it freely available. Less so the methods for making silk strings. Surviving early Chinese texts dating to the 12 C are more
helpful than the brief description in 14th C Persian Kanz al-Tuhaf - but every scrap of information could be useful.
Silk is a good string making material being strong and elastic and producing uniform strings.
Silk filament is secreted by a variety of moth caterpillars the most prominent being the 'Bombyx mori' species, originally domesticated by the Chinese
solely for silk production. The caterpillar pupates to an adult moth inside a silk cocoon - the cocoon silk being produced by the caterpillar in a
continuous filament measuring up to 1500 metres long. After (sadly) killing the pupa inside a cocoon, the silk may then be reeled off as a continuous
filament.
The raw silk filament from the cocoon (Bave) is actually a double strand (two Brins) of silk protein (fibroin) cemented together with gum (Sericin).
Silk filament may be used in this condition (Raw silk) but usually the Sericin is removed by boiling in water (De-gummed silk).
Silk filament is quite variable in its physical properties dependant upon species of moth, conditions during raising and feeding the caterpillars etc.
The cocoon Bave is tapered along its length ranging in diameter from about 30 microns (0.03 mm), for the first 200 - 300 metres reeled from a cocoon,
down to about 12 microns
(0.012 mm).
In order to make a silk thread of sufficient diameter for practical use, the filaments from several cocoons are simultaneously reeled off and twisted
together to make a thread.
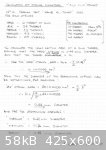
We already know the number of threads that make up 14th C oud strings but how many cocoon Bave filaments were used to make a single thread?
If a string maker was to select only the first 200 metres or so of the Bave reeled from a cocoon, the cross sectional area of the Bave would be about
0.00071 sq. mm.
We already know that a 'Hadd' string of 0.44 mm diameter was made from 16 threads of cross sectional area each measuring 0.0095 sq mm. From this we
can conclude that there are 13 cocoon Bave filaments to a single thread.
This is interesting as it compares with the 12 Bave filament thread used to make the ancient Chinese Ch'in strings (more modern Ch'in strings had 9
Bave filament threads).
Taking it a bit further, if the oud strings were made with 12 Bave filaments, the diameter of a 16 thread 'Hadd' string would then become 0.42 mm.
This then may be a better starting point for the project oud silk strings rather than using the arbitrary string diameter of 0.44 mm. This will have
the disadvantage of proportionally reducing the diameter and linear mass of the other strings with a possible reduction in acoustic performance of the
bass strings. However, the elastic, twisted construction of the silk strings may be more than enough to compensate. Time will tell.
The attached image are my notes on silk filament for the information of those interested.
Next is to review how oud strings of the 14th C were made.
|
|
|
jdowning
Oud Junkie
Posts: 3485
Registered: 8-2-2006
Location: Ontario, Canada
Member Is Offline
Mood: No Mood
|
|
The 'Kanz al-Tuhaf gives a description of how silk oud strings were made in the 14th C. According to Dr. H.G. Farmer's translation in 'Structure of
the Arabian and Persian Lute' :-
"the strings should be white, smooth, of equal gauge and well finished. These are boiled in water and ashes, and are then washed two or three times in
pure water and dried in the shade. The strings are then twisted into the following gauges .......... A paste of moderate consistency is then made of
gum and a little essence of Saffron. This is rubbed on the strings with a piece of linen until it has penetrated into all the parts when the string is
dried".
(The string gauges are those previously reported and discussed i.e. Bamm 64 threads, Mathlath 48 threads, Mathna 32 threads, Zir 24 threads and Hadd
16 threads)
This description,although brief, contains a lot of important information for a string maker.
Although Farmer's translation refers to 'strings' as the components of an oud string it is most likely, from the description, that the term 'thread'
was intended. So the basic thread components were likely to have been raw silk from the Bombyx mori species (characteristic white colour). According
to previous discussion, each thread would comprise 12 Bave cocoon filaments twisted together, the filaments glued to each other in the thread by the
natural gum Sericin.
The first action - to boil the threads in water and ashes (i.e. a lye or caustic soda solution)- is essentially the commercial procedure for removing
the bulk of Sericin from raw silk. So, prior to twisting the threads into strings, the silk is de-gummed (De-gummed silk is stronger - greater tensile
strength) than raw silk.
Note that the number of threads given for each string in Kanz al-Tuhaf are all divisible by 4 which strongly implies that the strings were made - like
the ancient Chinese Ch'in strings - the threads being first divided into four equal groups and then twisted up together like a small (flexible) rope.
(see the example of a Ch'in string previously posted - the construction is like the core of the string without the outer wrapping).
For effective acoustic performance, the elements of a finished string must be firmly bound together as a cohesive whole - to eliminate any losses due
to internal friction caused by the individual elements rubbing together as the string vibrates. The ancient Chinese strings used a binder made from
isinglass (fish glue) with other materials added. The oud strings used 'gum' as a binder but what kind of gum? Most likely, the gum used was 'Gum
Arabic' a flexible (and edible) material still in commercial demand today. One application is as a binder for good quality artists water colour paints
- the gum being soluble in water. The description mentions drying of the string after application of the gum which tends to confirm that this was the
binder material of ancient times.
Not sure what the essence of Saffron was for - apart for imparting a golden colour to the string.
Ziryab notes that strings of his time (9th C) were coloured (not sure why) Bamm - black, Mathlath - white, Mathna - red and Zir - yellow.
Unfortunately, he apparently does not give a colour for the fifth string that he introduced (green, blue?). So here is some scope for colouring the
reproduction silk strings using standard water colour pigments for greater 'authenticity'.
Will silk oud strings made in this way be acoustically viable? Only one way to find out!
|
|
|
jdowning
Oud Junkie
Posts: 3485
Registered: 8-2-2006
Location: Ontario, Canada
Member Is Offline
Mood: No Mood
|
|
The string making part of this project will likely be covered later under a separate thread as it is a big subject.
In the meantime, some further useful information has been provided by commercial suppliers of silk yarn and others with hands on experience of reeling
silk from cocoon as well as from the 200 or so books on sericulture and the silk industry freely available from the Internet Archive site.
The early Chinese string makers were specific about the number of cocoon filaments used to construct a basic thread for making strings - 12 for the
earliest strings and 9 for those made in a later period of history. This implies that a string maker may have reeled his basic threads simultaneously
from 12 (or 9) selected cocoons using only the first third of the filaments from the cocoons - these being the largest in diameter.
This contrasts with the procedure for reeled silk destined for weaving into textiles where a thread is made by continuously adding fresh cocoon
filament to the thread as reeling progresses - the thread being a fairly uniform mix of cocoon filaments of various diameters.
With this in mind, the string making experiments for this project will include reeling silk from cocoon to make basic threads.
The instructions for oud string making in the 14th C 'Kantz al-Tuhaf' on the other hand makes no mention of filament count in a basic thread. The
implication is that the starting point for the Persian string maker may have been commercially available raw silk reeled thread - "white, smooth, of
equal gauge and well finished". The whiteness of the thread suggests that the silk filament was produced by the domesticated moth 'Bombyx mori' rather
than species such as the Tussah moth that - fed on oak leaves - produces a yellow coloured filament due to the tannin content.
So, a second part of the project will be to make strings from commercially available reeled silk thread - less complicated than reeling your own
thread!
The other components for making the Persian oud strings are 'Gum Arabic' and 'essence of saffron'.
'Gum Arabic' is readily available and is soluble in water as well as a water/alcohol solution.
'Essence of Saffron' suggests a distillation of the Saffron herb which likely was a solution containing ethyl alcohol used for perfume manufacture or
simply as a foodstuff additive for colour and flavouring.
Saffron is the most expensive spice on the planet today ($10 per gram or about a teaspoonful) so producing an essence by distillation of large
quantities of the herb is not an option for this project. However, a close approximation of 'essence of saffron' might be possible using a small
quantity of Saffron mixed with ethyl alcohol (80% vodka) and glycerine - a standard preparation for making perfumes.
One comment about commercial silk available today is that the 'quality' of the raw silk has deteriorated over the past 10 years due to acid rain
(presumably due to contamination of the mulberry plant leaves used to feed the silk worm). Furthermore, it is quite possible that the strain of
silkworm available in the 14th C or earlier - and now extinct - may have been quite different from the modern variety - and possibly a lot more
suitable for instrument string making.
We will never know.
The same dilemma likely faces modern day historical string makers trying to replicate early instrument strings made from sheep's intestines (gut
strings) where the original strings may have been made from a breed of sheep, now extinct, and raised in a different environment / feeding regimen
from the sheep breeds of today. All variables that could have a significant impact on the acoustic performance of a gut instrument string.
Hoping to be able to re-commence work on completing the project oud in a couple of week's time.
|
|
|
jdowning
Oud Junkie
Posts: 3485
Registered: 8-2-2006
Location: Ontario, Canada
Member Is Offline
Mood: No Mood
|
|
Re- commencing the construction part of this project - after an enforced hiatus of 3 months - the thread resumes where last left with veneering of the
neck.
To recap, the two piece neck veneer - of 'Black Ash' wood, matching the ribs of the bowl - was 'marinated' in a 50/50 solution of 10% Ammonia solution
and wood alcohol (Methyl Hydrate). The veneer blanks were then heated with a hot air gun, tied tightly to the neck (used as a mold) and allowed to
dry.
Interestingly, on removal from the neck, the veneer then shrank to a tighter curvature than the neck radius. This will have the advantage of ensuring
a close fit of veneer to neck when the veneer is glued in place.
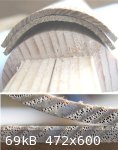
For information, the attached macro image of the veneer cell structure - before and after (approximately) - shows the slight deformation (stretching)
of the outer layers (or compression of the inner layers - or both) of the early wood cells. Otherwise, the cell structure appears to remain unaffected
by the 'marinating' process.
|
|
|
jdowning
Oud Junkie
Posts: 3485
Registered: 8-2-2006
Location: Ontario, Canada
Member Is Offline
Mood: No Mood
|
|
The neck veneer is in two" book matched" pieces 1.8 mm thick (which should finish at around 1.5 mm). The joint edges were dressed straight with a
plane and finished on a sanding block.
To facilitate handling, the neck has been temporarily screwed to the wooden block previously used to hold the neck during the shaping operation.
The first piece of veneer, held in position on the neck centre line with masking tape is then tightly clamped in place - after application of the glue
- using a rubber bands.

|
|
|
jdowning
Oud Junkie
Posts: 3485
Registered: 8-2-2006
Location: Ontario, Canada
Member Is Offline
Mood: No Mood
|
|
Each pre-bent marinated veneer has a degree of longitudinal curvature as well as that of the cross section (due to balancing of transverse and
longitudinal stresses in the wood). This makes the precise fitting of the veneer joint a little more complicated - requiring a certain amount of trial
and error fitting.
With the joint fitting perfectly, the second veneer piece was coated with glue and the joint faces pulled tightly together with masking tape. The
veneer was then clamped to the neck with rubber bands.
The veneered neck is now ready for final trimming and fitting to the bowl.
|
|
|
Anija
Oud Lover
Posts: 18
Registered: 7-2-2009
Member Is Offline
Mood: No Mood
|
|
John, this is fantastic! I always wondered what Farmer was talking about in his section on "strings", ie. threads. Now it makes total sense!
Bravo!!!
|
|
|
jdowning
Oud Junkie
Posts: 3485
Registered: 8-2-2006
Location: Ontario, Canada
Member Is Offline
Mood: No Mood
|
|
Thanks Anija - Bombyx mori cocoons are on order as a first step in a 'hands on' testing of the historical data by actually trying to make the strings
from scratch.
Continuing to run into practical considerations/contradictions (silk is a variable material), however, so nothing is ' clear cut' at this stage of the
game. Lots of research still remaining to be done in this area.
I expect to eventually post my findings as a separate topic on the forum as work proceeds.
|
|
|
jdowning
Oud Junkie
Posts: 3485
Registered: 8-2-2006
Location: Ontario, Canada
Member Is Offline
Mood: No Mood
|
|
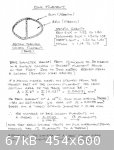
The pegbox sides will be made from Beech wood veneered with Ash. Beech has been chosen because it is one of the woods recommended as best for oud
making in the early Arabic and Persian texts. Also Beech was often used by lute makers of the 16th and 17th C for pegboxes and my old Egptian oud has
a pegbox of beech veneered with Mahogany.
I only have a small piece of old Beech wood (50 or 60 years old) to work with - just about sufficient to make the peg box sides - so there is no room
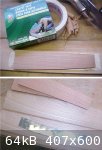
for error. The Ash veneer has been selected with a curved grain pattern to match the curve of the pegbox sides. The Beech wood blanks have been sawn
to about 8 mm thick and the Ash veneer to about 2mm. After the veneer has been glued to the sides, the Beech will be planed down to about 6 mm
thickness and the veneer to about 1mm.
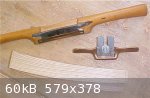
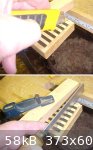
In order to hold the small pieces of Beech securely for the planing operation, I used a strip of double sided carpet tape to temporarily secure the
blanks/ veneer to a flat piece of wood held in a vice.
This is a technique adapted from Dr. Oud's (Richard Hankey) recently published (and recommended) e-book 'Oud Repair' - for sanding thin patches. (For
those interested, the book may be purchased on line at
http://www.droud.com/repair.htm)
The brand of carpet tape used here is fabric based and the 'tacky' glue easily holds everything in place during planing. To release the blanks/veneer
from the tape, I used a thin spatula to carefully (!) pry things apart. The adhesive can also be softened with heat if necessary.
The shiny metal thing in the images is a metal layout template of the peg box sides.
|
|
|
jdowning
Oud Junkie
Posts: 3485
Registered: 8-2-2006
Location: Ontario, Canada
Member Is Offline
Mood: No Mood
|
|
The veneered peg box sides have been sawn and planed close to final profile and thickness.
The 'inside' curve of the sides have been shaped using spokeshaves. My favourite spokeshave is an 'old fashioned', wooden boxwood, low angle blade
tool that belonged to my father. This type of spokeshave is subject to wear through use so I repaired this one by inlaying a brass strip in front of
the cutting edge.
I prefer the low angle blade as it is easier to control than the more modern high angle bladed spoke shave. However, this little 'high angle' bronze
spoke shave also works nicely for instrument and fine detail work. It is one of a three part set purchased from Lee Valley some years ago at less than
half the current catalogue price of $27.50 Can. but still good value (Cat# 61P10.10).
The neck has been fitted to the neck block so the position and size of the peg box rebate can now be determined. A big advantage of the dovetail style
of neck joint is that it facilitates precise set up without having to glue the neck in place.
The peg box rebate has been accurately sawn on a band saw by first centering and temporarily screwing the neck to a mounting block employed as a jig
against the bandsaw fence and square guide for the horizontal and vertical cuts. The sawn surfaces will, of course, have to be 'cleaned up' with a
chisel when the peg box is fitted.
The peg box block (at the nut end) will be made from spruce in order to simulate the unusual (and more complicated!) peg box construction found on my
old Egyptian oud where the 'block' has been cut integral with the neck. The block at the 'tail' end of the pegbox will be made from a piece of
beechwood and the back from Ash veneer.
|
|
|
jdowning
Oud Junkie
Posts: 3485
Registered: 8-2-2006
Location: Ontario, Canada
Member Is Offline
Mood: No Mood
|
|
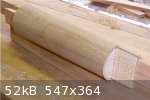
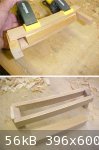
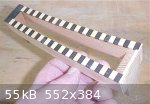
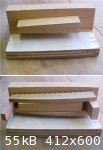
The peg box will be tapered along its length - using the same taper as the peg box on my old Egyptian oud. To facilitate handling and gluing of the
end blocks a simple tapered jig has been made from scrap pine. The pegbox sides - aligned, levelled and set at the correct overall width - are clamped
to the jig with self levelling spring clamps.
The end blocks, tapered to an exact fit, have been glued in place. The blocks have been made much longer than their finished size so that the peg box
may be securely held in a vice for the next step of the operation.
|
|
|
Ronny Andersson
Oud Junkie
Posts: 724
Registered: 8-15-2003
Location: Sweden
Member Is Offline
Mood: No Mood
|
|
I can not find anything about what type of wood you used for soundboard?
I guess it is spruce.
Best wishes
Ronny
|
|
|
jdowning
Oud Junkie
Posts: 3485
Registered: 8-2-2006
Location: Ontario, Canada
Member Is Offline
Mood: No Mood
|
|
That's correct Ronny. You will find a discussion about the sound board wood on page 4.
|
|
|
jdowning
Oud Junkie
Posts: 3485
Registered: 8-2-2006
Location: Ontario, Canada
Member Is Offline
Mood: No Mood
|
|
The top surface of the peg box must now be smoothed and levelled in preparation for the ebony/boxwood tile decoration that will match that on the
bridge and the sound board and fingerboard banding (yet to come).
Levelling is done by 'draw filing' i.e. drawing a fine file sideways along the top surface. This removes any slight irregularities left by the spoke
shave and ensures that both sides of the peg box are flat and even. The levelling is judged by feel (the slightest irregularity can be easily felt
under the file) and by sight (light reflected from the surfaces reveals any small hollows remaining).
Final finishing of the longitudinally curved surfaces is done using flexible sanding sticks (actually nail manicure emery boards - cheap and readily
available). This should only be done once work with the file is complete to avoid dulling the file cutting edges with any fine grit left in the
wood.
|
|
|
Ronny Andersson
Oud Junkie
Posts: 724
Registered: 8-15-2003
Location: Sweden
Member Is Offline
Mood: No Mood
|
|
I am ashamed to have missed this. If I had known I would have helped you in getting hold of Lebanon cedar from old stock.
Best wishes
Ronny
|
|
|
jdowning
Oud Junkie
Posts: 3485
Registered: 8-2-2006
Location: Ontario, Canada
Member Is Offline
Mood: No Mood
|
|
There is sufficient material left over from the bridge tiles to cover the top surface of the peg box. Preparation of the tile blank is discussed on
page 7.
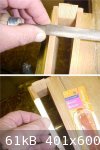
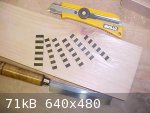
Five strips must be cut from the tile blank. Ebony and boxwood are hard and brittle woods so the strips are cut using a sharp knife and fine tooth
razor saw to avoid chipping of the edges of the wood.
Each strip is first marked using a straight edge and knife to scribe a line (several very light cuts). This line then acts as a guide for the saw. The
work must be firmly clamped to a flat board during the sawing operation as any movement of the work will surely result in breakage of the tiles.
The knife used here is a readily available, good quality 'Olfa' brand craft knife. The blades on this knife can be snapped off in segments to reveal
fresh, sharp cutting edges. A fresh cutting edge was used for this work.
The ultra-thin razor saw, 52 teeth per inch, is from Lee Valley (cat# 60F03.10 - $6.95 Can). The same saw is available from many luthier supply
houses. This saw has a stiff back and cuts on the draw stroke so is easy to control for more delicate cutting operations. Nice, inexpensive tool.
The sequence of operations now is first to glue on the tiles, trim the peg box to final dimensions, drill the peg holes, finish the interior surfaces
of the peg box before finally, fitting and gluing on the peg box back plate. Then, the peg box terminal may be fitted and shaped and the peg holes may
be reamed and pegs fitted.
|
|
|
jdowning
Oud Junkie
Posts: 3485
Registered: 8-2-2006
Location: Ontario, Canada
Member Is Offline
Mood: No Mood
|
|
No problem Ronny - next time around perhaps.
|
|
|
jdowning
Oud Junkie
Posts: 3485
Registered: 8-2-2006
Location: Ontario, Canada
Member Is Offline
Mood: No Mood
|
|
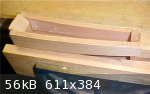
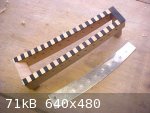
The tile strips have been glued to the top surface of the peg box. The strips were flexible enough to conform to the peg box curve without
difficulty.
The width of the strips is currently about 8 mm. This will be reduced to about 4 mm wide (the same width as the sound board banding) when the inside
face of the peg box is tapered in section to provide string clearance. This will be done after the peg holes have been drilled - which is the next
step.
|
|
|
jdowning
Oud Junkie
Posts: 3485
Registered: 8-2-2006
Location: Ontario, Canada
Member Is Offline
Mood: No Mood
|
|
To support the peg box at the correct angle for drilling the peg pilot holes, a simple jig has been made from wood offcuts. - to be used on a drill
press. This jig will be used one time only and then scrapped so does not need to be too fancy but does need to be accurate.
The support block on the jig is planed to the inside taper of the peg box. This provides backing to the inside face of the sides to eliminated any
splintering due to the drill breaking though. The block is reversible so that the peg holes may be drilled from either side.
I prefer to drill the holes from each side (two operations) rather than from one side and drilled right through in a single operation. This requires
accurate set up of the jig (square and level) and use of a metal layout pattern to ensure matching hole centres on each side of the pegbox.
The holes are drilled to 7 mm - just a bit less than the minimum diameter of my peg reamer - using a utility grade brad-point drill (designed for
drilling wood). I do not like this type of bit as much as the (much more expensive) lipped brad-point kind as they do not cut as cleanly or as
accurately but, as the holes will eventually be opened up with a peg reamer, this does not really matter at this stage. The main concern is to achieve
as close an alignment of the holes as possible (although any slight misalignment may be corrected when the holes are reamed out when fitting the
pegs). Hole alignment can be verified by pushing the drill bit though the holes and checking for squareness against the peg box sides.
|
|
|
jdowning
Oud Junkie
Posts: 3485
Registered: 8-2-2006
Location: Ontario, Canada
Member Is Offline
Mood: No Mood
|
|
The inside faces of the peg box are next tapered to provide string clearance and reduce peg box weight. This work should be done before the peg box
back plate is glued in place for better access. The inside of the peg box is shaped using metalworking files. The peg box is held firmly in a vice for
this operation - clamping the end block extensions left for this reason.
The taper extends to the top of the peg holes with the width at the top of the peg box reduced to 4 mm.
Metal working files are relatively low cost edge tools that do a good job. I use single cut files with a smoother double cut file to finish. Small
wood working rasps are too coarse for this work as they can chip and break the banding.
Only use best quality files - there are poor quality files on the market that suffer from being twisted and bent - impossible for accurate work - yet
costing about the same as best quality files free of these imperfections. USA made Nicholson brand files sold by Lee Valley are good quality. An 8"
single cut Mill File (Cat# 62W16.02) costs $7.20. Another very useful file for this work is the Nicholson Auger bit file (cat# 62W08.01) costing
$11.90. This is tapered with 'safe edges' good for cleaning out and finishing sharp corners.
Files used for wood working should not be used as well for metalworking!
|
|
|
| Pages:
1
..
9
10
11
12
13
..
16 |


