| Pages:
1
..
11
12
13
14
15
16 |
jdowning
Oud Junkie

Posts: 3485
Registered: 8-2-2006
Location: Ontario, Canada
Member Is Offline
Mood: No Mood
|
|
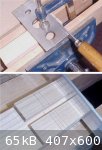
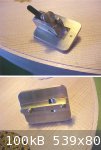
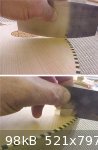
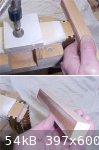
The banding tiles have been glued to the prepared fingerboard blank and the assembly planed close to finished dimensions.
To plane the fingerboard to the required depth (4 mm thick at the nut end and 2mm at the neck joint), the assembly was stuck to a flat board with
double sided adhesive carpet tape. The brand of fabric tape that I am using has quite a strong adhesive - more than adequate to hold the work during
planing. As the adhesive softens at a fairly low temperature, the fingerboard was released by applying heat with a hair drier. Unfortunately, although
the tape released cleanly from the board, quite a bit of the sticky adhesive remained on the underside of the fingerboard. Most of this was scraped
away while soft and the residue was cleaned up with a gum solvent ('Goo-Gone') followed by a cleaning with isopropyl alcohol.
To restore the 'missing' 1 mm. 'set back' of the neck (most likely caused by the problem encountered earlier with gluing the neck joint), it may be
necessary to plane a little from the neck - if sufficient material remains to allow the consequential reduction of the width of the neck at the nut.
If not, the fingerboard will be planed down in thickness at the nut end as necessary to set the required action.
Once glued in place, the fingerboard will be finished to its final contours. As this is a fretted instrument, the fingerboard will be given a slight
convex curve across its width (i.e. 'crowned'). This is necessary to ensure that the 'tied on' gut frets fit tightly to the fingerboard surface and do
not cause string 'buzzing'. This slight curvature must also be allowed for in setting the string action.
|
|
|
jdowning
Oud Junkie
Posts: 3485
Registered: 8-2-2006
Location: Ontario, Canada
Member Is Offline
Mood: No Mood
|
|
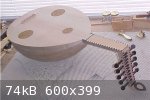
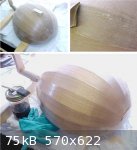
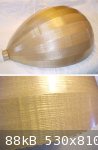
With the slightly oversize assembled fingerboard now glued to the neck it has been trimmed to fit on the edges by filing and scraping.
The fingerboard surface has been brought to the level of the sound board at the neck joint and finished flat with a cabinet scraper. The scraper
removes very fine shavings necessary for this operation.
A small amount needs to be removed from the nut end. This will be done when the nut is fitted, the fingerboard 'crowned' and the action finally set.
The 'crowning' is assymetric being deeper on the treble side than on the bass side (to keep the action as low as possible on the treble side). The
target will be to have a string clearance at the neck joint of 2.5 to 3 mm on the treble side and about 4 mm on the bass side - additional clearance
being required for the thicker (silk) bass strings and their greater amplitude of vibration. Also, for this reason, the depth of the bridge tapers
towards the treble side.
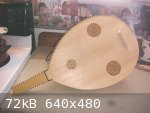
The attached image shows the assembled oud so far. Slowly 'getting there' but still quite a bit of work to be done.
The next step is to cut the rebate for the sound board binding, cut the tiles and glue them in place - which should take a while to complete!
The material for the tiles (Ebony and Persian boxwood) has been prepared by planing strips to a thickness of just over
1 mm. These will be further cut into 5 mm wide (oversize) strips for making the individual tiles - using a cutting jig to ensure consistent size and
angle of cut.
|
|
|
jdowning
Oud Junkie
Posts: 3485
Registered: 8-2-2006
Location: Ontario, Canada
Member Is Offline
Mood: No Mood
|
|
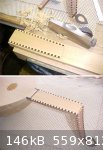
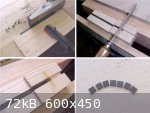
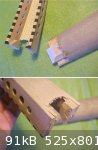
A tile cutting jig is an easily made tool.
A 5 mm wide slot has been milled in a piece of hardwood to a depth of about 5 mm to retain the veneer strip during cutting.
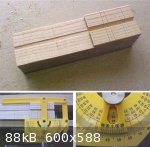
The tiles are wedge shaped, 5 mm wide on the inside edge with an included angle of 2 degrees for the tiles around the semi circular lower part of the
sound board and 1 degree for the upper part of the sound board that has a radius of curvature double that of the lower part. These angles were
determined by drawing a full sized layout plan.
Although small, the angles are (theoretically) significant cumulatively when the tiles are joined together - although, in practice, slight joint
mismatch between the tiles may be largely disguised by the contrasting colours of Ebony and Boxwood and the dark hide glue line.
In order to measure the angles with some reasonable level of accuracy, a low cost angle measuring tool was used that has a vernier device that allows
measurement (theoretically) to a tenth of a degree.
With the correct tile side angles marked on the jig with a knife, slots were cut with a fine razor saw to just beyond the depth of the milled slot.
The saw blade was guided vertically during the cut by using a square edged piece of metal clamped to the jig.
The prepared veneer strip was trimmed in width to fit the slot in the jig using a mini shooting board - a 5 mm slot, 2 mm deep milled in the edge of a
board with a router.
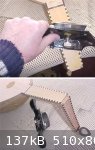
In use, the end each veneer strip is first cut to the required angle in the jig using the razor saw (a couple of draw strokes is sufficient to cut
through the veneer). A thin piece of metal is then inserted into the saw cut to act as an end stop. The veneer strip is then reversed, pushed up
against the stop and the second edge of the tile cut with the saw. The veneer strip is again reversed and the process repeated to produce the next
tile.
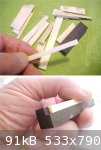
Seven tiles have been cut - only another 230 to go!
The first few tiles will be used to test the accuracy and viability of the method before going into 'mass production'.
|
|
|
jdowning
Oud Junkie
Posts: 3485
Registered: 8-2-2006
Location: Ontario, Canada
Member Is Offline
Mood: No Mood
|
|
In order to test the effectiveness of the tile cutting jig, a sample of sound board was first prepared from a piece of scrap Sitka spruce, cut to the
contour of the lower part of the sound board (16.8 cm radius).
A half banding rebate, 4 mm wide and about 0.8 mm deep, was then cut by first scribing the inner radius with a purfling cutter followed by a double
sided rebate plane - both 'home built' special purpose tools.
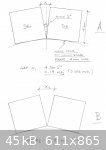
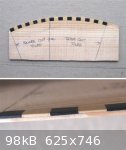
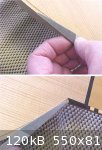
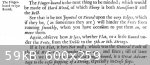
If square tiles are used for the sound board edge banding - each individually glued in place - there will be a gap between the tiles on the outside
edge of the sound board. If the tiles are set correctly at an equal 2 degree angle to each other, the gap will measure 0.14 mm (or 0.006 inch) - see
image A. However, in practice, the gap between the tiles might vary between zero and 0.23 mm ( 0.009 inch) maximum if the tiles are not set at
precisely the correct angle - see
image B . (the sketch is drawn with exaggerated proportions for clarity)
The tile cutting jig is designed to eliminate the gap between the tiles by cutting each tile to a wedge shape with an included angle of 2 degrees (for
tiles in the bottom section of the sound board). However, in practice, it has been found that - with the razor saw kerf measuring about 0.010 inches
wide (0.25 mm) together with working clearances and other slight cumulative dimensional errors in making the jig - that the tiles cannot be cut with
sufficient accuracy to maintain the required wedge shape of 2 degrees included angle. The test samples all measured about half that degree of taper or
less. Furthermore the saw cut edges introduce further lack of precision.
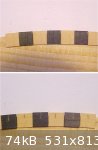
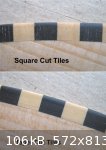
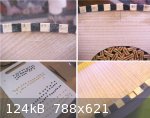
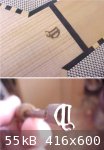
Comparing a set of square cut tiles with those cut on the jig, the attached image shows that there is little measurable difference in the fit between
the tiles (the jig cut tiles are those with the pencil marks indicating the outside or widest dimension). The tiles are oversize by about 1 mm so much
of the visible gap will be removed when the sound board edge is trimmed to finished dimensions. Also, any gap between the tiles will be filled by the
dark coloured hide glue used to attach the tiles to the rebate so should be practically invisible.
For tiles on the upper part of the sound board the gap will be half that of the lower tiles.
It has, therefore, been decided to move ahead with square section tiles - these being easier to cut accurately than the wedge shaped tiles. The tile
cutting jig has been modified to make the square cuts from straight edged 5 mm wide veneer strips.

|
|
|
jdowning
Oud Junkie
Posts: 3485
Registered: 8-2-2006
Location: Ontario, Canada
Member Is Offline
Mood: No Mood
|
|
To complete trials with the banding tiles, both sets of tiles - square cut and taper cut have been glued to the sound board test piece. The purpose of
this test was to determine the best method of gluing the tiles to the sound board edge rebate and to evaluate the best tile 'cut' to use.
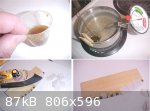
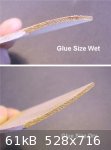
As the glue quantity requirement is very small for this operation, about 15 ml of 'pearl' glue were heated in a 30 ml plastic mixing cup ($4.40 per
100 from Lee Valley). Pearl glue was chosen as it is a darker colour than the higher strength hide glue that I use for instrument work. Water
temperature was maintained at around 140 Fahrenheit with a dial thermometer.
Hide glue gels quickly so I was prepared to have to reheat the glue with a hot iron at some time during the procedure to ensure all of the tiles had
'bedded' properly in the rebate. This was done by laying paper strips (cut from the print free edges of a newspaper) over the tiles and applying the
hot iron to remelt the glue and press the tiles firmly in contact with the rebate.
However, this part of the process was judged to be unnecessary as it was found to be quite easy to push each tile exactly into place - the tile then
being almost immediately held in position by the rapid gelling of the glue.
Nevertheless, in the event of a tile not being seated properly, the hot iron technique is the way to correct the situation.
Otherwise the gluing of the tiles was found to be a quick and uncomplicated process - if not a little messy (a damp cloth to remove gelled glue from
fingertips as work progresses is probably a good idea).
The test piece was finished by scraping away surplus glue (already hardened) and material about half an hour after the tiles had been glued in place.
(Normally a full day should be left for the glue to dry).
Macro images were used to assess the results - the digital camera having a far better resolution than my eyes! To judge the scale, tile width is 5 mm
and finished depth about 0.6 mm.
- and overall thickness at the edge of the sound board test piece is 1.4 mm. (I was a bit too'heavy handed' finishing with the scraper).
On the oud, the depth of the rebate will be increased slightly to give a finished tile thickness of about 0.8 mm.
On balance, the taper cut tiles - despite the tolerance inaccuracies inherent in the tile cutting jig - seem to be a cleaner, more precise fit than
the square cut tiles.
No question - use of hot hide glue is the simplest and most efficient way to go for gluing half banding tiles!
|
|
|
jdowning
Oud Junkie
Posts: 3485
Registered: 8-2-2006
Location: Ontario, Canada
Member Is Offline
Mood: No Mood
|
|
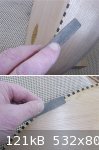
Work continued today on the sound board edge half banding by cutting the rebate.
The rebate inside edge is first scribed to the depth of the rebate (about 0.8 mm) using a purfling cutter. This is one that I made from brass some
years ago that does a reasonable job. The spear shaped blade tip (flat on the outside edge - i.e. the inside edge of the rebate) allows the tool to
cut in either direction. The width of cut is set to 4 mm using the two brass screws and the blade tip to project 0.8 mm (trial cuts on a piece of
scrap wood are made to verify the settings).
The scribing cut is made with several light passes of the tool around the edge of the sound board until full depth of cut is achieved.
As the tool cannot quite reach into the neck joint this part will be finished with a knife and chisel.
The rebate is being cut with a purpose designed, double sided, miniature rebate plane (made, step by step as a topic on this forum a while ago).
The plane cuts a rebate of fixed width and depth. The design allows the plane to be used on either a 'pull' or 'push' stroke - dependent upon the wood
grain direction of the sound board.
No room for error here so the rebate must be cut to depth with several passes - eventually setting the blade a little deeper for the final cut to the
required depth. The most difficult part is cutting across the end grain at the bottom of the sound board to avoid tear out. This part will, therefore,
be finished to depth with a 'safe edged' file.
I decided to take the cutting of the rebate slowly, carefully and leisurely, part done this afternoon for half an hour and - taking a break - finished
tomorrow.
Unfortunately, "taking a break" has now taken on a new meaning!!
|
|
|
jdowning
Oud Junkie
Posts: 3485
Registered: 8-2-2006
Location: Ontario, Canada
Member Is Offline
Mood: No Mood
|
|
To hold the oud firmly during the operation of cutting the rebate, I used a pad of non-slip rubber carpet underlay on my lap - oud bowls being a
difficult shape to hold without slipping and sliding.
However, at the end of the afternoon - when altering the position of the oud on my lap for a final cut with the rebate plane - the oud suddenly shot
from my grasp landing on the floor - some distance away - with a loud 'crack'. The peg box had broken off with the force of the impact!
Fortunately, the hard floor of the room is covered with carpet so the damage appears to be limited only to the area around the peg box/neck joint. The
hide glue withstood the test with the wood fracturing rather than the glue joint!
As this joint design replicates that on an old Egyptian oud in my possession, it is interesting to note that the fracture replicates almost exactly
the peg box damage found on the old instrument. So, I guess that this 'break' may be considered to be historically correct!
The peg box will be repaired with a new end block. The repaired peg box will be re-glued to the neck after completion of the sound board edge banding.
Rather than replace the whole back plate of the peg box, a 'beard shaped' patch of ebony will replace the broken area.
Just a bit more extra work.
|
|
|
Sazi
Oud Junkie
Posts: 786
Registered: 9-17-2007
Location: Behind my oud
Member Is Offline
Mood: مبتهج ; ))
|
|
 Nice to see you can still keep a sense of humor in such an unfortunate
situation! Nice to see you can still keep a sense of humor in such an unfortunate
situation!
All the best for this fine project.
|
|
|
jdowning
Oud Junkie
Posts: 3485
Registered: 8-2-2006
Location: Ontario, Canada
Member Is Offline
Mood: No Mood
|
|
The repair work should not be much of a set back Sazi as it will be a relatively straightforward job. On further examination, the back plate is also
split part way along its length so will be completely replaced as well. The new end block will be made from elm this time and not spruce.
The end block will be fitted and glued in place first (using the pegs already fitted to maintain correct alignment). Then the damaged back plate will
be removed and replaced.
The wood stock for the repair is now rough cut and will 'season' for a few days in our heated kitchen before use.
Quite a bit 'warmer' today than it has been (just below zero degrees) so the banding rebate work was completed in my work shop - this time with the
oud safely supported on the bench!
The rebate plane did a reasonable job dealing with the fairly wide grained Sitka Spruce sound board material. Any small irregularities in the the
rebate were finished level using a Nicholson 'safe edged' auger bit file (Lee Valley cat# 62W08.01 @$11.90) - a good quality tool that might have been
designed for this job.
The boxwood and ebony strips for the banding tiles have been prepared so the next task is to cut the tiles using the tile cutting jig. I shall need
about 65 each of boxwood and ebony tiles for the upper part of the sound board edge and about 55 of each kind for the bottom part - say about 250 in
total allowing for a few spares.
|
|
|
jdowning
Oud Junkie
Posts: 3485
Registered: 8-2-2006
Location: Ontario, Canada
Member Is Offline
Mood: No Mood
|
|
Rather than change the design/construction philosophy at this stage, I have decided to repair the peg box end block again using Spruce rather than Elm
- as Elm will add little, if anything, to the overall strength of the joint, the neck core being made from Spruce (veneered with Ash).
Peg box to neck joints are relatively weak due to the proportion of wood end grain (at the end face of the neck joint and peg box sides) so best to
avoid dropping an oud onto its peg box in the first place!
I shall make the end block a bit deeper than before for additional strength.
The first step in the repair is to fit and glue the replacement end block. The end block blank is made well oversize in order to make a precise fit of
the slight taper easy to achieve. This done, the blank may then be trimmed close to size and glued in place. The peg box back plate at this point
remains in position to maintain overall alignment.
|
|
|
jdowning
Oud Junkie
Posts: 3485
Registered: 8-2-2006
Location: Ontario, Canada
Member Is Offline
Mood: No Mood
|
|
The sound board edge tiles have been glued in place and will be left overnight for the glue to dry thoroughly before final trimming.
The tiles were first prepared, after cutting on the jig, by marking each tile with pencil to indicate correct orientation and to remove any 'burrs'
left by the razor saw underneath each tile. This was a fairly time consuming but important step to ensure that the gluing operation could proceed
quickly and smoothly.
The tiles were laid out in correct groups and orientation on a cheap kitchen plastic cutting board. Glue will not stick to the surface but - more
importantly - the board is relatively heavy so that there is little danger of upsetting the tiles halfway through the job as might happen if the tiles
were laid out on a sheet of paper - which would be a setback.
Hot hide 'Pearl' glue - maintained at a temperature of 140 F (60 C) - was used for gluing the tiles into the rebate. This grade of glue is not quite
as strong as the Granular hide glue that I use for structural components like the ribs and braces but takes longer to 'gel' so is perfect for the tile
gluing operation allowing time to correctly position each tile. Nevertheless, it is necessary to move forward with the gluing operation at a steady
pace.
As a precaution, a hot iron was left 'on stand by' in the event that some tiles were found not to be seated properly in the rebate and so could be
ironed in place. This was not found to be necessary however.
The edge of the sound board was marked (through the centre line of the two rosettes) to indicate the transition from square cut tiles to the wedge cut
tiles around the bottom of the sound board.
The procedure for gluing was to use a small paint brush to apply a dab of glue to the rebate surface and then press each tile into position wiping
away any surplus glue with thumb or forefinger of the left hand. Before picking up the next tile (using the left hand) the fingers were wiped on a
damp cloth to remove any glue. The wet finger tips also make it easier to position the tiles as the tiles will not readily stick to the fingers.
No additional clamping or taping of the tiles is required.
The tiles were glued on one side of the sound board at a time (one side in the morning the other during the afternoon) giving time for the glue to
harden sufficiently on the first side.
The last tile will have to be custom fitted as the remaining gap is just a little too tight to fit a tile without trimming. Also, the black/yellow
tile colour sequence did not quite work out perfectly so the last tile will be black.
The tiles are oversize so about 1 mm will be trimmed around the edge of the sound board and about 0.25 mm removed to bring the tiles flush with the
sound board surface.
|
|
|
jdowning
Oud Junkie
Posts: 3485
Registered: 8-2-2006
Location: Ontario, Canada
Member Is Offline
Mood: No Mood
|
|
As this project advances to completion (but not wanting to rush things!) there are a few items yet to consider ahead of time.
The fret gut has arrived direct from 'Pyramid Strings' in Germany (with the usual fast and efficient service).
I had hoped to purchase bone blanks for the nut from luthier supply companies in the USA and Canada but shipping and handling far outweighs the cost
of the blanks. I may be able to obtain bone blanks from the nearest music shop - half an hours drive away - but then there is the cost of gas and time
involved which again outweighs the value of the blanks (if they stock them).
I may try Persian boxwood as a nut material - cut on the end grain which is very hard - as I have plenty of that material.
However, as it may be of general interest, I shall try to make bone nut blanks 'from scratch'. So, a 'soup bone' (leg bone of a beef cow) was today
purchased from a local butcher ($2.50) with the knuckle joints trimmed off to leave a relatively straight section of bone in between. I have no idea
how to select the best bone for the job but must start somewhere. A brief search on the Internet indicates that there is much information on how best
to undertake bone preparation for use in musical instrument work. So, with our dog showing great interest in the raw material, it goes into the
refrigerator for now until I can decide how best to proceed. More to follow!
Concerning the finish to be applied to the oud and as this is an experimental project with none of the usual commercial restraints (if it doesn't work
- no customer to satisfy so no big deal) I am curious to try traditional 'glue size' as a grain sealer for the Ash wood.
Some test pieces of Ash wood have been tested to confirm compatibility with possible finishes such as Shellac or oil varnish.
Glue size is just a dilute solution of hot hide glue in water. For this test the concentration was 25 ml of 'Pearl' glue (fluid) in 250 ml water. This
was brushed on to the test pieces at 140 C.
Each test piece immediately expanded into a convex curvature as moisture was absorbed into the surface of application. For example a test piece 48 mm
wide and 2 mm thick arched into a significant curve 2 mm deep in the centre. However, once the surface moisture had evaporated, shrinkage of the dried
glue resulted in an almost equal and opposite concave curvature.
Glue size (as well as water) 'raises the grain or fibres' of the wood (an important part of the finishing process) - these raised fibres and
'whiskers' then being removed by scraping or fine sanding to produce a smooth surface in preparation for the final finish (Shellac or Oil Varnish).
|
|
|
jdowning
Oud Junkie
Posts: 3485
Registered: 8-2-2006
Location: Ontario, Canada
Member Is Offline
Mood: No Mood
|
|
The edge banding of the sound board has been levelled and finished to size.
To avoid breaking or chipping the tiles, a flat single cut file has been used to dress the tile edges to the profile of the sound board. (Only files
and scrapers will do the job - slow but safe)
The same file was then used to roughly level all of the tiles to an equal height.
The tiles were then reduced to sound board thickness with a curved scraper blade followed, finally, by a flat scraper blade (with masking tape on the
outer edges to avoid possible damage to the sound board surface). The curved scraper allows material and dried surplus glue to be removed locally
close to the banding tiles without contacting the sound board surface. The scrapers are worked at an angle to the tiles (and sound board grain) to
prevent the scraper 'catching' in the joints between each tile which might cause irregularity in the finished surface.
To complete the work, the sharp edges of the banding tiles have been rounded over with a single cut file. (I avoid using sand paper wherever possible
when finishing wood)
A job not to be rushed - taking about 4 hours to complete.
|
|
|
jdowning
Oud Junkie
Posts: 3485
Registered: 8-2-2006
Location: Ontario, Canada
Member Is Offline
Mood: No Mood
|
|
The damaged pegbox has been repaired with a new end block and back plate. The backplate has been made a bit thicker than before for extra strength.
After a 'dry run' to check the accuracy of the pegbox to neck joint, the peg box has been glued in place.
Before gluing the peg box in place, the finger board was finished level ( using a scraper and double cut flat file to remove any slight 'high
spots'). As the oud will be fretted, the finger board surface is slightly 'crowned' to ensure that the tied on gut frets lie tight against the
fingerboard.
It is interesting to note the comments about flat versus rounded fingerboards on lutes written in 1676 by Thomas Mace (Musick's Monument). Mace
published his book in an attempt to regenerate interest in the lute that - in his time - was waning in popularity (eventually to die out completely by
the mid 18th C).
He warns about the flat fingerboards found on lutes of the 16th C as being a fault. However, the lute of Mace's time had more strings and a much wider
fingerboard than the five or six course lutes of the early 16th C - so rounding of the fingerboard surface of his lutes was essential to avoid string
'buzzing' or sound damping due to loose frets.
Nevertheless, even for the relatively narrow fingerboard of the oud of this project, the finger board surface has been very slightly 'crowned' and the
edges of the finger board smoothly rounded.
With the sound board edge banding levelled and cleaned up, my maker's brand was used to mark the sound board just below the fingerboard. Branding a
lute sound board was the practice of some 16th C lute makers - the brand sometimes attempting to disguise the wooden guide pin in that location used
for sound board alignment.
The branding tool is easily made from brass strip bent to the required shape and hard soldered (brazed or silver soldered) to a metal rod. The fine
detail is then done with needle files. All in reverse, of course!
In use, the brand is heated to scorching temperature with a propane torch - tested first on wood scrap - and then pressed in place to make the brand
mark.
At this rate of progress it looks as though I am going to have to drive to the nearest town to purchase a bone nut blank after all.
|
|
|
jdowning
Oud Junkie
Posts: 3485
Registered: 8-2-2006
Location: Ontario, Canada
Member Is Offline
Mood: No Mood
|
|
Conditions in my kitchen are perfect for varnishing (25 C/72 F @ 45% Relative Humidity) so work on finishing the oud started yesterday with a first
varnish sealing coat on bowl, neck and peg box (the sound board will be left unvarnished).
I have decided not to use glue size as a wood grain sealer when I realised that the grain had already been sealed with glue as a consequence of
constructing the oud bowl using the ancient technique of applying glued paper strips to hold the rib joints together during assembly. Also, I was a
bit nervous about the possibility of introducing stresses to the bowl - due to glue shrinkage - now that the sound board is in place.
I am using an oil varnish to finish the oud. In the past I have used violin oil varnishes to finish lute bowls - slow to dry and difficult to apply,
particularly if the varnish is coloured with stain.
For this project I am using a so called 'hand rubbed' oil varnish - Minwax Antique Oil. I have used this product successfully on many wood working
projects in the past but not for instrument making. The 'hand rubbed' varnishes are all basically a mixture of linseed oil and varnish. Linseed oil
takes forever (never?) to dry so addition of the varnish speeds up the drying process to within a few days.
The Minwax product dries hard enough to re-work in 24 hours. Ash wood is an open grained wood so the method I am using aims to fill the grain (with
the varnish) to produce a smooth surface (but not a glossy 'French Polish' finish). Most of the varnish coats will eventually be removed by sanding
with fine sandpaper (320/400 grit - 3M 'non clog' paper is the best) leaving a thin, light, protective layer of varnish at the end.
The first sealing coat of varnish has been applied and allowed to dry overnight. This coat has been lightly rubbed down with 320 grit paper - to level
any 'high spots'. This produces a fine varnish dust that will be used as a grain filler during the next finishing stages.
The varnish is applied with low cost, disposable 'foam brushes' (wearing plastic gloves for protection). Once the varnish has been allowed to 'cure'
for about 5 minutes, surplus varnish is then wiped off with a piece of cotton cloth and the work allowed to dry.
All used foam brushes, cloths etc are a potential fire hazard until the varnish has hardened so are left outside - in the snow - for safety.
|
|
|
jdowning
Oud Junkie
Posts: 3485
Registered: 8-2-2006
Location: Ontario, Canada
Member Is Offline
Mood: No Mood
|
|
In the meantime!
Local music shops do not stock bone nut blanks.
Making my own own blanks from scratch using cow bone may take a few weeks to accomplish so thought that I would try using what I already have in
stock.
None of the bone pieces are big enough for the nut so thought that it would be interesting to make a 'composite' nut - Ebony with bone inlay. Easily
made - the ebony blank being rebated for the bone inlay. I shall glue the bone to the ebony with epoxy cement but a better choice would be the
traditional luthier glue (wood to ivory joints) made from hide glue and isinglass (sturgeon glue).
|
|
|
jdowning
Oud Junkie
Posts: 3485
Registered: 8-2-2006
Location: Ontario, Canada
Member Is Offline
Mood: No Mood
|
|
Varnishing of the oud will take a week or so to complete as each layer of varnish must be allowed to dry before being rubbed down to the wood with
steel wool. Three coats have been applied so far. It may take another four or five 'rubbed down' coats to finish the job.
In the meantime other work can proceed.
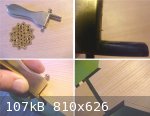
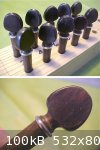
The Brazilian Rosewood pegs - refurbished from a set that I made years ago for a lute - have been 'inlaid' with pure tin/silver alloy wire (as
reported in a previous post) a technique that I wanted to try out on this project.
The tin/silver wire is quite soft and easy to form and can be cut with a sharp knife. The split wire rings sit in a groove hand filed in the peg shank
just below the peg head. Each ring must be trimmed in length so that it fits exactly in the groove when compressed into position.
The rings have been glued in place with epoxy resin for convenience although hide/isinglass glue or shellac would likely do just as well. Brazilian
Rosewood is an oily wood - great for finishing to a polished surface but problematic for gluing. All surfaces must, therefore, be thoroughly
de-greased before gluing. I have used 100% isopropyl alcohol. In the past have used de-greasing agents like 'Genklene' (used to remove grease spots
from clothing) but these (hazardous) products may now be unavailable on the consumer market.
In addition to the 'silver' ring, a silver 'dot' has been inlaid into each peg head. Easily done by drilling a short hole of suitable diameter (1/16
inch in this case) in the peg head so that the wire is a tight fit in the hole. The wire is then lightly hammered into the hole (without need for
glue) and trimmed flush with the peg surface.
All surplus cured glue has been removed with a 'safe edged' file and fine steel wool.
All that remains is to give each peg a final hand polishing with cloth strips/string (or perhaps with a felt buffing wheel in a 'Dremel' type
tool).
|
|
|
Peyman
Oud Junkie
Posts: 496
Registered: 7-22-2005
Member Is Offline
Mood: Mahoor
|
|
This is very exciting. I have been more ore less following the prgoress and can't wait to hear and see the final results.
|
|
|
jdowning
Oud Junkie
Posts: 3485
Registered: 8-2-2006
Location: Ontario, Canada
Member Is Offline
Mood: No Mood
|
|
Me too Peyman! Having lost three months or so last year I now want to get things completed as soon as possible (before some other unforeseen
circumstance gets in the way - that's life!).
I shall initially set up the oud with modern nylon strings (Pyramid lute strings) and soft nylon frets so that the string action can be measured with
the instrument under full string tension. If the action is too high then this can be corrected by planing down the fingerboard at the nut end (excess
fingerboard material has been allowed for this).
Nylon frets are not as good as gut but are much less expensive. (I have used nylon fishing line in the past on lutes) - so these will be fine for
initial trials. Once the performance and 'playability' of the oud has been assessed and any necessary adjustments made, the nylon strings will be
replaced by silk strings and the nylon frets by gut.
The Minwax 'Antique Oil' varnish that I am using is partially oxidised as I have had it in stock for a number of years (25!). This has made the
varnish a bit too viscous to apply properly so before proceeding further a fresh can of varnish has been purchased. This product is now called Minwax
"Antique Protective Oil Finish' and it seems to be made to a different formula than the original 'Antique Oil' varnish (a lighter colour and thinner
consistency). So the original varnish has been applied diluted with the new varnish - which seems to work.
As it has been decided to initially use a composite bone/ebony nut for the project oud - work on preparation of a bone nut 'from scratch' (which may
take several weeks to complete) will now be subject of a new thread on the forum
|
|
|
jdowning
Oud Junkie
Posts: 3485
Registered: 8-2-2006
Location: Ontario, Canada
Member Is Offline
Mood: No Mood
|
|
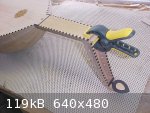
Taking a break from varnishing the bowl, the nut rebate for the composite bone/ebony nut has been finished and the nut shaped and fitted.
To hold the oud securely for this work, a clamping jig was made from scrap materials - padded with rubber carpet underlay to prevent damage to the
neck. The jig is conveniently held in the bench vise.
The nut rebate was finished square with a sanding block - easily made from a piece of pine, planed square with some 120 grit Garnet or sand paper
glued to one face. Final adjustments to the rebate were then made using a mini scraper blade.
The composite nut is just sufficient in length to make two nuts - a useful spare if needed. The nut has been planed and filed square to precisely fit
the rebate and roughly finished to the required contour. The nut will be finished just prior to stringing the oud.
A final coat of varnish has been applied to the bowl after rubbing down all of the previous varnish coats (5 coats I think but have lost count). The
final sanding was done with 400 grit 3M non clog paper (good stuff) followed by 0000 grade steel wool. So, after all of this work, only one coat of
varnish - the final coat - remains! I am not sure if this will be sufficient to fill all of the open wood grain but will wax the bowl which should
fill any remaining pores to a smooth surface.
The neck will be varnished next followed by the peg box - both varnished separately just for ease of handling.
That should bring the project to the final stage of stringing, action adjustment, fretting etc. perhaps a week or so from now - all being well.

|
|
|
SamirCanada
Moderator
Posts: 3404
Registered: 6-4-2004
Member Is Offline
|
|
Hi John,
I hope to have a chance to see this beauty when I pass by sometime in the future.
Is it really going to have frets? if so, would the action of the string allow to play the instrument with the frets removed? or is it going to be a
strictly fretted instrument? just wondering. 
|
|
|
fernandraynaud
Oud Junkie
Posts: 1865
Registered: 7-25-2009
Location: San Francisco, California
Member Is Offline
Mood: m'Oudy
|
|
John makes a lie of the famous fallacy: "it's not rocket science". Of course it is.
|
|
|
jdowning
Oud Junkie
Posts: 3485
Registered: 8-2-2006
Location: Ontario, Canada
Member Is Offline
Mood: No Mood
|
|
Thanks for your interest and comments guys. Hope that the instrument sounds well enough not to become a decorative wall hanging conversation piece!
Time will tell.
The oud will be fretted/tuned according to the scales described in the early Persian and Arabian manuscripts (ie with some quarter tone fret
positions) - if I can figure it all out - but will also be played as a lute (safer ground for me!). So the instrument will be something of a test bed
just to try out this and that to see where it takes us.
The last fret shown in the oud engraving is equivalent to the 5th fret on a lute tuned to Western scale. Why the early oud fretting stopped at this
point may just have been for the purposes of the musical theory perhaps rather than in practice where additional frets may have been used at higher
positions? I shall therefore add two additional higher frets - if there is space on the fingerboard - just so that I can more readily initially assess
the instrument acoustically by playing it as a lute.
The differences in the fret positions between the oud configuration and the lute is that the fret spacings for the fretted oud (played in monophonic
style) are based upon Pythagorean intervals whereas for the lute (played polyphonically) essentially equal temperament tuning applies. Of course, as
the frets are 'tied on' they can be readily adjusted for micro tuning of intervals - and in the final analysis it all depends upon what sounds 'right'
for the player. In the 16th C Spanish lute (vihuela) tradition, the frets were sometimes adjusted to sound more in tune when playing in a particular
mode.
I anticipate the action (with frets) to work out at about 3mm (treble side) at the neck joint and about 4 mm at the bass side (to account for the
larger diameter strings and their greater amplitude of vibration) with height at the nut of around 1mm. If I can get the action somewhat lower than
this I shall do so.
The gut frets (when eventually fitted) will be graduated in diameter starting thicker at the nut end diminishing in 0.5 mm steps towards the neck
joint. This means of fretting is early lute practice designed to keep the action as low as possible along the length of the fingerboard. The frets
will be double tied rather than single tied (as is common practice among lutenists today). This would conform with the frets depicted in the oud
engraving that appear to be doubled.
However, I am getting ahead of things here. Still a way to got yet!
Next time you drop by Samir, bring your best eagle feather risha with you and give the completed oud a test run. You will of course have to adjust to
the shorter string length and a lower string tension than you are used to.
|
|
|
jdowning
Oud Junkie
Posts: 3485
Registered: 8-2-2006
Location: Ontario, Canada
Member Is Offline
Mood: No Mood
|
|
The final varnish coat on the bowl, after drying overnight, has a rough surface due to areas of small diameter dried spots of varnish on the surface -
rather like spray from a brush. Not sure why this has occurred. It looks as though varnish left in the open pores of the wood may have moved to the
surface during drying. I suspect that use of fine steel wool for final rub down might have something to do with it - the wool perhaps containing some
oil contaminants?
To try to correct this problem, the final varnish coat has been rubbed down with 600 grit silicon carbide paper, used dry, to remove all of the spots.
This operation was then repeated using paint thinner as a lubricant followed by wiping the surface clean with paint thinner. The surface will now be
left to dry for 24 hours before applying another finish coat of varnish - hopefully this time without a problem
|
|
|
jdowning
Oud Junkie
Posts: 3485
Registered: 8-2-2006
Location: Ontario, Canada
Member Is Offline
Mood: No Mood
|
|
The final varnish coat was re-applied today but with similar negative results.
Hand rubbed oil varnish is applied to the surface of the wood, allowed to dry for 5 to 10 minutes, then surplus varnish is wiped off with a cloth
until the surface loses any 'stickiness' after which is allowed to dry for 24 hours.
This procedure was followed but after about half an hour small spots of varnish started to appear on the finished surface - coming from the open pores
of the wood. These were wiped away with a dry cloth to remove any 'stickiness' which seems to have corrected the problem - although some small specks
of varnish still remain in places. So the problem seems to be related to the open grained Ash wood trapping uncured varnish.
Rather than attempting to completely fill the wood grain with repeated applications of varnish, this final coat will be buffed to smooth out any
remaining small varnish spots and then waxed.
This kind of finish is not the same as a brushed on instrument varnish (as used on violins) - however it does help to 'bring out' the grain of the
wood and provide a hard protective finish.
The Ash wood of the bowl is relatively plain (as far as woods go) but, nevertheless, has a some complex but subdued 'fiddle back' figuring.
|
|
|
| Pages:
1
..
11
12
13
14
15
16 |


