| Pages:
1
..
12
13
14
15
16 |
jdowning
Oud Junkie

Posts: 3485
Registered: 8-2-2006
Location: Ontario, Canada
Member Is Offline
Mood: No Mood
|
|
Varnishing is now complete and the banding tiles cleaned of any residual varnish, along the front edges, using a scraper blade and file.
The peg holes have been cleaned of any residual varnish using a peg reamer (with a light touch to avoid removing any wood). The pegs have been fitted
using dry soap as a lubricant - important at a time of year when humidity changes might cause the pegs to jam. The soap is just regular hard laundry
soap that hasn't been near water for years so is powdery dry.
The nut has been fitted and the string grooves marked in pencil using a rubbing taken from the nut of one of my lutes. The grooves have been filed
with needle files and burnished smooth with a piece of string. The string height has been left at just over 1 mm so may still require further
adjustment.
String action and alignment has been checked on the treble and bass sides using thin fishing line as string. The action is currently about 0.5 mm
higher than I want but will leave it at that for now until it is seen how the instrument 'moves' at full string tension. About 2 mm extra finger board
thickness at the nut has been allowed for possible action lowering adjustments.
Target string clearances at the neck joint are 3 mm on the treble side and 4 mm bass side.
The completed oud (without strings and frets) weighs 624 grams - well within the 650 gram target weight.
Now to calculate the strings required. These will be Pyramid PVF with metal overspun basses for initial tests switching later to all silk strings. The
oud will be strung first without frets so that the action can be verified and any adjustments made.
|
|
|
jdowning
Oud Junkie
Posts: 3485
Registered: 8-2-2006
Location: Ontario, Canada
Member Is Offline
Mood: No Mood
|
|
The oud has now been fitted with strings and frets for an initial assessment. The strings fitted are those that I have to hand, including plain nylon
trebles - just to bring the instrument up to tension. These will later be replaced by the correct Pyramid PVF trebles. The frets are also temporary -
0.8 mm nylon fishing line (much cheaper than gut!) - just to get a feel for things.
Apart from fitting better strings, the action feels too high. Also the string pairs need to be a little closer. So, after an initial trial period with
these strings and frets, the fingerboard will be planed down by about 1 mm at the nut end and the nut reworked accordingly. Graduated gut frets will
then be fitted
Initial string tensions at g' pitch, A440 are 3.5 Kg. 3.3 Kg, 2.5 Kg, 2.5 Kg, 2.5 Kg. The top string tension feels too high so will be reduced
accordingly.
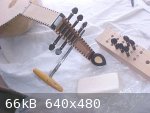
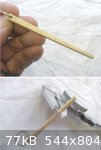
To measure the action (i.e. the distance between the fingerboard surface and underside of a string), I used an easily made tool. Made from a piece of
boxwood (but any close grained hardwood will do) cut to a slow taper. The gauge is calibrated, using a dial gauge caliper, for 2.5 to 5 mm gaps in 0.5
mm increments.
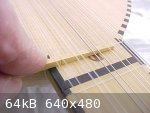
In operation, the string is lightly sounded and the gauge slid underneath until contact is made with the string (a buzz and then silence).
The action at the 7th fret position (at the neck joint) measures just over 3.5 mm on the treble side and about 3.75 mm on the bass side. This will be
reduced to 2.75 mm on the treble and 3.5 mm on the bass.
|
|
|
jdowning
Oud Junkie
Posts: 3485
Registered: 8-2-2006
Location: Ontario, Canada
Member Is Offline
Mood: No Mood
|
|
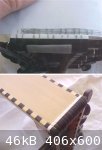
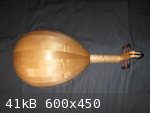
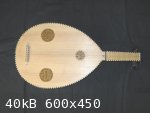
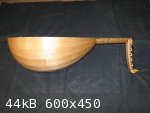
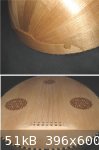
So far so good - here are some images of the completed oud.
|
|
|
jdowning
Oud Junkie
Posts: 3485
Registered: 8-2-2006
Location: Ontario, Canada
Member Is Offline
Mood: No Mood
|
|
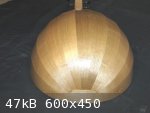
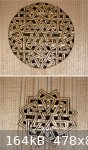
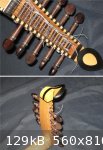
...... and a few detail images.
|
|
|
Microber
Oud Junkie
Posts: 853
Registered: 1-20-2006
Location: Belgium - Liège
Member Is Offline
Mood: No Mood
|
|
Hello John,
The instrument you made is really won-der-ful.
The process of construction during all these months was absolutely exciting.
A real thriller for me.
But one think makes me a little sad : I feel like at the end of the hollydays.
I will no longer have these little moments of happiness when I saw in the 'today's posts' the long-awaited 'Old oud - New
Project'.
Thank you John for sharing your passion.
Robert
|
|
|
Peyman
Oud Junkie
Posts: 496
Registered: 7-22-2005
Member Is Offline
Mood: Mahoor
|
|
It's great to see it finally came together! This was a great journey to follow. This is a great reference post too.
|
|
|
ALAMI
Oud Junkie
Posts: 643
Registered: 12-14-2006
Location: Beirut
Member Is Offline
Mood: No Mood
|
|
John, you did it !
We are looking for the first time to a 13th/14th century oud, or at least to the closest possible model ever attempted by anyone.
From old manuscripts study to wood research, to glue, to design to tools...to strings
I don't want this epic to end..yet.
We still need to hear it played, may be with the silk strings.
I would also love to read an epilogue regarding all the learnings you made during this one of a kind project.
Thank you John for this lesson of passion, wisdom, determination, precision workmanship, you took us through one great journey.
|
|
|
jdowning
Oud Junkie
Posts: 3485
Registered: 8-2-2006
Location: Ontario, Canada
Member Is Offline
Mood: No Mood
|
|
Thank you for your kind words and encouragement gentlemen. It was a pleasure to undertake this project and it is very gratifying to me that others
have found my work to be of interest.
The project, of course is not finished yet. This is more like the beginning of the end!
The next step is now to remove the temporary stringing and nylon frets, plane down the fingerboard at the nut end to bring the action down to a more
comfortable level, rework the nut for the lower action and closer string spacings, fit graduated gut frets and then restring with Pyramid PVF and lute
strings. This will allow me to then properly assess the oud and become accustomed to the shorter string length and five courses.
If the oud passes this test then I shall post an audio clip for information before moving on to testing all silk stringing - which is the ultimate
objective.
..... and the final step will be to make a wooden case for the oud.
However, if the instrument does not pass muster then it will be destined to become just a decorative wall hanger and conversation piece!!
|
|
|
Yaron Naor
Oud Junkie
Posts: 275
Registered: 1-24-2009
Location: Bat Hefer, Israel
Member Is Offline
Mood: Happy
|
|
Dear John,
This is an amazing process and instrument! Bravo
Next step is a replica of a lute? 
Take care
Yaron Naor
|
|
|
jdowning
Oud Junkie
Posts: 3485
Registered: 8-2-2006
Location: Ontario, Canada
Member Is Offline
Mood: No Mood
|
|
Thanks Yaron.
Actually this is my first oud - my historical interest in the oud naturally developing from my primary interest in the lute.
I started making replica lutes (and other plucked instruments of the 16th and 17th C) way back in the 70's. Still more research projects to go however
- time and life permitting! (e.g see 'Old Project - New Lute' , posted 11-5-2007, page 8 on the Oud Projects Forum - sadly, still awaiting
completion!)
|
|
|
paulO
Oud Junkie
Posts: 531
Registered: 9-8-2004
Location: California
Member Is Offline
Mood: Utz
|
|
Hi John,
Your meticulous attention to detail is mindblowing; and your documentation of each step in the process is to be commended (duh ). Thanks for all your hard work, its very much appreciated.
Regards,
PaulO
|
|
|
jdowning
Oud Junkie
Posts: 3485
Registered: 8-2-2006
Location: Ontario, Canada
Member Is Offline
Mood: No Mood
|
|
Thanks PaulO - glad that the topic has been of interest.
Of course work that is enjoyable is not hard work!
|
|
|
Yaron Naor
Oud Junkie
Posts: 275
Registered: 1-24-2009
Location: Bat Hefer, Israel
Member Is Offline
Mood: Happy
|
|
Quote: Originally posted by jdowning  | Thanks Yaron.
Actually this is my first oud - my historical interest in the oud naturally developing from my primary interest in the lute.
I started making replica lutes (and other plucked instruments of the 16th and 17th C) way back in the 70's. Still more research projects to go however
- time and life permitting! (e.g see 'Old Project - New Lute' , posted 11-5-2007, page 8 on the Oud Projects Forum - sadly, still awaiting
completion!) |
Sorry, but the forum's search didn't find it... do you have a link or some info about this?
Thanks in advanced
Yaron
|
|
|
Danielo
Oud Junkie
Posts: 365
Registered: 7-17-2008
Location: Paris
Member Is Offline
Mood: No Mood
|
|
I'm rather impressed by what you have achieved John, and all the research involved in this project.
Really wonderfull! As others I'm a little sad that this journey is over - it's time for the next one
Dan
|
|
|
jdowning
Oud Junkie
Posts: 3485
Registered: 8-2-2006
Location: Ontario, Canada
Member Is Offline
Mood: No Mood
|
|
Hi Yaron. The Forum 'Search' function seems to be case sensitive so you need to type Old Project - New Lute to find it. Otherwise just go to page 8
of this the Oud Projects Forum and you will find it near the bottom of the page.
The lute that is the subject matter of the topic is a 'Liuto Attiorbato' that I started a few years ago but never finished. This form of lute was used
to play the Italian solo repertoire of the 17th C so has a relatively short stopped string length plus extended bass strings running to a second
pegbox.
The Old Oud project has taken priority - so perhaps my next move will be to pick up the thread again and complete the instrument - perhaps later this
year when all the other essential 'non-instrument' work around the house has been completed.
Thanks Dan - the next instrument project is likely to be the 'Liuto Attiorbato' mentioned above but I also plan to make a fluted back vihuela .....
For the final stages of this project, the 'proper' (modern) strings are on order from Pyramid. In the meantime, the temporary strings have allowed a
more precise evaluation of the action set-up. The string tension resulted in a pull up at the nut of about 0.5 mm so the strings and temporary frets
have been removed ready for final adjustments by planing some material (about 1 mm) from the nut end of the fingerboard as well as adjustments to the
nut to bring the action at the neck joint on the treble side down to about 2.75 mm. The pitch of the top string will be
f' sharp (at A440) rather than g' as this should give a better string life when historical silk strings are eventually fitted.
The new gut frets will be graduated in diameter from 0.8 mm (1st fret position) down to 0.5 mm at the neck joint (7th fret position). I have decided
to make the frets single rather than double tied as this will probably work better given the relatively short string length.
|
|
|
DaveH
Oud Junkie
Posts: 526
Registered: 12-23-2005
Location: Birmingham, UK
Member Is Offline
Mood: No Mood
|
|
Hi John
Congratulations, this is a really fantastic piece of work.
But you're not going to fool anyone on this forum if you try to tell us that you've strung her up and resisted the temptation to pick out a few notes!
How about a (preliminary) sound sample?
|
|
|
jdowning
Oud Junkie
Posts: 3485
Registered: 8-2-2006
Location: Ontario, Canada
Member Is Offline
Mood: No Mood
|
|
Thanks DaveH.
Of course, I have played a lot of notes with the preliminary set of strings and did make some brief audio recordings (before removing the strings and
frets), in order to assess and record the oud response etc using the spectrum analysis feature of "Audacity" software.
The strings used are those that I had to hand (i.e. less than ideal) - plain nylon for the first two courses, Pyramid 1010Al for the third, Pyramid
906 for fourth and Pyramid 1010 for the fifth. The plain nylon is stock that I have from the 'good old days' when the material could be purchased in
50 metre spools so may be a bit different from the plain nylon strings currently sold by Pyramid. I used 1010Al for the third course only because I
did not have any suitable plain nylon (or PVF). This selection of strings was for g' tuning of the first course giving a tension of about 3.5 Kg with
2.5 Kg for the lower strings. However, at a pitch of f' sharp - that seems to suit the oud better - this tension drops to 2.8 Kg and 2.3 Kg for the
lower three courses. So, not the preferred selection of strings but good enough for a preliminary assessment of the oud. I expect to hear significant
improvements with the new strings that will have PVF for the top three courses at a slightly higher tension.
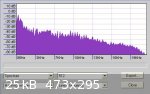
So, with all this in mind, here - for what it is worth - is a brief audio clip (a little doodle up and down the fingerboard) just to give some idea of
the potential, as well as an image of the corresponding spectrum analysis (don't ask me what it means - it is only for file and future reference at
this point in time). The strings are being plucked with fingertips - lute style.
The 'raw', unenhanced recording was made with a Zoom H2 digital recorder using the front stereo microphone pair placed about a metre from the oud. The
room is pretty well 'dead' acoustically being lined with books wall to wall. The recording is compressed to MP3 format so there are consequent audio
losses in the file.
Attachment: Old Oud Clip 4.mp3 (299kB)
This file has been downloaded 521 times
|
|
|
DaveH
Oud Junkie
Posts: 526
Registered: 12-23-2005
Location: Birmingham, UK
Member Is Offline
Mood: No Mood
|
|
Thanks John for posting this. I hope it wasn't too cheeky to preempt you even though you were intending to wait for a better stringing setup.
Curiosity got the better of me.
It sounds great. Very responsive - and very lute like, which is not surprising given you're plucking with fingers and using lute-comparable tensions.
I suppose the structure is quite lute-like as well, particularly in terms of wood thicknesses, which is quite possibly much more the style that
historical ouds were built. I think it has a lot of promise and look forward to further trials!
|
|
|
jdowning
Oud Junkie
Posts: 3485
Registered: 8-2-2006
Location: Ontario, Canada
Member Is Offline
Mood: No Mood
|
|
It is, of course, necessary to distinguish between modern ouds and lutes fitted with nylon and metal overspun strings and the instruments of a more
ancient period of time when only plain gut or silk strings were used. Then there would have been little, if any relative, difference in string tension
between oud or lute.
The maximum pitch that can a gut or silk string of a specified length can be raised to depends upon the material of a string. For example, in the case
of gut or silk the maximum pitch for a double course top string of say 55 to 57 cm in length (if frequent string breakage is to be avoided - measured
at A440 pitch standard) would be about f' sharp.
Use of modern nylon strings allows for a higher tension and relative pitch. However, even if I use nylon strings I prefer to use a pitch for the top
string that would be suitable if I were to use gut or silk as the response is usually better.
At the other end of the scale - so to speak - if plain gut or silk bass strings are to sound well either the tension must be lowered or the strings
made more elastic in the way they are constructed or both. String breakage is not a concern for these larger diameter strings. So for a 55 to 57 cm
string the lowest acceptable pitch might be B, F sharp or C sharp dependent upon the strings construction (source E. Segerman, N.R.I.)
What I find interesting when making comparisons between early oud and lute is that string technology for the oud must have been well in advance of
that in medieval Europe as the oud has always been fitted with unison string pairs (4 or 5 courses) yet the lutes of the late 15th/ early 16th C had
octave tuned gut bass courses (the octave string being needed to brighten the otherwise dull sound of the thicker string) as well as a gut single top
course (because of the difficulty in being able to match unison string pairs - as well as the cost).
This situation was to change for the lute by the end of the 16th C as string making technology developed. This change coincided with the demise of the
vihuela (also strung with unison pairs like the Moorish oud) in Spain towards the end of the 16th C - at a time when the agricultural economy
(including sheep rearing and sericulture necessary for string making) was all but destroyed by punitive measures introduced by the Spanish government
as well as a period where the Moors and Jews were being expelled in large numbers from the country. One might speculate, therefore, that one
consequence of the expulsions might have been that the advanced instrument string technology, developed over centuries by the Moors, was carried away
to other lands by those involved in the making of gut and silk instrument strings - Spain's loss being Europe's gain.
While the oud is generally considered to have been played with a risha there is evidence to confirm that - on occasion - the early fretted oud was
played by plucking the strings with finger and thumb like the lute technique of the 16th C.
I play with lute technique because that is the only way I know how at present but future testing of the oud must also include use of a risha for
purposes of comparison.
|
|
|
jdowning
Oud Junkie
Posts: 3485
Registered: 8-2-2006
Location: Ontario, Canada
Member Is Offline
Mood: No Mood
|
|
With temporary strings and frets removed the fingerboard has been planed down by 1 mm at the nut end and re-levelled. The nut has been reworked to
bring the strings to a clearance of
1 mm above the fingerboard surface. A preliminary check of the action measures just under 3 mm at the 7th fret position (the neck joint) treble side
and 3.5 mm at the bass side. These measurements may increase a little under full string tension but the action will now be left as it is.
Removal of the temporary strings reveals staining of the sound board and fingerboard surfaces below the strings - not unexpected. This is primarily
due to the third course aluminium wire over spun strings (Pyramid 1010Al). These are good strings but the metal wire - being soft and readily oxidised
- leaves a dark oxide deposit on the fingers, after a few minutes of playing, that is then transferred to the playing surfaces. The marks on the sound
board were easily removed with a soft pencil erasure and the affected areas reworked lightly with a curved scraper blade (I avoid use of abrasive
papers wherever possible - no matter how fine - when finishing wood surfaces).
The marks on the finger board were removed during the planing and levelling process.
To minimise future staining (due to oils from the fingertips), the sound board will be finished with a very thin wax coating and the finger board with
a penetrating light oil sealer.
Old lute soundboards surviving from the 16th and 17th C show no signs of local staining of this kind - just an even oxidation of the wood surface. The
sound boards must have been coated with an invisible protective coating of some sort - as an unfinished sound board would show localised staining over
time - but what was it?
No ouds survive prior to the late 18th C but I would expect that the early oud sound boards were finished in much the same way as lutes.
Several possibilities for lute sound board finish have been proposed - but without scientific verification - including thin glue size, egg white,
whole egg mixed with linseed oil, and wax.
An old Egyptian oud that I own has a sound board (and bowl) that seems to have been protected with a wax finish (the finish can be removed with
solvents like 'GooGone'). Some modern lute makers also use a wax soundboard finish.
I have used very dilute shellac as a sound board sealer with some success in the past. However, as this is an experimental project, I am going to try
a thin wax finish on the oud.
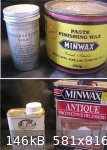
For this, I may use either 'Minwax' Finishing Wax or 'Lee Valley' Conservator's Wax - yet to be decided.
For the fingerboard, I shall seal the surface with a dilute, penetrating, oil based sealer. There are a number of modern alternatives possible - for
example, diluted 'Danish Oil', diluted 'Minwax' Antique oil finish (the stuff used to finish the oud bowl) or diluted Tung oil. As I have a partly
used can of the stuff, I am going to try 'Lee Valley' brand polymerized Tung Oil Sealer - specifically formulated as a wood grain sealer but just a
dilute solution of polymerized Tung Oil.
The oil penetrates and seals but is otherwise invisible and does not leave a varnish like coating.
|
|
|
jdowning
Oud Junkie
Posts: 3485
Registered: 8-2-2006
Location: Ontario, Canada
Member Is Offline
Mood: No Mood
|
|
The fingerboard has been given a first coat of Tung oil sealer. This is applied in the same way as any rubbing oil. Applied to the finger board with a
rag until the whole surface was wet, allowed to dry for about 5 minutes (until dry patches were in evidence) and then all surplus oil wiped off with a
clean rag. This will be left to dry for 24 hours before a second and final coat is applied. The objective is only to penetrate and seal the wood - not
to varnish the finger board. The box wood is hard and close grained to start with so two coats should be sufficient.
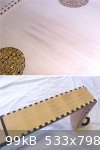
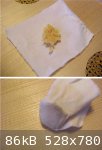
The sound board has been waxed with the 'Minwax' finish as the 'Conservator's Wax' seemed to be too soft for the purpose. To ensure the absolute
minimum wax coating - just sufficient to protect the wood surface against staining - a small amount of the wax was placed in a piece of fine cotton
fabric that was then used as a 'rubber' to apply the wax in a very controlled fashion. The first application removed quite a bit of 'dirt' (mostly
fine ebony particles) and revealed a small glue spot that was then removed with a scraper blade.
A second application was then made with a clean 'rubber' and the wax buffed to a slight sheen when dried - invisible but sufficient to accentuate the
fine 'cross-silk' figuring of the quarter-sawn Spruce wood grain .
The shellac coated rosettes were not waxed.
The additional fret gut and new strings from Pyramid should arrive any day now so it is time to calculate fret spacings and prepare fretting
templates.
|
|
|
jdowning
Oud Junkie
Posts: 3485
Registered: 8-2-2006
Location: Ontario, Canada
Member Is Offline
Mood: No Mood
|
|
The oud will be a 'test bed' to evaluate a variety of possible fret placements (an advantage of 'tied on', adjustable gut frets).
A starting point for fretting a lute is to use equal temperament fret spacing. In this system an octave is divided into 12 equal intervals
(semitones), each (for convenience) being subdivided into 100 units or cents.
In practice, theoretical fret placement (in whatever historical temperament system is used) may be affected by practical considerations such as string
tension, fret diameter, string action, string diameter, string elasticity, string material, string construction, actual vibrating string length,
musical mode or key etc. At the end of the day it is the player that will make the fine adjustments necessary to suite his or her judgment of the
best overall 'in tune' fret placement.
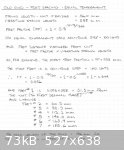
Attached, for information, is the calculated fret placement for the project oud in equal temperament. The vibrating string length used in the
calculations is slightly less than the distance between the front edge of the nut and front edge of the bridge because of the way each string is tied
at the bridge.
This will now be compared with alternative historical (theoretical) fret placements for both lute and oud.
|
|
|
jdowning
Oud Junkie
Posts: 3485
Registered: 8-2-2006
Location: Ontario, Canada
Member Is Offline
Mood: No Mood
|
|
The subject of historical temperament and fretting of both oud and lute is complicated and specialist field but one that has fortunately been well
researched and represented by scholarly texts (some more clearly written and helpful than others). In order to get a better understanding of the
subject I shall be referencing several books and articles. As well, I shall be using free software to eliminate most of the tedious calculation
involved in determining fret placement for a variety of tuning temperaments. These may be of interest to others:
Mark Lindley's book "Lutes, Viols Temperaments" has recently been reprinted by the Cambridge University Press. The author reviews the various
historical temperaments and how they may have been applied to fretted instruments.
Cris Forster's new book "Musical Mathematics" is due for release later this year and deals with instruments tuned in various temperaments both from an
historical perspective and as applied to newly invented instruments. In order for prospective buyers of his book to gain an appreciation of the
contents he generously posts on his web site several chapters including translations of texts relating to fret placement by the early Arab and Persian
theorists.
http://www.chrysalis-foundation.org
(The book may be currently pre-ordered for 37% reduction in price)
A comprehensive article "Safi Al-Din al- Urmawi and the Theory of Music" by Dr Fazli Arslan is available as a free download from
http://www.muslimheritage.com/uploads/The_Theory_of_Music.pdf
(Lots of other good articles on this site)
A useful free fret position calculator ('Lute Fret Calculator' by Jeff Lee) for Dowland's lute (late 16th C) - including Dowland's fretting
instructions - is available at
http://www.shipbrook.com/jeff/frets.html
Another more comprehensive 'spreadsheet' type calculator 'FretPlacement.2006' by Daniel F. Heiman and the Lute Society of America, is available as a
free download from
http://www.cs.dartmouth.edu/~lsa/download/index.html
(This did not work on my older version of Microsoft Word but it does on freely available 'OpenOffice'
Another useful free software tool that may be helpful gaining an appreciation of historical temperaments as well as being a very accurate tuning
device ("WinTemper" by Mark D.Wilkes) is available from
http://www.wilkosoft.com
|
|
|
jdowning
Oud Junkie
Posts: 3485
Registered: 8-2-2006
Location: Ontario, Canada
Member Is Offline
Mood: No Mood
|
|
Another valuable reference for those who may want to delve into and explore the complexities of microtonal music is the "Encyclopedia of Microtonal
Music Theory" at
http://tonalsoft.com/enc/encyclopedia.aspx
|
|
|
jdowning
Oud Junkie
Posts: 3485
Registered: 8-2-2006
Location: Ontario, Canada
Member Is Offline
Mood: No Mood
|
|
The gut frets and new strings have arrived from Germany so a layout of some of the possible historical fret positions (oud and lute) has been prepared
- drawn full size - so that the fret positions may be readily compared and transferred to the fingerboard of the project oud.
On the left side of the Fret Position diagram attached is the fingerboard, drawn full size, with the frets located according to 12 tone Equal
Temperament (or more correctly E.D.O. - Equally Divided Octave). In this system the divisions of the octave are all of equal size. So that comparisons
may readily be made between various tunings and temperaments, the E.T. divisions are each divided into 100 parts or 'cents'.
Six other fretting arrangements have been represented on the diagram, calculated according to:
1) Pythagorean or Just tuning.
2) Al-Farabi's 10 fret system for oud(10th C)
3) Safi Al-Din's system for oud (13th C)
4) Hans Gerle system for lute (1532)
5) Juan Bermudo's system for vihuela (1555)
6) John Dowland's system for lute (1610)
The vibrating string length assumed for calculation purposes is 559 mm i.e. 1 mm shorter than the nut to bridge distance of 560 mm to allow for the
slight shortening of the string at the bridge.
Note:
- The length of the fingerboard is 1/3 of the string length so that the fingerboard will accommodate 7 frets in the lute systems - the 7th fret being
located at the neck joint.
- Al-Farabi proposed both a 10 fret and 12 fret system i.e. 10 or 12 frets up to the 5th fret in the lute system. The same applies to Safi Al-Din's
system. If extended to the full length of the fingerboard, the Al-Farabi 10 fret system would consist of a total of 14 frets and the Safi Al-Din
system 10 frets. It should be noted that not all of these frets would have been used by the oudists - the frets employed being the choice of the
player to give the best intonation (to his or her ear) dependent upon the mode of a composition. However, both theorists stopped their fretting at the
5th fret lute system equivalent (little finger fret). This suggests that the oudists of the time did not move to higher fret positions.
More to come!

|
|
|
| Pages:
1
..
12
13
14
15
16 |


