| Pages:
1
2
3
4
5
6
..
16 |
DaveH
Oud Junkie

Posts: 526
Registered: 12-23-2005
Location: Birmingham, UK
Member Is Offline
Mood: No Mood
|
|
Hi John
Glad to see you've gone for ash and I'll be interested to see how it turns out.
My own trunk (European Ash, fraxinus excelsior) is still a trunk as I'm having problems getting hold of a portable sawmill rig. Hopefully next week.
Some pieces cut a while ago from the same stand, which are now seasoned firewood, look very attractive in an understated kind of way, very regular but
marked growth rings of nearly white and grey (not as dark as your black ash) and a very nice pattern of medullary rays. I'm hoping the current batch,
which is much paler, will season to a similar appearance. And as split firewood it has a real ring to it when you knock it - possibly a good sign,
though maybe I should be making a marimba!
|
|
|
jdowning
Oud Junkie
Posts: 3485
Registered: 8-2-2006
Location: Ontario, Canada
Member Is Offline
Mood: No Mood
|
|
The KT reference to 'Shah' or Kingwood (or rather 'King of Kings wood?}was discussed some time ago under the topic "Wood fit for a king" on this
forum. However, so far there has been no positive identification of what wood that may have been - certainly not the Kingwood (Dalbergia cearensis) of
today which is a species of rosewood found only in a small area of Brazil.
If anyone has more information about 'Shah' wood, by all means post the findings under "Wood fit for a king".
|
|
|
Peyman
Oud Junkie
Posts: 496
Registered: 7-22-2005
Member Is Offline
Mood: Mahoor
|
|
| Quote: | Originally posted by jdowning
The KT reference to 'Shah' or Kingwood (or rather 'King of Kings wood?}was discussed some time ago under the topic "Wood fit for a king" on this
forum. |
I actually didn't read that thread and wasn't sure if this was mentioned there. As far as the milk goes, the book mentions that boiling the bowls in
milk will make them easier to carve. I thought that might be of use in the fluting process.
|
|
|
jdowning
Oud Junkie
Posts: 3485
Registered: 8-2-2006
Location: Ontario, Canada
Member Is Offline
Mood: No Mood
|
|
I am curious about the milk. If wood is easier to carve after the treatment then the wood may become softer and possibly lubricated by the solids in
the milk absorbed into the cells of the wood during boiling? Just boiling in water alone would soften the wood so milk must do more. I will run some
tests some time (just to see what happens) and post the results in the 'marinated wood/fluted ribs thread.
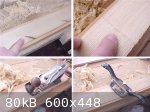
Made a start today on cutting the Ash timber into rib sets. Three sets have been cut from sections that have a very mild 'fiddle back' figure -
nothing spectacular like the Hungarian Ash stuff - but not completely plain either.
I have cut the blanks a little thicker than usual (just under 3mm) so that there is plenty of scope for planing out any minor faults like pin knots
and scars/holes/staining left by old nails etc. For the same reason the blanks have been made 2.5 inches wide by 30 to 36 inches long (64 mm X 760 to
920 mm) - well oversize, so there is plenty of scope for avoiding any faults. The wood surfaces were inspected before each pass on the band saw to
ensure there were no embedded nails.
I am now not completely sure about my Black Ash identification as it could well be White Ash with narrow growth rings - as it would be if forest
grown. The density is closer to that of White Ash than Black Ash. No matter - it will still be used.
|
|
|
jdowning
Oud Junkie
Posts: 3485
Registered: 8-2-2006
Location: Ontario, Canada
Member Is Offline
Mood: No Mood
|
|
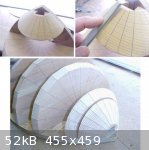
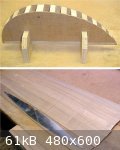
The neck block has been carved close to the required profile using a paring chisel and template as a guide to the correct shape. To finish the neck
block, it has been mounted on the mold base plate and filed to size with a small wood rasp. The rib positions have been marked with pencil and the
areas between flattened and smoothed with a file - using the pencil marks as guides. The mold is now 'ready to go'.
|
|
|
jdowning
Oud Junkie
Posts: 3485
Registered: 8-2-2006
Location: Ontario, Canada
Member Is Offline
Mood: No Mood
|
|
The sound board will be made from Sitka Spruce. I have a good supply of well seasoned material in stock to choose from. Sitka spruce is not an
authentic choice like the denser softwoods - Larch and Cedar of Lebanon. A species of Larch is available locally but is unlikely to be of the quality
required for instruments. Cedar of Lebanon is not an option unfortunately.
The sound board will be made from two, book-matched, pieces cut exactly on the quarter. Grain spacing is fairly wide for increased cross grain
stiffness - to compensate for the lower density of spruce compared to Larch and Cedar of Lebanon.
The first step is to trim what will be the sound board joint with a straight edge and knife so that the grain runs parallel to the joint.
|
|
|
jdowning
Oud Junkie
Posts: 3485
Registered: 8-2-2006
Location: Ontario, Canada
Member Is Offline
Mood: No Mood
|
|
A sample of the selected sound board wood has been measured - its volume calculated - and weighed. The density is 0.43 grams/c.c. - heavy for Sitka
Spruce but lighter than Larch or Cedar of Lebanon both with average densities of about 0.53 grams/c.c.
Before continuing with work on the sound board, this might be a good time to take a break and review aspects of the possible sound hole design. The
oud engraving shows only two sound holes but it is possible that the engraver may not have represented a third large diameter sound hole because of
the difficulty of representing both the strings and sound hole.
The sound holes may have been made in three possible ways :
1 - a hole cut through the soundboard with a separate decorative rosette (shamsa) glued behind the sound hole - as on a modern oud.
2 - a hole cut through the sound board and inlaid with a separate decorative rosette. This style of soundhole is found on early oud/lute related
instruments like the gittern, vihuela and viola da mano.
3 - a decorative rosette cut directly into the sound board - the style of rosette invariably found on surviving lutes of the 16th and 17th C. 'Cut in'
rosettes may ,therefore, have been adopted originally from early oud design (two oud like instruments depicted in the 13th C 'Cantigas de Santa Maria'
have what appear to be 'cut' in rosettes).
It is not possible to determine from the oud engraving which of these three possibilities might apply. It has been decided, therefore, to 'cut in' the
sound hole like a lute - this giving the best continuity and strength of the sound board structure in the area just above the bridge. I am experienced
in making 'cut in' rosettes so the procedure might be of general interest.
The oud engraving represents a six point star motif for the rosette - most likely a greatly over simplified design for clarity. It has been suggested
that the six point star design could imply a Jewish connection - perhaps the engraver himself was Jewish. However, I am more inclined to believe that
the six point star in the rosette represent a basic element of traditional Arabic design.
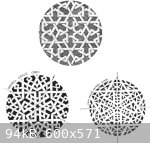
The attached image shows a portion of a beautiful pierced window screen from the 14th C Mosque of Qawsun. Careful observation reveals the six point
star motif appearing many times in the simple (yet complex!) design.
Compare this to two lute rosette designs - one from an early 16th C lute by Laux Maler and the other from the second half of the 16th C on a lute by
Georg Gerle. The similarity to the window screen design is striking and so, strongly implies an Arabic origin. By the 16th C, these lute rosette
designs were widely used 'standard' patterns and appear on many surviving lutes of the 16th and 17th C. so may also have been found on ouds and lutes
from an earlier period.
To make smaller diameter rosettes - a lute maker would not scale down the design but would simply cut only that part of the original pattern covered
by the reduced diameter. So, for example, the Maler rosette was likely made this way from a larger pattern (note that the points of the six point star
in the design are 'cut off').
The Gerle pattern (conveniently, a favourite of mine!) is full size so will be used in this project - cut down for the small sound holes. If a large
sound hole is also to be included then - interestingly - the pattern would fit the full diameter exactly.
Perhaps two sound boards should be made for testing - a 'two holer', as represented in the engraving and a 'three holer' as implied by the engraving.
Perhaps even - two ouds should be constructed to enable direct comparisons to be made - all in the interests of science, music and history?!
|
|
|
jdowning
Oud Junkie
Posts: 3485
Registered: 8-2-2006
Location: Ontario, Canada
Member Is Offline
Mood: No Mood
|
|
....... and still pondering the enigmatic sickle shaped pegbox and spike shaped pegbox terminal of the oud engraving, here are some images from the
'Kitab al-mawalid' (the book of Nativities) by Abu Ma'shar al-Balkhi - taken from a 15th C copy translated into Arabic from the original 8th C Persian
work.
The illuminations from the book can be seen in a slide sequence of images at
http://www.antiqillum.org/slideshows/Nativities/index.htm
The oud like instruments represented also show two-tone coloured sound boards (some with small sound holes?) and a smooth transition between neck and
sound board - as discussed earlier in this thread.
|
|
|
jdowning
Oud Junkie
Posts: 3485
Registered: 8-2-2006
Location: Ontario, Canada
Member Is Offline
Mood: No Mood
|
|
The Spruce sound board panels have been set aside in a heated kitchen for final drying, before they are jointed and glued, so work continues, in the
meantime, on the rib blanks.
The jig that was made to create the rib profile has now done its job so - with the addition of a few extra 'V' blocks and a pair of stands - will now
serve as a jig (to determine the required rib curvature) during the bending operation. Not essential but a bit more convenient than using the mold for
the same purpose.
The rib profile has been transferred from card to a metal pattern. This pattern is useful in determining the best part of the rib blanks to use (grain
direction and figure) -while, at the same time, avoiding any flaws.
As the rib blanks have been cut in sequence from the billet, the ribs will each be laid out from a common centre - in this case the widest point of
the rib - so that the grain and figuring of each rib will match when assembled into the bowl.
|
|
|
Peyman
Oud Junkie
Posts: 496
Registered: 7-22-2005
Member Is Offline
Mood: Mahoor
|
|
It's good to see progress. Those paintings from the book of Nativities look very interesting to me as well. They have a Chinese feel to them. The
miniature style of painting is an art that originally came to Iran from China. I wonder if that had an effect on depicting those musicians and their
instruments.
|
|
|
jdowning
Oud Junkie
Posts: 3485
Registered: 8-2-2006
Location: Ontario, Canada
Member Is Offline
Mood: No Mood
|
|
The miniatures certainly seem to have a 'Far Eastern' flavour to them so it would not be surprising if the influence is Chinese.
To digress a little, the earliest culture of silk also came to Iran from China - relevant as early oud strings were made from silk (as well as gut).
Perhaps the earliest of the oud strings were made by the Chinese and imported to Persia over the well established trade routes with China?
The tradition of the ancient Chinese zither ('quin') extended well into the 19th C, an instrument that used silk strings before modern (and inferior!)
string materials became available. The strings were made by twisting silk filaments - like a thread (or rope) - and then boiling the strings in a glue
concoction that consolidated the silk filaments and gave the strings smoothness and additional weight. The larger diameter strings were made by
winding silk thread over a silk core - like modern overspun strings.
On completion, the project oud will be eventually strung in silk/gut and compared to modern nylon stringing.
|
|
|
Peyman
Oud Junkie
Posts: 496
Registered: 7-22-2005
Member Is Offline
Mood: Mahoor
|
|
I have read about silk used as musical strings. I know up until the 1950s in Iran, the dotar players were still using silk. Gut is mentioned in the
Kanzo-al-Tohaf book as well. I also remember goat hair was mentioned in KT, as used for Harps (chang). Horse hair was another one that was used on
bowed instruments (still used in Turkish rebabs). Very interesting. Your oud will be very unique!
|
|
|
jdowning
Oud Junkie
Posts: 3485
Registered: 8-2-2006
Location: Ontario, Canada
Member Is Offline
Mood: No Mood
|
|
The question of early musical instrument strings, the materials that they were made from and how they were made, is a whole research subject in itself
without very much information to go on. The early texts like the KT book give some information about the construction of the strings - as do the
surviving Chinese books.
Sinew is another possible historical string material.
Silk filament was generally used as a core material on metal wound oud and guitar bass strings - until nylon floss became commercially available in
the 1950's. While living and working in Cairo in the early 1960's, I was still able to purchase a set of oud strings that were metal wound on silk
with gut trebles. Early oud, lute and related instrument strings, however, were not wound with metal - just twisted gut or silk - with added weight by
being saturated with glue compounds or (in the case of silk strings at least) by being wrapped with silk.
If anyone knows of the existence of surviving old oud (or other instrument) strings, or even string fragments, this would be information of great
interest to those specialising in researching and recreating early strings.
|
|
|
jdowning
Oud Junkie
Posts: 3485
Registered: 8-2-2006
Location: Ontario, Canada
Member Is Offline
Mood: No Mood
|
|
On closer inspection, several of the sawn rib blanks cannot be used because of the location of scars left by the old nail holes. It has been decided,
therefore, to use two, now incomplete, sets of ribs - arranging the ribs alternately in sequence. There are 8 good rib blanks in one set and 7 in the
other so there is still plenty of room to maneuver in the final choice of ribs.
One rib has a pin knot running across the width of the blank. It may still be possible to use this if the fault (a structural weakness) can be located
inside the rib and over the neck block.
The saw marks on each rib blank have been removed with a smoothing plane and the ribs brought down to about 2 mm thickness. The plane does not have an
adjustable throat so - even with the relatively plain grain figuring of the wood and working the plane at an angle - some slight 'tear out' of the
grain is inevitable. Final smoothing and thicknessing (to about 1.5 mm) will, therefore, be accomplished using a cabinet scraper.
|
|
|
jdowning
Oud Junkie
Posts: 3485
Registered: 8-2-2006
Location: Ontario, Canada
Member Is Offline
Mood: No Mood
|
|
The batch of sound board material to be used on this project was cut many years ago at a local sawmill from a billet of Sitka spruce - measuring 8
inches X 4 inches X 4 ft long
(20 cm X 10 cm X 120 cm). (The Spruce was originally purchased, during the 1970's, from a company that made gliders - used for making airframes. The
company (the Kirby Glider Co. of Yorkshire, U.K.) kindly allowed me to select the only two timbers from their entire stock that I judged would be
suitable for instrument sound boards. Great customer service!).
Unfortunately, the local sawyer ran this billet through his bandsaw using power feed rather than by carefully hand feeding the work (this was a large
bandsaw - with blade about 6 inches (15 cm) wide - used for resawing large timbers). Consequently, the batch of soundboard blanks came out of the saw
straight on one side but with a pronounced bow on the other. Rather than scrapping the whole batch, each sawn blank was cut down the middle to
eliminate the bowed portions. This resulted in a number of blanks about 4 inches (10 cm) wide up to 30 inches (76 cm) long with no longitudinal twist
and with only a slight longitudinal 'ripple' or 'waviness'(this will eventually be planed out when each sound board is reduced to its required
thickness).
These blanks will make four sound boards (each made from four pieces - the two piece soundboard mentioned in an earlier posting will not now be used).
The pieces will not be 'book matched', in the conventional way, but will be selected and joined so that any longitudinal ripples will exactly match.
This is to eliminate any potential 'built in' stresses in the finished soundboards.
I might as well make up the four soundboards at one time and choose the best for this project.
The first step is to 'shoot' the edges of each blank so that the longitudinal grain runs parallel to the joint edge.
|
|
|
WFBustard
Oud Addict
Posts: 31
Registered: 3-7-2009
Member Is Offline
Mood: No Mood
|
|
Thanks for this jd! Im learning a lot here!
Now is it important to remember which faces are which so that when assembling the panels they will all go in the same direction since they are not
booked? What would be the difference or Does it matter.
|
|
|
jdowning
Oud Junkie
Posts: 3485
Registered: 8-2-2006
Location: Ontario, Canada
Member Is Offline
Mood: No Mood
|
|
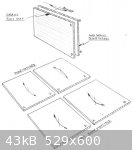
I am attempting on this project to salvage sound board material that would otherwise have been thrown out. The panels have all been cut in sequence
from a billet with end grain cut perfectly on the quarter and are well seasoned so should potentially make reasonably satisfactory sound boards.
All of the panels - because of the way they were sawn - have a slight but matching longitudinal bow or curve. To compensate for this in the completed
sound board, the panels will not be book matched as any longitudinal 'bow' will be reversed along the central glue line that could result in built in
stress. On the contrary, if the panels are not book matched, any longitudinal bow will be perfectly matched between the panels - eliminating any
danger of built in stress from that cause. The panels will not be switched end for end.
Is this approach likely to be significant? Hard to tell without trying. This is an experimental project so I have an excuse to try to find out!
This approach might also be beneficial - for the same reasoning - in the case of sound board panels with longitudinal grain run out. This is caused by
spiral growth commonly occurring in trees and so is likely to be found - to a greater of lesser degree - in a lot of sound board material offered for
sale on the open market?
Note that many early ouds (and lutes) had their sound boards made from several (three to five) - sometimes mismatching - pieces rather than from two
'book matched' panels as is the common practice today.
The attached sketches should clarify what I am trying to explain.
Note that this thread is not intended to be a tutorial claiming to be the "right" way or the "best" way to do things but is just an ongoing record of
my approach (rightly or wrongly) to creating this instrument.
|
|
|
WFBustard
Oud Addict
Posts: 31
Registered: 3-7-2009
Member Is Offline
Mood: No Mood
|
|
Thanks, I realise this is a record of your approach to this build, and do not mean to interefere so if I overstep my bounds please ignore this post
and Ill get the message.
I was under the impression that the use of "booked" lumber was to alleviate the problems which arise from expansion and contraction due to changes in
humidity. The idea being that the centre joint would be equal on both edges and generally the whole thing would remain symetrical to avoid warping.
Maybe I have been misled?
I have built many "experimental" instruments, guitars, vihelas, mandos and bouzikis and have come across this numerous times.
Will you be making a close aproximation to booked along the centre?
Im not sure if I understand the way the wood was cut Since the peices you are using are cut sequencially I would approach the construction with the
idea that: even though they are not true booked peices I would match the grain as such as best as possible. that is to say A tree is round and nature
is a fine example of strength and stability.
I once produced an archtop Jazz box where I only had a single 1 inch, 48long , 9 inch w board where I simple cut it in half and "dropped matched the
peices. .. :-). It worked very well and you could not tell the difference except under light. In other words I kept the same grain together for the
join even though it came from further up the plank lonitudally.That was in 1995 and the guitar is still functional today with out any movement.
Anyways, This project looks very nice and clean, I look forward to seeing more of your work.
cheers.
|
|
|
jdowning
Oud Junkie
Posts: 3485
Registered: 8-2-2006
Location: Ontario, Canada
Member Is Offline
Mood: No Mood
|
|
No problem.
I am not sure why a book matched pair of boards would alleviate problems from expansion and contraction due to humidity change. The boards - even if
they appear to match - might still warp or twist if there is longitudinal run out of the grain or if not perfectly quarter sawn. As wood shrinks about
twice as much along the direction of the growth rings (tangential) than across the growth rings (radial) it is the short quarter grain (running
vertically through the sound board - less than 2mm thickness in an oud or lute) that would contribute most to stability under changing conditions of
humidity.
The sound board in this project will not approximate to a book matched sound board at all. The sound board will be of three piece construction with
the boards, ideally cut in sequence from the billet, laid edge to edge in the pattern AB- AB- AB as indicated in the previous posting for a non book
matched arrangement. If three boards are not wide enough, I shall simply add a short fourth piece on one side to make up the difference. I may also
choose to make the sound board from three or four mis-matched pieces (i.e. not cut from the billet in sequence). Either approach would be authentic
for early ouds (and lutes). Clearly, there will be no centreline joint or symmetrical arrangement of the sound board panels - but that is also
authentic. 'Perfect' symmetry of an instrument is probably a modern concept.
The preference these days would seem to be to use two piece, book matched sound boards - but this might have more to do with cosmetic appearance than
optimum acoustic considerations.
A two piece sound board would also be appropriate for an oud of the 13/14 C but it is impossible to know if the panels would have been book matched,
non book matched or mismatched - I suspect the latter two possibilities would have applied but could be wrong.
The multiple panel approach allows a greater freedom of choice to select the best of a particular batch of wood to build a sound board - which is what
I am up to now.
|
|
|
jdowning
Oud Junkie
Posts: 3485
Registered: 8-2-2006
Location: Ontario, Canada
Member Is Offline
Mood: No Mood
|
|
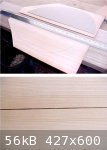
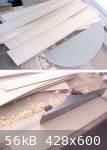
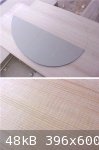
The sound board panels, having been rough planed to remove the saw marks, have now been sorted into four sets sets of four panels ready to be jointed.
It is helpful to use a half template of the soundboard profile to help visualise and determine the best positioning of the panels. All of the panels
show a pronounced "cross silk" figuring - a good sign indicating that the grain is cut perfectly on the quarter. The colourful grain doesn't bother
me!
I will be able to make up four soundboards - perhaps five - from this batch of wood.
Two sets of panels (to make two complete sound boards) have been jointed ready for gluing. The jointing process is quite critical as the joint
surfaces must be planed accurately enough to be practically invisible (viewed on both sides of the panels) without forcing the joint together. I judge
the precision of the joint by eye as well as by feel - flexing the joint to ensure rubbing contact along its length. The joint surface is left as it
comes off the plane as the smooth surface results in the strongest glued joint. Not having built an instrument for a few years now, it took me a
little while to get the hang of jointing sound boards again (frustrating!) - a good reason to make up a batch of sound boards at one time.
A batch of hide glue has been made up and is currently soaking ready for use tomorrow in gluing up the sound board.
|
|
|
Peyman
Oud Junkie
Posts: 496
Registered: 7-22-2005
Member Is Offline
Mood: Mahoor
|
|
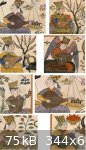
I found this low quality picture in an oud blog. I thought I would post it. It's dated 1507 - 1524. Apparently, it's from one of G. Farmer's books. I
thought the peghead was interesting. Looks like a guitar.
|
|
|
jdowning
Oud Junkie
Posts: 3485
Registered: 8-2-2006
Location: Ontario, Canada
Member Is Offline
Mood: No Mood
|
|
I have not seen this picture before but what is striking to me is not the representation of a singer playing some kind of generic plucked instrument
but all of the wild animals laying around together in a state of repose - predators like the leopard, the wolf, the lion, the jackal etc. together
with the deer and other related species - presumably held spell bound by the music? This is surely a representation of what - in Western society - was
the 16th C belief in the power of music over the mind - the myth of Orpheus.
All completely off topic but interesting nevertheless.
|
|
|
jdowning
Oud Junkie
Posts: 3485
Registered: 8-2-2006
Location: Ontario, Canada
Member Is Offline
Mood: No Mood
|
|
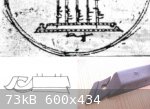
Taking another interlude from the practical aspects of this thread to consider another design detail - the bridge.
The representation of the bridge in the engraving of the oud is distinctly 'lute like'. As no ouds survive from earlier than the late 18th C. it may
be useful to look to surviving lutes for clues as to how ouds once may have been constructed.
The decorative carved ends of the bridge are reminiscent of two unusual examples found on surviving lutes. The first is to be found on a lute by Magno
Dieffopruchar, Venice, 1612 cat. 1753 in the Museo Civico, Bolognia and the second on a lute by Christofolo Choc, Venice 1630, cat. 7756-1862,
Victoria and Albert museum, London. The attached images show a tracing of the bridge end of the former and a picture of the bridge end of a copy of
the latter currently under construction (see "Old Project - New Lute" on this forum).
The bridge in the engraving would appear to have tile inlays on the top front and rear edges of the bridge - presumably to protect the edges of the
bridge against wear from the strings. The main body of the bridge would appear to be 'in the white' or unstained (compared to the tuning pegs in the
engraving that are represented in black).
With these clues in mind, the bridge of the reproduction oud will be made from pear wood left unstained in its natural colour with tile inlays of
African Ebony and Persian Boxwood. The ends of the bridge will be carved similar to the lute designs.
A matching tile inlay will be repeated around the edge of the sound board - the half binding (or banding) is represented in the engraving but without
details of the inlay pattern.
|
|
|
Peyman
Oud Junkie
Posts: 496
Registered: 7-22-2005
Member Is Offline
Mood: Mahoor
|
|
| Quote: | Originally posted by jdowning
I have not seen this picture before but what is striking to me is not the representation of a singer playing some kind of generic plucked instrument
but all of the wild animals laying around together in a state of repose - predators like the leopard, the wolf, the lion, the jackal etc. together
with the deer and other related species - presumably held spell bound by the music? This is surely a representation of what - in Western society - was
the 16th C belief in the power of music over the mind - the myth of Orpheus.
All completely off topic but interesting nevertheless. |
Yes, I had to look up the poem. This is from Kheradnameh (book of wisdom) of Nezami. The piece is about the invention of music and musical instruments and Greek philosophers:
"He drew a line around him and started to play. All animals rushed towards him..." I couldn't figure out who the "he" was. It seems like Aristotle is
referenced.
|
|
|
jdowning
Oud Junkie
Posts: 3485
Registered: 8-2-2006
Location: Ontario, Canada
Member Is Offline
Mood: No Mood
|
|
Thanks Peyman.
Relative humidity in the heated kitchen is currently around 45% so today was a good time to make a start on gluing up the soundboard panels.
The work surface is made from two pieces of 15 mm thick MDF (medium density fibreboard) glued together. This makes a firm, flat and stable
surface.
The gluing technique is well known - standard methodology, not 'rocket science! Two panels are laid edge to edge on a strip of wood (about 10 mm thick
X 20 mm wide in section) so that the edges to be glued are temporarily slightly elevated. The panels are held firmly in this position with pins driven
into the work surface. This arrangement is to provide a clamping force on the glued joint when the panels are pressed into place against the work
surface.
To prevent the panels sticking to the work surface, a strip of 'non stick' cooking paper is laid underneath the joint. Hot glue is then applied along
the joint surface, the strip of wood pulled from underneath and the joint pressed to the work surface along its full length. Another strip of 'non
stick' paper is then placed over the joint and the panels held in place with a wooden batten clamped at each end.
The non stick paper works quite well but a strip of newspaper can also be used as an alternative.
One (of many) advantage of using hot hide glue is that clamping time is relatively short so the panels may be removed from the work surface after
about an hour - allowing another set to be glued up. The glued panels removed from the work surface will be allowed to dry fully overnight before they
- in turn - will be glued together to complete the soundboard.

|
|
|
| Pages:
1
2
3
4
5
6
..
16 |


