| Pages:
1
..
6
7
8
9
10
..
16 |
jdowning
Oud Junkie

Posts: 3485
Registered: 8-2-2006
Location: Ontario, Canada
Member Is Offline
Mood: No Mood
|
|
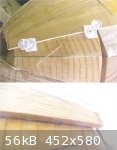
Humidity still on the high side but decided to glue rib #7 to avoid losing momentum. Only four more ribs to go.
When gluing the ribs a start is made at the neck block. This end of the rib is clamped in place with two push pins before continuing - bit by bit -
along the remainder of the joint with the hot iron and glued pieces of paper.
The final operation is to remove the two pins at the neck block. The area of the rib over the neck block is then ironed with the hot iron to re-melt
the glue and the pins replaced to hold the rib in position.
To avoid damage to the edge of the rib, small squares of card are placed under the hard plastic head of each pin. It is possible also for the metal
pin itself to dent the side of the joint. In this case any slight dents can be easily removed later - after the glue has dried - by brushing a small
drop of water over the area of the dent and applying the tip of the hot iron. This causes the wood to swell and removes the dent - as can be seen in
the lower image. It is possible that a pin dent might also be removed when ironing the joint during gluing - due to the moisture in the glue and the
applied heat - but I haven't tried that.
|
|
|
jdowning
Oud Junkie
Posts: 3485
Registered: 8-2-2006
Location: Ontario, Canada
Member Is Offline
Mood: No Mood
|
|
Humidity levels continue to fall (but it will not last as more rain is in the forecast) so decided to move ahead with fitting and gluing ribs # 8 and
#9.
I miscalculated the number of glued paper strips required for two ribs so supplemented the freshly prepared strips with some dried and curled strips
left over from yesterday. Instead of dipping the dried strips in water, each glued area of each strip was first wiped on a moistened rag. This was
sufficient to 'rejuvenate' the glue without weakening the paper when ironed in place. Strips rejuvenated in this way have lost most of their shrinkage
advantage but, nevertheless, help to hold everything together.
By the time rib #9 had been glued in place, the paper strips, freshly prepared at the start of the operation were beginning to dry out and curl. So -
at the speed that I work - it is best to work one rib at a time and prepare sufficient glued strips for each rib.
The outside ribs # 10 and #11 have been made, by design, a bit wider than the other ribs. This is an allowance to compensate for any accumulated
errors that may occur in the fitting of the ribs. However, as rib geometry has been kept under control during the fitting process, the outside ribs
will remain slightly wider than the rest.
|
|
|
jdowning
Oud Junkie
Posts: 3485
Registered: 8-2-2006
Location: Ontario, Canada
Member Is Offline
Mood: No Mood
|
|
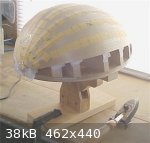
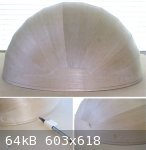
Another beautiful, sunny late Spring day, with humidity levels dropping to acceptable levels, so ribs # 10 and #11 have been fitted and glued. Mission
accomplished!
The ribs are a close fit to the mold profile.
The outside edges of the ribs were marked with compasses using the base of the mold as a reference - allowing about
5 mm extra width for any trimming later. This marking will be used as an approximate reference line only.
After allowing the glue to dry overnight, the bowl will be released from the mold tomorrow - hopefully without any problem!
The next step will be to, first, glue in the reinforcing end plate and then the paper or fabric strips covering the interior rib joints.
|
|
|
jdowning
Oud Junkie
Posts: 3485
Registered: 8-2-2006
Location: Ontario, Canada
Member Is Offline
Mood: No Mood
|
|
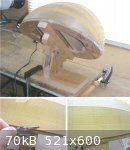
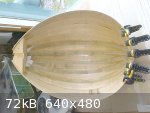
The bowl was released from the mold without problem.
The measured outside dimensions are width 34 cm and length (neck joint to bottom of bowl) 45 cm - exactly to design.
These dimensions may change slightly after the end plate and interior rib joint reinforcement are added - due to glue shrinkage.
|
|
|
jdowning
Oud Junkie
Posts: 3485
Registered: 8-2-2006
Location: Ontario, Canada
Member Is Offline
Mood: No Mood
|
|
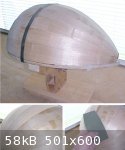
The end plate reinforcement has been modified from the end plate in an old Arabic oud - due to the spherical geometry of the bowl (the Arabic oud is
more flattened in profile). This design of end plate conforms to 16th/ 17th C lute practice which, in turn, may have come from early oud design.
The end plate has been made from Ash (same material as the bowl) - hot bent to the bowl contour. It has been made 1.5 mm thick at the upper edge
tapering to a 'feather edge' of about
0.5 mm. This provides flexibility at the edges to closely fit the bowl contours.
After several practice 'dry' runs, the end plate was glued in place with hide glue. Speed is of the essence here - as the glue sets in less than a
minute - so the spring clamps were ideal for the job.
|
|
|
jdowning
Oud Junkie
Posts: 3485
Registered: 8-2-2006
Location: Ontario, Canada
Member Is Offline
Mood: No Mood
|
|
While the glue on the end plate is curing, the rib joints were reinforced with fabric strips. The strips have been cut from Chinese raw silk fabric
(recycled garment cloth) - 15 mm wide - glued in place with hide glue. The procedure is to first coat each joint with glue, stick the fabric in place
and then brush on more glue to fully saturate the fabric with glue.
As there was only enough glue to complete five strips, a fresh batch of glue has been prepared to finish the job tomorrow.
|
|
|
jdowning
Oud Junkie
Posts: 3485
Registered: 8-2-2006
Location: Ontario, Canada
Member Is Offline
Mood: No Mood
|
|
With the remaining silk, rib joint, liner strips glued in place this morning the time has come to remove all of the glued paper strips from the
exterior of the bowl.
Not sure of the best way to go about this so consulted 'Musick's Monument' by Thomas Mace, London, 1676 (see image). Mace describes how to remove and
replace the sound board of a lute as a regular maintenance activity. The sound board is clamped in place, on the bowl, with glued paper strips
scorched with a hot iron. To remove the strips, Mace recommends moistening the strips with a wet cloth (to soften the paper and glue) after which the
paper is scraped away using fingernails (to avoid damage to the varnished surfaces of the bowl).
Testing a small section of the bowl according to Mace's instruction - the glued paper strips eventually softened sufficiently to be scraped off but
the process was very slow and messy. There must be a better way!
Carefully slicing off the dry paper strips with a paring chisel was also very slow and there was the risk of cutting into and damaging the surface of
the ribs. So, no improvement.
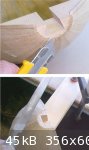
The most effective method found for removal of the glued strips was to place a moistened cloth over the strips and apply the hot iron for a couple of
seconds. This was sufficient to immediately liquefy the glue in the strips so that they could be easily removed with a plastic (or wooden) scraper -
working with two or three strips at a time. It is necessary to move quickly in removing the strips as the glue will re-harden within a few
seconds.
The remaining glue residues on the surface of each rib - as well as the wood grain 'raised' by the moisture - will be removed and finished with a
curved scraper blade after everything has been allowed to dry overnight.

|
|
|
jdowning
Oud Junkie
Posts: 3485
Registered: 8-2-2006
Location: Ontario, Canada
Member Is Offline
Mood: No Mood
|
|
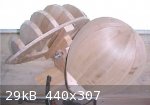
Now that the external paper strips have been removed and everything has dried the time has come to clean up the bowl exterior to remove all glue
deposits, pencil reference marks and other minor discrepancies.
This is work is all done with a scraper blade - which requires use of two hands - so the bowl has been placed back on the mold (now imperfectly
fitting due to the addition of the end plate) and held in place with the rubber strap. The scraper blade used is from the Lee Valley Tools set of
'super hard' curved scraper blades (the' barrel' shaped blade from cat# 05K20.20 or 05K20.10 that happens to nicely fit the the natural fluted curve
of the ribs that I wish to conserve for this instrument).
This work requires some care and attention so will take a few hours to complete so - with other priorities - will likely be completed in the next day
or two. All the time in the world - but not a moment to lose!!
As a matter of interest, the bowl, soundboard and bridge, neck blank (and a six course peg-box assembly) have been individually weighed from which it
can be estimated that the weight of the completed oud will be about 1.5 pounds or 0.68 kg. I am aiming for an even lighter weight than this - but time
will tell.
|
|
|
Ararat66
Oud Junkie
Posts: 1025
Registered: 11-14-2005
Location: Portsmouth, UK
Member Is Offline
Mood: mellow yellow
|
|
Wow
That's a really light oud, my Tasos oud is about 900 grams and that's light so it will be interesting to hear this one.
Leon
|
|
|
jdowning
Oud Junkie
Posts: 3485
Registered: 8-2-2006
Location: Ontario, Canada
Member Is Offline
Mood: No Mood
|
|
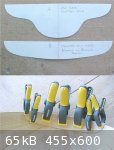
The final component to be fitted to the bowl is the clasp (not sure what this is called in oud terminology).
On a modern oud this is often just a semi-circular disc of wood - about 50mm or so in diameter that is primarily cosmetic in function - to cover the
imperfectly fitting tips of the ribs and any nail holes that were used to hold the ribs in position over the tail block during construction of the
bowl.
On surviving lutes of the 16th and 17th C the practice (which may also reflect earlier oud construction) is to reinforce the bottom perimeter of the
bowl with a clasp - glued to the outside of the bowl - and usually extending as far as the widest point of the bowl. The clasp not only covered up the
tips of the ribs and any nail holes but provided additional structural stiffness to the bottom of the bowl and to the sound board in the area below
the bridge.
The lute clasp was also decorative and the terminal points were either left plain - cut simply at an angle - or provided with a more fancy scalloped
motif. The attached image shows some examples of clasp points sketched, to scale, from surviving lutes of the 16th C. This tradition and design detail
continued to be a feature of 17th C lutes.
After gluing the silk liner strips and the interior end plate to the bowl, the width of the bowl - as predicted - has reduced slightly by 5 mm to 33.5
cm due to glue shrinkage etc.
By using an end clasp, it should be possible to apply a slight corrective pressure to the bottom of the bowl sufficient to restore the original design
dimension of the bowl to the maximum design width of 34 cm. So a lute like (or early oud like?) clasp it is!
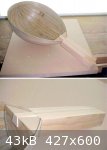
The template for the clasp is first made from card to test the best fit to the bowl.
The second image shows a first attempt. The design of this clasp point reflects the motif of the ends of the oud bridge which I think is the way I
want to go. Card is cheap so will make more trial attempts in order to optimise the design before cutting wood. I have a nice, but modestly, figured
piece of Ash wood left over from the rib stock that I think would do for the clasp

|
|
|
jdowning
Oud Junkie
Posts: 3485
Registered: 8-2-2006
Location: Ontario, Canada
Member Is Offline
Mood: No Mood
|
|
The final weight will indeed be interesting Leon. Just 'sticking my neck out' only to be proven wrong in the final analysis, perhaps!
Of course, this will be a comparatively smaller oud with string length of around 56 to 57 cm and only 5 courses so should be relatively lighter than a
modern, more heavily built (with higher string tension), six or seven course oud - but we will see.
Lightness of construction was a feature of early lutes and so was likely the way early ouds were made as well.
I shall be using 'low' string tensions - aiming for individual string tensions of around 2.5 to 3.5 Kg on this project. However, it will all depend
upon how the finished instrument responds.
|
|
|
jdowning
Oud Junkie
Posts: 3485
Registered: 8-2-2006
Location: Ontario, Canada
Member Is Offline
Mood: No Mood
|
|
The clasp will not extend to the widest point of the bowl - as is usual practice on surviving lutes - but will only cover the same perimeter distance
as the internal end plate. The bottom of the bowl as far as the first brace is, therefore, 'sandwiched, between the end plate and clasp to give an
overall wall thickness of about 5 mm. The sound board banding will be
4 mm wide so - unlike the remainder of the sound board - will not be effective in this area as an edge weakening device designed to modify sound board
vibration and response.
This method of providing stiffness to the sound board below the bridge is similar to that used on my old Egyptian oud which has a thin interior end
plate (but not a clasp). However, instead of using a clasp, additional stiffness is provided in this area by omitting the edge banding and also by
covering the sound board edge with a leather strip glued in place.
Compare this to the method used in the 15th C Arnault de Zwolle lute where the required stiffness is provided simply by employing a very thick tail
block. This method could have been used on this project but I wanted to test how a lighter and more sophisticated solution might work.
Modern ouds, of course, generally have a much thinner tail block (due to a more flattened bottom profile of the bowl) together with a brace below the
bridge - a design solution falling between that of the Arnault lute and the oud of this project.

|
|
|
jdowning
Oud Junkie
Posts: 3485
Registered: 8-2-2006
Location: Ontario, Canada
Member Is Offline
Mood: No Mood
|
|
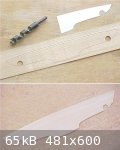
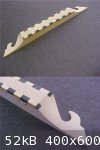
The final shape of the clasp has been established, by trial and error, using card templates.
The Ash wood blank has been planed to a thickness of under 1.5 mm and the profile marked in pencil by tracing around the card template. The decorative
clasp ends are fragile and will easily break (due to the wood cross grain) so the 'scallop' motif has been cut first using a sharp, single spur,
cutter in a drill press - the work being clamped securely for this operation to avoid risk of breakage.
The profile of the clasp was then carved close to the marked line with a sharp knife and finished to size with files.
The top of the clasp has been left about 10 mm oversize. This will allow some latitude for obtaining the best fit on the spherical surface of the end
of the bowl.
The clasp will be hot bent and fitted with a slight amount of 'spring' to bring the width of the bowl back about 5mm to the required 34 cm design
width.
|
|
|
Peyman
Oud Junkie
Posts: 496
Registered: 7-22-2005
Member Is Offline
Mood: Mahoor
|
|
Nice to see the progress on this project. I found this painting in a blog (from the Metropolitan museum of Art, I guess) and decided to put it up
here. There is a nice level of detail on the oud with some other instruments. The painting seems to be from 1520 and documents a wedding ceremony.
|
|
|
jdowning
Oud Junkie
Posts: 3485
Registered: 8-2-2006
Location: Ontario, Canada
Member Is Offline
Mood: No Mood
|
|
Thanks Peyman. What a charming miniature painting - is it Persian? An interesting combination of instruments - harp, pipes, tambourines and oud. I
love the depiction of the 'cross eyed' piper behind the oud player - it must have been quite an effort to blow those things!
So again we have an example of the sickle shaped peg box, and - unusually(?) - a clear representation of contrasting tiled banding around the edges of
the sound board, finger board and pegbox. Are those frets on the fingerboard- or just decorative panels? Rather late for frets on an oud? Also note
again the mysterious two tone colour of the sound board - what can that mean?
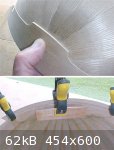
Humidity in the workshop (65% RH) is too high today for assembly work so spent time hot bending and fitting the clasp to the bowl. The clasp is flat
but the bowl is spherical so it was necessary to glue a thin wedge of Ash wood to the central part of the clasp to obtain a close fit all around. In
order to apply slight pressure and bring the bowl width back - 3mm - to the design of 34 cm, a flexible 'strong back' of spruce is to be used under
the central clamp - verified by a 'dry' run. When the clasp is glued in place, the bowl width should be maintained close to design width.
|
|
|
Peyman
Oud Junkie
Posts: 496
Registered: 7-22-2005
Member Is Offline
Mood: Mahoor
|
|
Yes, it's Persian. It depicts the wedding of Bahram and Farangis, two figures from Persian mythology.
I didn't realize the piper was cross eyed! It's a nice observation. I think they are playing something called a "balaban" (different than a "Ney," the
bamboo reed).
I think there is also a good chance those lines on the fingerboard are frets. This was mentioned in the KT book as well. I am not sure about why they
use contrasting wood on the soundboard. It wasn't only ouds but other instruments had this going too (like Tanburs and so on). You can still see this
idea used in Bagalamas today. I am curious about it as well.
|
|
|
jdowning
Oud Junkie
Posts: 3485
Registered: 8-2-2006
Location: Ontario, Canada
Member Is Offline
Mood: No Mood
|
|
Continuing, uncomfortable, high humidity levels so spent a little time modifying the bridge.
The shellac coating was removed and the bridge ends re-profiled and reshaped to more accurately reflect the bridge design depicted in the engraving.
These modifications resulted in a weight reduction of the bridge from 7 grams to 6 grams without any significant reduction in the bridge 'foot print'
(area glued to the sound board).
At around 3 pm, the 'winds of change' in the weather conditions could be felt blowing through - so hopefully lower humidity conditions will prevail
over the next few days.
|
|
|
jdowning
Oud Junkie
Posts: 3485
Registered: 8-2-2006
Location: Ontario, Canada
Member Is Offline
Mood: No Mood
|
|
Current hot, but rain free, weather conditions over the past couple of days mean that Relative Humidity is around 64% in the morning dropping to
around 50% by mid afternoon as the moisture in the atmosphere is 'burned off'. So the clasp was glued yesterday afternoon - to complete the bowl
structure - at an RH in the workshop of 53%.
Digital 'Weather Stations' - measuring inside and outside temperatures, as well as indoor RH, were on sale at low price at the local hardware store,
so picked one up to replace the less accurate, cheap analogue unit that I have been using so far. (Subject of another thread yet to be posted - for
information).
The edge of the bowl must now be trimmed to the level of the neck block which means that about 5 mm must be removed by planing. The correct level is
determined by placing the bowl on a flat MDF working surface and tracing around the edge of the bowl using a pencil taped to a piece of wood of
appropriate thickness. Simple, 'make shift' tools that do the job.
The slight tension applied to the clasp before being glued in place has brought the width of the bowl to within 2 mm of the design 34 cm - close
enough.
|
|
|
jdowning
Oud Junkie
Posts: 3485
Registered: 8-2-2006
Location: Ontario, Canada
Member Is Offline
Mood: No Mood
|
|
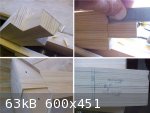
With the bowl structure complete, the rib ends overlapping the neck joint face have been trimmed and finished flush with the joint face.
The trimming is best done with a sharp knife making shallow carving cuts across the wood grain. To finish the joint face, the neck block is firmly
supported on a small board - clamped to the workbench - and filed flat using a fine, double cut, machinists file. A file is a cutting tool that can
give more accurate results than a sandpaper block which, nevertheless, might also be used as an alternative. Beware of 'not so inexpensive' files that
may be twisted and warped and incapable of producing accurate results. Pay a little bit more for good files from reputable manufacturers like
Nicholson.
The width of the finished joint at this stage is 5.1 mm (5 mm is the minimum width by design).
|
|
|
jdowning
Oud Junkie
Posts: 3485
Registered: 8-2-2006
Location: Ontario, Canada
Member Is Offline
Mood: No Mood
|
|
The neck blank dovetail (prepared during the winter period) has now been precisely shaped and fitted to the neck block.
I have not used this technique before but the great advantage is that it accurately locates the neck in relation to the bowl allowing any necessary
alignment adjustments to be made prior to final gluing of neck to bowl.
The 'disadvantage' is that any slight discrepancy in the dovetail or neck block alignment is greatly magnified over the length of the bowl or neck.
For this reason, I have left extra material in the neck blank and bowl for final trimming and adjustment.
The neck dovetail has been reduced to the required, close, dimensions using a paring chisel - checking accuracy, as work proceeds, with a good quality
steel ruler. The final, precise, fit is made using a file - carefully removing material, little by little. The whole process took about an hour to
obtain a precise fit.
Although the dovetail fits accurately, the centre line of the neck now requires about a 2.5 mm adjustment towards the bass side. No problem - as there
is ample material left in the neck blank to accomodate this adjustment.
Shrinkage of the hide glue in the inter-rib liner strips has also caused slight backward rotation of the neck block so that the neck block upper face
(and the neck) tilt back from horizontal. This may be corrected (without applying longitudinal stress to the completed bowl) by gluing a small wedge
of spruce to the neck block and neck or by making the adjustment in the bowl (where the extra 5 mm edge allowance may be sufficient). I prefer the
latter course of correction.
|
|
|
jdowning
Oud Junkie
Posts: 3485
Registered: 8-2-2006
Location: Ontario, Canada
Member Is Offline
Mood: No Mood
|
|
While there has been a slight contraction in the bowl width due to glue shrinkage this is not the primary cause of the slight neck block tilt back.
Further examination of the oud mold reveals that there is an almost imperceptible 'bow' or warp in the plywood baseplate. With the mold placed on a
flat reference surface and using feeler gauges to measure the gap at the neck block position on the baseplate, the gap at the neck block was found to
be 0.4 mm (0.016 inch) equivalent to a slope of about 1:100.
This slight misalignment - due to an 11 times magnifying effect - means that at the tail end of the bowl the slope translates to an error of about 4.5
mm.
In other words, the slight tilt back of the neck block relative to the rest of the bowl, is 'built in'. However, correcting this error - as already
described - is straight forward.
Never trust modern plywoods for flatness!
|
|
|
jdowning
Oud Junkie
Posts: 3485
Registered: 8-2-2006
Location: Ontario, Canada
Member Is Offline
Mood: No Mood
|
|
To be on the safe side, additional material has been glued to the upper surface of the neck block (about 4mm at the thickest point tapering to zero at
the dovetail). This gives maximum latitude for adjustment - although most of this additional material will be planed away in the final fitting and
leveling process. Additional work - punishment, no doubt, for not being diligent in checking the flatness of the mold base plate in the first place!!
The dovetail and neck joint surfaces - after careful filing - are now a perfect fit.
The neck blank will be left, unshaped, with square sides, until the bowl leveling process is completed. This makes it easier to clamp the neck block
in a vice when planing the upper surface.
Too humid now to undertake assembly work so this may be a good time to turn attention to the design of the pegbox.
|
|
|
jdowning
Oud Junkie
Posts: 3485
Registered: 8-2-2006
Location: Ontario, Canada
Member Is Offline
Mood: No Mood
|
|
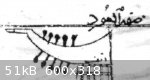
The peg box, depicted in the engraving, is something of a mystery (compared to modern day oud construction). Obviously, it is not an exact,
perspective, representation of what the artist saw but is subject to artistic convention. So what does the artist tell us?
1- There are 10 pegs, consistent with a 5 course oud - made from a dark wood or light wood stained black. The pegs have relatively long shanks and
circular heads - possibly with small, decorative finials.
2 - The peg box is uniformly curved along its length, or is 'sickle shaped' (side view).
3 - The peg box is tapered from the nut to the 'tail' end (side view).
4 - The peg box is set at a more acute angle than 90 degrees to the neck (side view).
5 - There is a mysterious termination at the tail end of the pegbox (side view?). This detail appears in some early Persian miniature paintings. Was
it purely decorative or did it have a practical function - perhaps a place to tie a shoulder strap to support the oud when being played 'walk
about'?
|
|
|
jdowning
Oud Junkie
Posts: 3485
Registered: 8-2-2006
Location: Ontario, Canada
Member Is Offline
Mood: No Mood
|
|
Modern oud peg boxes are invariably 'S' shaped. However, early ouds not only had curved, 'sickle' shaped peg boxes but some also had straight side,
'lute like' peg boxes. Also, some. according to the iconography, were mainly straight sided except for the tail end - which was sharply curved and
terminated in one of those mysterious finials.
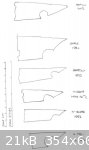
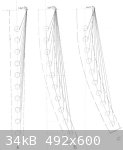
Investigating further, the attached image shows the geometry of three test examples of five course peg boxes drawn to scale.
Image A represents a lute like straight sided version (or rather early oud like?). This peg box is set at 90 degrees to the neck (or close to that
angle). Note that the strings are contained within the framework of the peg box but that the string clearance above adjacent pegs diminishes toward
the tail end.
As this successful design is invariably found in surviving lutes, why were many old oud peg boxes curved like a sickle? Was it simply cosmetic (purely
decorative) or was there a practical, functional purpose?
Image B shows a peg box - drawn to the same scale - where the string clearance above each adjacent peg is equal throughout. This results in a curved
profile but with peg spacing increasing slightly towards the tail end.
Image C shows a peg box with the same constant string to peg clearance but, with the peg spacing maintained at equal distance throughout, is more
curved along its length.
In examples B and C, the strings are not contained within the peg box frame work but fall outside - harp like. Therefore, neither of these
alternatives would seem to be appropriate.
|
|
|
jdowning
Oud Junkie
Posts: 3485
Registered: 8-2-2006
Location: Ontario, Canada
Member Is Offline
Mood: No Mood
|
|
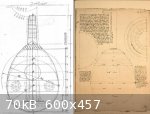
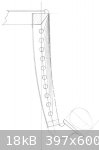
The plan is to design the peg box based primarily on a logical and practical geometrical principal rather than cosmetic appearance.
A development of layout C is to keep the string clearance above each peg constant with equal peg spacing. This geometry also produces a curved peg box
profile.
The image shows a preliminary peg box layout, drawn to scale, with a peg spacing of 13 mm and constant string clearance of 2 mm - the strings being
contained within the structure of the peg box.
The final design may end up being a bit thicker in profile at the nut and somewhat thinner at the tail end - but generally, to my eye, this seems to
be the way to go.
The proposed decorative end of the peg box is in the shape of a 'tear drop' (the geometry being exactly that of the oud sound board). This is shown
here with a flat upper surface but which could also be curved in profile - as represented in some of the early Persian miniature paintings previously
posted. This detail will be made from ebony with - perhaps - a matching central boxwood inlay within the 'tear drop'.
The 'tear drop' could be set at a lower angle relative to the peg box profile but would then be more vulnerable to damage.
The overall length of the peg box turns out to be 170 mm which is the depth of the oud bowl. This is a geometrical relationship found in early
lutes.
|
|
|
| Pages:
1
..
6
7
8
9
10
..
16 |


