| Pages:
1
2 |
jdowning
Oud Junkie

Posts: 3485
Registered: 8-2-2006
Location: Ontario, Canada
Member Is Offline
Mood: No Mood
|
|
Workshop Rework
As significant winter conditions arrived in this area in mid November this has put a stop to making instruments in my main workshop which is unheated.
I can still use the woodworking machines when necessary - except when ambient temperatures drop below minus 20 C when the electric motors will not run
effectively.
In order to make progress on current instrument making projects, I have decided to temporarily convert a small metal working shop to allow woodworking
operations. This topic may be of interest to those with only limited space available in order to demonstrate that large workshops are not necessary
for making one or two ouds (or lutes).
The workshop is attached to the kitchen area of the house and is currently set up as a tinsmith shop. I have used this shop, year round, for many
years making reproduction heritage tinware and copperware as a full time occupation until retiring about 4 years ago - although I still do tinsmithing
as a volunteer to support local museums.
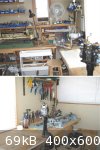
The shop measures only 3.4 metres (11 feet) long by 2.3 metres (7.5 feet) wide. Although small, this is an advantage as heating costs are minimal.
There are bench surfaces built along three walls. The main bench, on the south side, made from elm 61 cm (24 inches) wide and 4 cm (1 1/2 inches)
thick. The bench on the North side measures 36 cm (14 inches) wide. Both benches connect to an end bench 69 cm (27 inches) wide. All very
substantial!
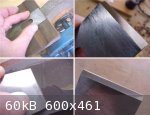
The attached image shows the two corners of the south bench with a vented soldering station in one corner and a folding machine and metal forming
machines in the other. The plan is to move this equipment into temporary storage in an attic and to use this bench for wood working. As the elm
surface of the bench is not perfectly flat (not necessary for metal working) and as it will not be practical to plane the surface level, the bench is
to be resurfaced with 19 mm (3/4 inch) thick M.D.F. (Medium Density Fiberboard) and fitted with a small woodworking vise. It will not be necessary to
move the heavy metal shear on the end bench.
|
|
|
jdowning
Oud Junkie
Posts: 3485
Registered: 8-2-2006
Location: Ontario, Canada
Member Is Offline
Mood: No Mood
|
|
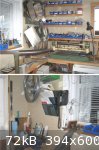
The narrower bench along the North wall is built to hold Tinsmith/ Coppersmith stakes (anvils). As these tools are designed to fit into tapered
mortise holes in the bench they are easily moved and will be placed in temporary storage to provide additional bench space for woodworking. It should
not be necessary to move any of the other tools and materials not otherwise occupying this bench space.
So, with the minimum amount of work, the shop may be converted to metalworking or wood working.
All gluing operations will probably be done in the heated kitchen next door - to minimise the amount of water vapour released into the limited
workshop space (not good for the metal tools).
|
|
|
jdowning
Oud Junkie
Posts: 3485
Registered: 8-2-2006
Location: Ontario, Canada
Member Is Offline
Mood: No Mood
|
|
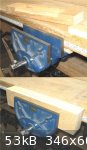
The first step is to instal a wood working vise on the bench. I have decided not to go to the trouble of resurfacing the bench as the flat surfaces
required for planing ribs and soundboard will be provided by boards of appropriate dimensions held in the vise.
Here I have installed a light duty vise - a spare Record No 57 with no quick release mechanism. Similar light duty vises may be purchased for around
$25 - good enough for instrument making work. The bench top is about 38 mm thick so a 12 mm thick plywood shim was glued underneath the bench to bring
the top edge of the vise below the surface of the bench. Pine plates were then fitted to the jaws - cut oversize so the the top edges can then be
planed level with the bench top.
|
|
|
SamirCanada
Moderator
Posts: 3405
Registered: 6-4-2004
Member Is Offline
|
|
nicely done I have to do this to my next bench so it will be useful info!
|
|
|
jdowning
Oud Junkie
Posts: 3485
Registered: 8-2-2006
Location: Ontario, Canada
Member Is Offline
Mood: No Mood
|
|
Wood working vises are currently on sale at Busy Bee Tools until Jan. 10th so might be worth checking out Samir. For example the light duty
8"woodworking vise,
cat # B17078 is on sale at $15.48 - can't get much cheaper than that if you are on a budget. I don't know what the quality is like - probably not as
good as the Record - but they look OK from the photos online so should do for light woodworking. A heavier duty 7" quick release vise is also on sale
at $57.98.
I had hoped to do a bit more this weekend but it is too cold to work in my main workshop in relative comfort. Hopefully all of this frigid Arctic air
mass will soon go back to where it belongs!
|
|
|
Jameel
Oud Junkie
Posts: 1672
Registered: 12-5-2002
Member Is Offline
Mood: No Mood
|
|
John, I'm intrigued by your metalworking tools. Care to share some of the other work your producing with them? I've always been attracted to the type
of work that dictates a small workspace. I think if I had a little shop like this through a door in my kitchen, I'd have little need for any other
rooms. Well, maybe the toilet.  ) )
|
|
|
jdowning
Oud Junkie
Posts: 3485
Registered: 8-2-2006
Location: Ontario, Canada
Member Is Offline
Mood: No Mood
|
|
Glad to Jameel. Will post some images of my tinware later.
Of course, a small workspace like this is no good for heavy woodworking such as furniture building where a larger workspace and heavy bench is pretty
well essential - not to mention space for woodworking machines. This little workshop is only good for small sized work with hand tools. My much larger
(unheated) workshop is where I do both woodworking and heavier metal working (lathe work, welding etc) - not an ideal mix however.
The way the small shop is to be adapted for woodworking means that it may be quickly converted back to metalworking in less than half an hour. The
main problem will be controlling wood dust and shavings to prevent the dust getting into the machines. So will have to go back to more disciplined
ways drummed into us in school woodworking classes many decades ago where - at end on each class - every tool had to be put back in its allotted space
at the end of the bench and the workbench and surrounding area had to be spotless and free of dust. The end of class was like a military inspection
where we had to stand to attention beside our benches awaiting the scrutiny of the class supervisors - before we were allowed to leave the building.
Happy days!
The tinsmithing tools (hand operated forming machines and special anvils or stakes etc.) are originals dating from the mid 19th and early 20th C, that
I use to make copies of 19th C tinware. I had to rebuild most of the tools (make and fit new bearings, shafts re-machined, etc) in order to restore
proper functioning. Quite a lot of work in itself.
|
|
|
jdowning
Oud Junkie
Posts: 3485
Registered: 8-2-2006
Location: Ontario, Canada
Member Is Offline
Mood: No Mood
|
|
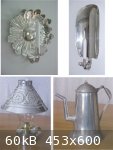
As requested by Jameel, here follow four composite images of a small variety of tinware designed and hand made in my tinshop. Tinware is made from
tinplate - thin sheet iron coated on both sides with pure tin to prevent rusting. Popular in the 19th C and known as 'poor man's silver' because it
has the appearance of silver (but does not tarnish like silver - for this reason 16th C craftsmen used pure tin in place of silver for inlay work).
Tinsmiths made a wide range of tinware utility items - cups, pans, scoops, lanterns, kerosene lamps, chambersticks etc etc as well as custom designed
tinware for presentations. It was considered quite acceptable to give custom tinware as anniversary presents - a custom that survives today in the
traditional 10th wedding present which is tinware (but nowadays stainless steel ware no doubt!).
I made a 19th C guitar in tinplate some years ago so may make an oud in tinplate some day - just for fun.
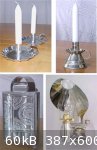
The attached images are of a very fancy church chandelier and a street lamp - about the largest items that can be made in the small workshop space.

|
|
|
jdowning
Oud Junkie
Posts: 3485
Registered: 8-2-2006
Location: Ontario, Canada
Member Is Offline
Mood: No Mood
|
|
...... another exterior lantern and a couple of pierced lanterns.
Pierced lanterns were in vogue in North America when glass was in short supply and expensive. The candle light in a pierced lantern passes through a
multitude of holes cut into the panels of the lanterns (hence the name 'pierced'). They do not give out much light so were often used by the military
in camp - no glass to break and storm proof. The extra candle holder on the top (known as a 'chimney) is used in a sheltered environment to provide
more light.

|
|
|
jdowning
Oud Junkie
Posts: 3485
Registered: 8-2-2006
Location: Ontario, Canada
Member Is Offline
Mood: No Mood
|
|
..... more lighting tinware and a crooked spout coffee pot.
|
|
|
jdowning
Oud Junkie
Posts: 3485
Registered: 8-2-2006
Location: Ontario, Canada
Member Is Offline
Mood: No Mood
|
|
... and finally (!), last but not least some more lighting devices. In the 19th C one worked only during daylight hours, from sunrise to sunset as the
available light sources - particularly candles - gave off little light and were an expense as well.
Back to the workshop revamp!
|
|
|
Ararat66
Oud Junkie
Posts: 1025
Registered: 11-14-2005
Location: Portsmouth, UK
Member Is Offline
Mood: mellow yellow
|
|
Beautiful tin work John, really lovely!
Leon
|
|
|
jdowning
Oud Junkie
Posts: 3485
Registered: 8-2-2006
Location: Ontario, Canada
Member Is Offline
Mood: No Mood
|
|
Thanks Leon - the lighting devices are also useful during the frequent power cuts that we experience in these rural areas during winter.
The vise is installed and the wooden jaws planed down to the bench top level.
The auxiliary work surface has been made by gluing two pieces of MDF (medium density fibreboard) together giving a total thickness of 33 mm (1.25
inches). The work surface can be made as large or as small as required. This one happens to measure 60 cm (23.5 inches) by 55 cm (21.75 inches) -
large enough for planing sound boards and ribs. A wooden batten has been glued and screwed under the work surface so that it may be clamped in the
jaws of the vise and held firm when in use. Sufficient overhang from the edge of the bench (in this case 15 cm or 6 inches) has been allowed so that
work may be held in place with 'G' cramps. When not required, the work surface may be quickly released from the vise and stored out of the way.
MDF provides a very flat surface but must be allowed time to acclimatise to workshop humidity so that it does not warp. I glued the boards together,
placed them on a solid flat surface and weighed them down with piles of books until the glue had set. MDF is fairly soft material (more like thick
heavy cardboard) so the surface cannot tolerate much abrasive wear. However, the work surface may be hardened somewhat and sealed against humidity
changes by coating both sides with a hard varnish like urethane or spar. Thick, good quality plywood would do just as well but is more costly.
Using an auxiliary work surface means that you do not need a flat bench surface so is a useful tool if you do not own a professional woodworking bench
and have to make do with something less refined (but solid nevertheless).

|
|
|
Jameel
Oud Junkie
Posts: 1672
Registered: 12-5-2002
Member Is Offline
Mood: No Mood
|
|
Beautiful work John! The pitcher and wall sconces are especially nice.
|
|
|
patheslip
Oud Junkie
Posts: 160
Registered: 5-24-2008
Location: Welsh Marches
Member Is Offline
Mood: smooth
|
|
Beautiful work.
How much light do you get from these lovely things? A few years ago I was doing up an old shepherd's cottage with no electricity. Reading at night
by the light of two candles gave me notice that someday I'd need glasses. It would have been very difficult to do any meaningful handwork by plain
candlelight. Perhaps I should have flattened out some bean tins to act as reflectors.
A note for neophytes: MDF dust is really dangerous. Wear a really good mask and clean it up to avoid lasting lung damage.
|
|
|
jdowning
Oud Junkie
Posts: 3485
Registered: 8-2-2006
Location: Ontario, Canada
Member Is Offline
Mood: No Mood
|
|
Thanks Jameel and patheslip. Working by candlelight is probably a good way to ruin one's eyesight as, no doubt many did in the 19th C and earlier. No
need to flatten out a bean can to make a sconce - just cut it to the shape of this traditional sconce! (image to follow if I can find it).
Always a good idea to wear a mask when sawing or sanding wood. I have a home built dust extractor unit attached to my bandsaw (made from plastic
tubing attached to a shop vac. that vents outside the workshop) that works quite well for the amount of work that I do. When installing dust
extractors remember to run a copper grounded wire along the inside of the tubing to eliminate static electricity build up that can cause hazardous
sparking - a potential fire hazard.
|
|
|
jdowning
Oud Junkie
Posts: 3485
Registered: 8-2-2006
Location: Ontario, Canada
Member Is Offline
Mood: No Mood
|
|
Here is an image of a traditional 'scoop sconce' that could be cut from a tin can. It gives a stronger directional light and is a protection against
draughts. No need for a handle at the back - just watch for sharp edges. On the 'real thing' the sconce is built up with folded seams and 'safe
edges'. On a safety issue make sure that any sconce or candleholder is placed upon a fire proof surface - just in case the candle burns down and
overheats the base.
Temperature outside is currently minus 39 C with windchill so another day spent keeping the woodstove fired up!
|
|
|
jdowning
Oud Junkie
Posts: 3485
Registered: 8-2-2006
Location: Ontario, Canada
Member Is Offline
Mood: No Mood
|
|
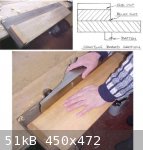
Another essential but easily made tool for a small luthier workshop is a shooting board. For those generally unfamiliar with wood working tools and
techniques, a shooting board enables the accurate planing (straight and square) of the edges of a workpiece (such as a sound board blanks).
In use the joint surface is made with a plane (a long sole jack plane or a jointer plane) set on its side and moved along the edge of the work that is
held firmly against the end stop on the upper part of the shooting board. The shooting board surfaces must be made flat and parallel and the plane
sole and sides must be square (as they usually are on good quality metal planes).
My shooting board is made from good quality plywood with a batten underneath so that it can be temporarily held in a bench vise. It is about 3 ft
(0.92 metre) long. A relief slot is planed in the upper part (to provide clearance in order to prevent build up of sawdust) although this really is
not essential as the plane should not come into contact with the upper part in use.
|
|
|
jdowning
Oud Junkie
Posts: 3485
Registered: 8-2-2006
Location: Ontario, Canada
Member Is Offline
Mood: No Mood
|
|
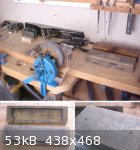
The bench opposite the main bench has now been cleared of tinsmith tools (stored under the bench) and is now a convenient place to store my planes,
scrapers, chisels and other edge tools as well as an area for sharpening tool blades. Only the tools required for a particular task in hand are kept
here due to the limited space available.
As this topic is mainly for those with limited space and little woodworking experience it might be worth mentioning some hints and methods - familiar
to experienced wood workers - that may be of some help to beginners. Note that all of the edge tools are placed so that the cutting edges are never in
contact with the bench surface. This is to prevent any hard grit (e.g. from a sanding operation) or dust coming into contact with and damaging the
razor sharp cutting edges. Planes in particular should never be placed sole down on a bench surface but always set down on their sides.
A convenient area for sharpening blades is most important. The method that I prefer for sharpening is described by master woodworker James Krenov in
"The Fine Art of Cabinetmaking" and is particularly suited to small work areas. I use two oil stones one medium grade synthetic stone and a fine
natural stone for honing blades - hard stones that wear well. These are kept covered when not in use in fitted hardwood boxes. The oil stones stay in
the boxes at all times when in use. Four small finishing nails are hammered part way into the underside of each box at the four corners and the nail
heads then cut off to leave a short piece of each nail projecting. When placed on a wooden bench the nails bite into the surface and prevent the oil
stone from skidding around when in use. The nails leave small marks in the bench surface so the oil stones should be used in a location where this is
of no consequence.
|
|
|
jdowning
Oud Junkie
Posts: 3485
Registered: 8-2-2006
Location: Ontario, Canada
Member Is Offline
Mood: No Mood
|
|
The first step in sharpening a plane blade is to lap the back of the blade flat and to a mirror finish. This operation needs only to be done once with
a new blade. Some new blades require quite a bit of work to make the blade flat (the front portion only). I use a flat metal lapping plate and silicon
carbide grit to create a flat surface which is then finished on an oil stone. The Micro-Abrasive sheets made by 3M, mounted on a piece of plate glass
might be a better solution for the finishing operation but I have yet to try this material.
The cutting edge of the blade in then hollow ground on a grinder. I use an old fashioned hand cranked grinder so that there is no danger of 'burning'
the steel due to overheating as there always is with an electric bench grinder - even when using soft 'white' stones. The bade is moved from side to
side on the wheel - supported by a wooden rest set at the required cutting edge angle - while the other hand cranks the grinding wheel. The rest has a
slot cut into it as a guide for the fingers. All very sedate and relaxed but metal removal is, nevertheless, still quite fast and the job soon
done.
The edge must then be honed on an oil stone. The stone must be kept lubricated at all times (I use kerosene) and never used 'dry'. The correct angle
of the blade on the oil stone is determined by 'feel' - rocking the blade slightly on the stone until the edges of the hollow ground blade can be felt
to 'lock into' place. The second check for the correct blade angle is to look for lubricant being squeezed from under the front edge of the blade. A
few light strokes of the blade held at the correct angle on the stone is all that is required to form the cutting edge. A slight burr will be felt at
the back of the blade which is then removed by light honing on a fine oil stone - the back of the blade being held flat against the stone.
The final stage is to strop the blade cutting edge to a mirror finish on a piece of leather glued to a flat block of wood dressed with a fine abrasive
compound. I use the Lee Valley 'green' compound. The finished cutting edge can be seen as a thin bright line on the blade. The blade is sharp enough
when it can shave the hairs from your arm (carefully!).
|
|
|
jdowning
Oud Junkie
Posts: 3485
Registered: 8-2-2006
Location: Ontario, Canada
Member Is Offline
Mood: No Mood
|
|
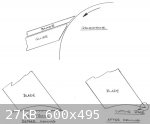
The attached sketches should make the sharpening procedure a bit clearer. The curvature of the hollow grind is, of course, dictated by the diameter of
the grind stone. In this case the grind stone is 6 inches (153 mm) in diameter.
After grinding, the blade is positioned on the oil stone by feel - no sharpening jigs being necessary. The sketch shows the blade in the correct
'locked on' position on the surface of the oil stone prior to honing.
The advantage of working with a hollow ground surface is not only that it is easy to maintain the correct blade angle by feel but also that only a
narrow part of the blade is honed to form the cutting edge - not the full bevel. This can save a lot of time.
After two or three sharpenings of the blade, when the hollow ground surface is almost honed away, it is then only a matter of a couple of minutes to
regrind the blade and repeat the honing cycle over again.
|
|
|
antekboodzik
Oud Junkie
Posts: 109
Registered: 5-24-2010
Location: north poland
Member Is Offline
|
|
Dear jdowning,
may I ask about your grinder? Are these two screws (shown with arrows) that are used for reducing "loose" on the wheel shank? I can hardly judge from
picture.
I found one grinder that can handle even 6 inch wheels, but with "pinion" shank being slightly loose in its mounting, and wheel wobbling I see it
totally useless... Until I can use holes for oiling (there are two, on each side of case) and set there screws to just temporairly hold the shank
securely.
|
|
|
jdowning
Oud Junkie
Posts: 3485
Registered: 8-2-2006
Location: Ontario, Canada
Member Is Offline
Mood: No Mood
|
|
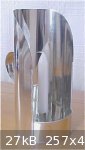
Here for information are some more detailed images of my hand grinder - 'MOLE' made in Britain - most likely no longer manufactured. I purchased it
new many years ago so have properly maintained it over time. The grinding wheel is a hard stone 6 inches diameter by 1 inch wide. The grinder has
plain bearings with no transverse 'play' on the pinion shaft - just a small amount of axial clearance. As lubrication of the moving parts is essential
there are two oiling cups on the two pinion bearings with a central oiling cup for oiling the internal gears. The hand cranked drive shaft has a
covered oiling hole for the single external bearing. Gear ratio is 10:1
The stone has a slight wobble on its side face (a manufacturing 'fault') but this is not a problem as the grinding surface of the wheel (the
periphery) runs true.
As with all new grinders (hand cranked or motorised) a grinding wheel must first be 'trued' before use - to remove any irregularities - using a
special grinding wheel 'dresser' that is held against the grinding wheel and moved side to side as the wheel rotates (as if sharpening a blade). The
simplest and cheapest 'dressers' are just 'stone' blocks that are harder than the grinding wheel. A grinding wheel should be regularly 'dressed' to
remove any build up of metal particles from the wheel, open up a fresh grinding surface and re-true the wheel after any irregular wear of the grinding
surface.
No doubt there are a number of instructional videos on Youtube that will go into detail on wheel dressing.
[file]33074[/file] [file]33076[/file] [file]33078[/file]
|
|
|
rootsguitar
Oud Junkie
Posts: 144
Registered: 7-12-2012
Member Is Offline
|
|
Really great to see these details!
|
|
|
jdowning
Oud Junkie
Posts: 3485
Registered: 8-2-2006
Location: Ontario, Canada
Member Is Offline
Mood: No Mood
|
|
I should mention that the correct term for the dressing block that I use - previously mentioned - is a 'grinding wheel dressing stick' made from hard
bonded silicon carbide. This is best for dressing a hand cranked grinding wheel (unless you have a helper) where one hand manipulates the dressing
stick while the other cranks the grinder. Most of the diamond tipped dressers on the market are for commercial precision grinders so do not apply
here. The other kind fitted with 'star' wheels are meant for two handed operation (so can be used on motorised grinders).
Always wear protective safety goggles when working with grinders.
|
|
|
| Pages:
1
2 |


