| Pages:
1
2 |
jdowning
Oud Junkie

Posts: 3485
Registered: 8-2-2006
Location: Ontario, Canada
Member Is Offline
Mood: No Mood
|
|
The shellac coatings have successfully sealed the grain and fully dried.
An oil varnish could be applied over the sealing coats (but not a varnish containing polyurethane as it will not stick properly to the shellac).
Rubbing oil varnish should not be used as the shellac will prevent it from penetrating into the wood.
It has been decided, however, to finish the instrument with only shellac.
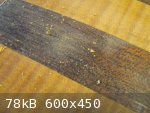
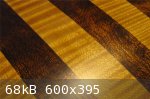
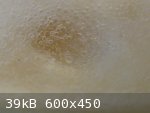
The first step is to fill the open grain of the Utile wood. This is done by first sanding away most of the shellac coating trying not to cut through
to the wood underneath. 400 grit open coat paper is used for this which generates a lot of very fine yellow dust (which is powdered shellac). This
powder is left on the surface of the wood and worked into the grain with a cloth pad dipped in thin 1 lb cut shellac - using a small circular motion
of the pad (a bit like French polishing) - soaking the pad at regular intervals as the shellac dries quickly. The shellac will then be left to dry for
a day in a warm kitchen and the procedure repeated until the wood grain is completely filled. This should take about 3 or 4 coats - and a few days.
|
|
|
jdowning
Oud Junkie
Posts: 3485
Registered: 8-2-2006
Location: Ontario, Canada
Member Is Offline
Mood: No Mood
|
|
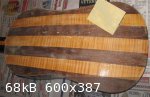
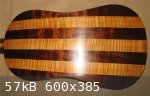
After several coats of shellac each allowed to dry for 24 hours or more and then rubbed down with 400 grit paper - the wood grain is filled and
sealed.
Three final coats of 2 lb cut shellac were then applied with a cloth pad - this time without rubbing down between coats - and allowed to dry
thoroughly for a few days. This left a glossy surface with streak marks and dust inclusions that were removed by rubbing down with 0000 grade steel
wool. This is done with fingertip control - working over small areas at a time - until all streak marks etc are removed and the whole surface has a
uniform sheen. Strong incident light is necessary in order to see all surface imperfections as work proceeds. Steel wool - even of this finest grade
cuts quite quickly so care must be taken not to cut through the shellac coat to the wood underneath.
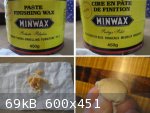
Shellac is not a particularly durable finish and will discolour if in contact with moisture or alcohol (although easily repaired if this happens) so
has been given a thin protective coat of hard furniture wax. The wax is applied by putting a small piece in cotton cloth to form a pad - working in
small circles over the entire surface. After drying for half an hour the wax is then polished to a nice satin sheen with a soft cloth.
This is essentially a shellac varnish finish - not a 'French Polish' shellac finish (that is far too glossy for my taste).
|
|
|
jdowning
Oud Junkie
Posts: 3485
Registered: 8-2-2006
Location: Ontario, Canada
Member Is Offline
Mood: No Mood
|
|
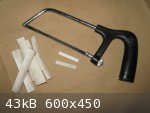
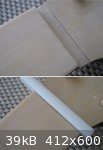
The nut will be made from a quantity of cattle leg bone pieces cleaned and prepared about 18 months ago (see "Making Bone Nuts from ,Scratch' on this
forum).
The bone is pretty hard and irregular in shape so is (safely) cut roughly to size by hand with a metal cutting saw and a filed with a wood rasp
(file).
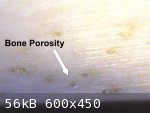
The pieces have been checked with a magnifying glass to ensure that there is no bone porosity which would make a piece unsuitable for use as a nut -
not only because of the tiny holes but because they likely still contain fat or grease deposits. Areas where the inside of the bone is 'cratered'
rather than smooth are where porosity is most likely to be found and so should be avoided.
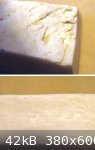
Two pieces that seem to be without porosity have been cut and - to be absolutely sure they are grease free before use - have been immersed in lacquer
thinner (a mixture of Acetone, Methyl Ethyl Ketone and other solvents) where they will remain for about a week. If all grease is not removed from the
bone then it may 'leach out' later and soak into and damage the surrounding wood of the neck.
Is it worth preparing cattle bone at home rather than buying nuts 'ready made' from luthier supply houses? Probably not.
In the meantime work on finishing the pegs and fingerboard surface will proceed.
|
|
|
jdowning
Oud Junkie
Posts: 3485
Registered: 8-2-2006
Location: Ontario, Canada
Member Is Offline
Mood: No Mood
|
|
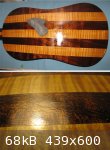
The fingerboard has been levelled with a cabinet scraper and then given a slight curve or 'crown' across the width to ensure that the tied frets fit
tightly against the surface of the fingerboard.
The guitar has been temporarily fitted with an old ebony nut and old nylon strings (plus a silk 'bourdon' bass string on the 4th course) and brought
up to tension (ranging from 3.5 Kg course #1 to 2.8 Kg for courses #3 and #4). Temporary graduated diameter nylon frets (cheap fishing line - 0.8mm to
0.5mm - much cheaper than gut but not as good) have also been fitted. This is to assess if any further adjustments may be required to the string
'action'.
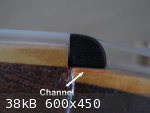
Under full string tension, the temporary nut can easily be pushed from side to side with finger pressure (due to the shallow angle of the pegbox -
unlike an oud). As this might result in an inefficient transfer of string vibration, the bone nut that will eventually be fitted will be set tightly
in a shallow channel.
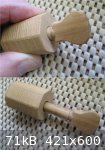
The boxwood pegs require finishing by rounding off sharp edges with fine sandpaper. Further finishing should not be necessary as the peg heads will
become 'burnished' with use. The ends of the pegs are slotted (rather than drilled) in the traditional way (no need for small diameter drills for pegs
or bridge). In order to facilitate tuning when using gut or silk strings, the diameter of peg projecting above the pegbox may be reduced in diameter
but, for now, the pegs will be left unmodified.
With a string length of 55 cm the maximum pitch of the top string - if traditional gut or silk - would be g' at A415. Initially PVF strings will be
used so maximum pitch of the top string might be raised to a' - just to establish the optimum pitch for the guitar.
The 4th course could be unison or octave tuned - another factor requiring some experimentation for best results.
In the meantime - to hear how a renaissance guitar might have sounded at its finest - do a Google search for videos of Massimo Lonardi playing
Renaissance Guitar - from the Spanish and French 16th C tablatures.
|
|
|
jdowning
Oud Junkie
Posts: 3485
Registered: 8-2-2006
Location: Ontario, Canada
Member Is Offline
Mood: No Mood
|
|
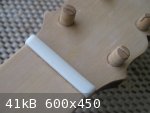
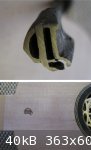
The degreased nut blank has been tightly fitted into a shallow rebate and trimmed to size ready for filing the string grooves. The rebate has been
sealed with shellac and the nut will be glued in place with dilute hot hide glue to endure perfect seating and prevent any movement when under string
loading.
To be absolutely certain that the nut is completely free of grease it will be left to soak for a few more days in pure acetone a relatively non toxic
solvent (but highly inflammable).
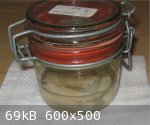
To demonstrate the need for perfect degreasing of home prepared bone a few cut small pieces (previously cleaned by boiling in detergent followed by
soaking for days in purified gasoline) have been soaking in Lacquer thinner for about a week - this brand being a mixture of Toluene, Methyl Ethyle
Ketone, Methanol and Acetone. The liquid during this time has turned 'cloudy' in appearance due to thousands of what seem to be air bubbles but which
are probably water/grease globules extracted from the bone. So this solvent mix is pretty effective. Pure Acetone is supposed to be better.
|
|
|
jdowning
Oud Junkie
Posts: 3485
Registered: 8-2-2006
Location: Ontario, Canada
Member Is Offline
Mood: No Mood
|
|
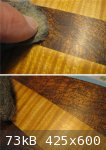
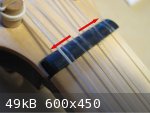
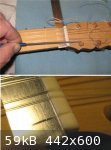
With the nut fitted the grooves for the strings have been cut with a needle file. It helps to have temporary strings fitted and up to tension to hold
the nut in place during this operation.
To ensure consistent depth of the grooves a metal strip just over 1 mm thick has been placed in front of the nut so that the file does not cut too
deeply. After filing the string slots have been polished with a thin string dipped in a fine abrasive ('rottenstone' - used for final polishing of a
varnish finish).
The nut has been glued in place with a small 'dab' of hot hide glue.
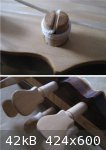
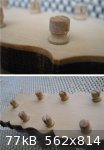
The pegs shank have been burnished to a polished finish using burnishers made from small blocks of boxwood drilled and then cut to the correct taper
with a peg reamer. Each peg is put in the burnisher and rotated by hand - being careful not to push the peg into the burnisher too tightly - to avoid
jamming the peg. This compresses the wood fibres to ensure a smooth action of each peg when finally fitted.
The peg ends have been reduced in diameter by filing a groove with a needle file. This is to make tuning less sensitive - particularly when using gut
or silk strings. It also helps prevent the annoyance of nylon strings tending to pop out of the peg slot before a string is brought up to tension.
Other finishing touches - the tail button has been fitted, a push fit and my makers brand has been burnt into the sound board just below the
fingerboard.

|
|
|
jdowning
Oud Junkie
Posts: 3485
Registered: 8-2-2006
Location: Ontario, Canada
Member Is Offline
Mood: No Mood
|
|
The guitar has been initially test strung with PVF strings with the top string pitched at g' (A440) - the intervals between courses being 4th - 3rd -
4th (in other words equivalent to the second, third, fourth and fifth courses of a six course vihuela or lute of the early 16th C.
The fourth course of the Spanish or French guitars of the 16th C would have been an octave pair - that is with a bourdon and a thinner string tuned an
octave higher to add brightness to the tone of the relatively thick gut or silk bourdon string. For these preliminary tests, however, non historical
Pyramid nylon/metal overspun unison tuned strings have been used for the fourth course.
The string gauges calculated for the initial tests allow the pitch to be raised or lowered a full tone from g' by adjusting string tension. This has
allowed the optimum pitch to be determined for best resonance of the guitar sound board which is about a full tone below G tuning - i.e. with the top
string tuned to f' (A440). This means that - in order to maintain proper string tension - the trial strings must be replaced with those of heavier
gauge - for example the top string diameter of 0.37 mm must be increased to 0.41 mm.
The lower optimum pitch is consistent with use of all gut or silk historical stringing where the breaking limit for a gut top string at a string
length of 55 cm would be at a pitch somewhat lower than g' at A440.
The temporary nylon frets will next be changed for gut graduating in diameter from 0.85 mm at the nut end of the fingerboard to 0.5 mm at the neck
joint end.
|
|
|
| Pages:
1
2 |


