| Pages:
1
2
3
4
5 |
jdowning
Oud Junkie

Posts: 3485
Registered: 8-2-2006
Location: Ontario, Canada
Member Is Offline
Mood: No Mood
|
|
The angle of the neck joint for this instrument - based on the Christofolo Choc lute - is about 45 degrees. The exact angle of the neck joint for a
lute depends upon the width of the fingerboard at the neck joint - the depth of the neck being fairly consistent at the joint to facilitate playing of
the instrument which would be difficult if the neck was made too thick. For an early lute (like the oud today) the joint would be at about 90 degrees
to the fingerboard because the fingerboard is relatively narrow in width.
The original Choc lute has a large headed iron nail driven through the neckblock into the neck. This likely would have been driven into place when the
neck was being glued to the neck block and would have clamped the joint together, prevented the joint from sliding apart before the glue had set and
also reinforced the joint. This method was commonly used by early luthiers (because screws would likely have been relatively more costly in the 16th
C?) but I use wood screws on my lutes. The fit of the neck, screw holes pre drilled and tested etc is done as a dry run before final gluing.
I started making lutes in the mid 1970's a long time before the Robert Lundberg book was published (2002) so I had to figure out by trial and error
and examination of original instruments how to do it - and there is more than one right way. I have just recently purchased a copy of the book (out of
interest and to find out what I had been doing 'wrong' all of these years!!) and while it does not cover every detail (it was published posthumously)
it is very nicely produced and well worth purchasing if you are interested in building a lute. I wish that such a book had been available when I
started out.
To my surprise, I note that listed in the 'Bibliography' are a number of articles that I wrote relating to lute construction which were published
between 1978 and 1988 in the, sadly, now defunct journals of FoMRHI (Fellowship of Makers and Researchers of Historical Instruments). If anyone is
interested in reading any of those articles let me know and I should be able to scan and post them on this Forum for general information.
I would also recommend Richard Hankey's book on Oud Construction and Repair that I also bought a few weeks ago.
|
|
|
Jesse Frank
Oud Lover
Posts: 23
Registered: 9-17-2007
Location: North Florida
Member Is Offline
Mood: No Mood
|
|
Thank you for the information, Mr. Downing. I would love it if you would post some (or all!) of those articles.
Thanks for sharing. I hope you don't mind my endless barrage of questions.
|
|
|
jdowning
Oud Junkie
Posts: 3485
Registered: 8-2-2006
Location: Ontario, Canada
Member Is Offline
Mood: No Mood
|
|
No problem - keep 'em coming! That is the primary purpose of this Forum - so that we can all share and learn from each other's experiences.
I shall look at my old FoMRHI files to see what articles of mine might be of general interest to other Forum members. There are also many other
articles by others published in FoMRHI that would also be of interest to luthiers but I would not be in a position to post those without the author's
permission. I must check to see if it would be possible for re publication of back copies of FoMRHI - but I doubt it.
|
|
|
Peyman
Oud Junkie
Posts: 496
Registered: 7-22-2005
Member Is Offline
Mood: Mahoor
|
|
I am curious to know if the extra strings have any sympathetic effect on the instrument in general. This looks like a neat project.
|
|
|
jdowning
Oud Junkie
Posts: 3485
Registered: 8-2-2006
Location: Ontario, Canada
Member Is Offline
Mood: No Mood
|
|
All of the strings on a lute can contribute to the overall resonance of the instrument - if properly built - by responding sympathetically (ie without
being plucked). This helps give the lute its characteristic and complex 'cathedral like' sound. The same, I have no doubt, applies to the oud and
other stringed instruments
|
|
|
jdowning
Oud Junkie
Posts: 3485
Registered: 8-2-2006
Location: Ontario, Canada
Member Is Offline
Mood: No Mood
|
|
A complete listing of articles in the FoMRHI Quarterly Index as well as the Galpin Society Index, Early Music Index and Bouwbrief Index - compiled by
Charles Stroom - can be found at
http://www.xs4all.nl/~stremen/music.html
Mr Stroom also gives a list of libraries and other organisation who may have copies of FoMRHI for reference.
I should mention that FoMRHI - established by Eph. Segerman and Jeremy Montagu in 1975 - was intended as a forum for free exchange of research,
experience, ideas etc. between subscribing members concerning early instruments - rather like this Forum but by 'snail mail' - not 'on line'. Also
many of the communications (including some of mine) are speculative and furthermore may comment on communications by others requiring access to more
than one communication to gain a full understanding of a particular topic under discussion. The quality of the communications is also variable as
there was little or no attempt made to edit any of the articles submitted for publication (including correction of grammatical errors etc) - a
consistent policy aimed at encouraging full, unrestricted access for members to post their ideas and comments.
|
|
|
jdowning
Oud Junkie
Posts: 3485
Registered: 8-2-2006
Location: Ontario, Canada
Member Is Offline
Mood: No Mood
|
|
I made a start on completing the mold this afternoon by filing the rib locations flat. I first used a sharp scriber to define the rib outlines so that
they would not be removed during the filing process. I used a flat rasp of the type designed for use on soft metals such as lead or aluminium as this
cuts cross grained wood quickly and smoothly to produce a flat surface. As the surface of the pine mold had oxidised over time to a darker colour it
was quite easy to judge the extent of wood removal as filing progressed. Flatness of the filed surfaces was checked often as work proceeded.
Once the filing operation is completed and all surfaces (including the neck block) smoothed with fine sandpaper, the mold will be sealed with a couple
of coats of shellack and wax polished to prevent the ribs being glued to the mold during assembly of the bowl.
The adjustable mold mounting proved to be essential for this part of the operation.
|
|
|
jdowning
Oud Junkie
Posts: 3485
Registered: 8-2-2006
Location: Ontario, Canada
Member Is Offline
Mood: No Mood
|
|
After filing all rib positions flat, the rib outlines were clearly redefined with a scriber and marked in pencil as a future guide when building the
bowl. There is still a little material that needs to be removed at the rib locations for perfect flatness but it is now pretty close to where I want
it.
The central rib outline has been traced in pencil on to a strip of tracing paper taped temporarily to the mold and the tracing then transferred to
card where the rib half outline has been cut out. This profile, in turn, has been traced onto a strip of tinplate (more stable than card which can
expand or contract with humidity changes at this time of year) which was cut slightly oversize to allow for final trimming of the rib when being
fitted. The half rib profile will ensure symmetry of the central rib which, however, is likely to be the only rib that will be perfectly symmetrical
as individual rib fitting progresses.

|
|
|
Jesse Frank
Oud Lover
Posts: 23
Registered: 9-17-2007
Location: North Florida
Member Is Offline
Mood: No Mood
|
|
Thanks for the update-and thanks for the link. My wife works for the state archives here, so she can inter library loan stuff pretty easily.
|
|
|
jdowning
Oud Junkie
Posts: 3485
Registered: 8-2-2006
Location: Ontario, Canada
Member Is Offline
Mood: No Mood
|
|
I have now narrowed the choice of material for the bowl to two options - the first being the highly figured birds eye maple (image previously posted)
the second being alternating ribs of lightly figured maple and yew wood. I purchase the yew from Oxford University (Parks) during a visit to that city
many years ago. While walking through the parks I noticed a couple of workmen felling an English yew tree of fair size (about 9 inches in diameter).
So - always on the lookout for useful wood at that time- I enquired if I could purchase the timber. They referred me to the Parks Superintendent and a
sale was made. The
Superintendent then mentioned that they had recently felled a very large 'American' yew tree that might be of interest. This was about 24 inches in
diameter and had been slab cut into boards about 2 inches thick and 'stickered' to dry. I purchased the central board from the stack and this is the
material that I now have on hand - having given away the English yew logs to a couple of deserving luthiers in the UK who I trusted would make good
use of it.
The yew is unlikely to be 'American' as the only yews native to North America and Canada are small, shrub like trees (and now protected). I
assume,therefore, that I have a European variety of fairly straight grained yew of the type used to make the English long bow in ancient times - the
native English yew being of rather crooked grain and unsuitable for bow making. I understand that today the surviving stands of yew trees in Europe
are now protected.
OK - I still have a decision to make but am in no particular rush to do so!
|
|
|
Peyman
Oud Junkie
Posts: 496
Registered: 7-22-2005
Member Is Offline
Mood: Mahoor
|
|
Is yew easy to heat bend? The sample looks nice.
|
|
|
jdowning
Oud Junkie
Posts: 3485
Registered: 8-2-2006
Location: Ontario, Canada
Member Is Offline
Mood: No Mood
|
|
I had not tried heat bending yew before so did a test on a piece of scrap to find out. This was easily heat bent - dry - into a circle of about 110 mm
(4 1/2 inches) in diameter so I do not expect any problems. Yew is a very fine textured wood and quite hard for a "softwood".
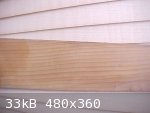
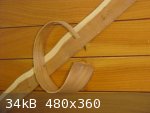
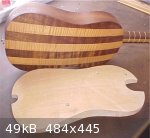
I have only used this wood before for the flat back of one of my vihuelas. The attached image shows the bent wood sample on the back of the vihuela -
to give some idea of the attractive colour of yew wood when finished.
The strip of yew alongside is a piece of unfinished English yew showing the contrast in colour between heart and sapwood (and the crooked grain).
Contrasting heartwood/sapwood ribs
(of straight grain) were often used in the construction of lute bowls in the late 16th C. - which gave the visual impression of double the actual
number of ribs.
|
|
|
Ronny Andersson
Oud Junkie
Posts: 724
Registered: 8-15-2003
Location: Sweden
Member Is Offline
Mood: No Mood
|
|
| Quote: | Originally posted by jdowning
I had not tried heat bending yew before so did a test on a piece of scrap to find out. This was easily heat bent - dry - into a circle of about 110 mm
(4 1/2 inches) in diameter so I do not expect any problems. Yew is a very fine textured wood and quite hard for a "softwood".
I have only used this wood before for the flat back of one of my vihuelas. The attached image shows the bent wood sample on the back of the vihuela -
to give some idea of the attractive colour of yew wood when finished.
The strip of yew alongside is a piece of unfinished English yew showing the contrast in colour between heart and sapwood (and the crooked grain).
Contrasting heartwood/sapwood ribs
(of straight grain) were often used in the construction of lute bowls in the late 16th C. - which gave the visual impression of double the actual
number of ribs. |
Is this what they call for ¨shaded¨ yew?
Best wishes
Ronny
|
|
|
jdowning
Oud Junkie
Posts: 3485
Registered: 8-2-2006
Location: Ontario, Canada
Member Is Offline
Mood: No Mood
|
|
Hi Ronny - yes it is sometimes known as shaded yew and it was a wood often used on lute bowls with large numbers of ribs. Because the ribs were narrow
in width, the grain of the yew had to be very straight so that sapwood/heartwood line ran - more or less - along the middle of the full length of each
rib.
|
|
|
jdowning
Oud Junkie
Posts: 3485
Registered: 8-2-2006
Location: Ontario, Canada
Member Is Offline
Mood: No Mood
|
|
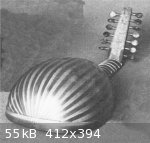
Just for information for those interested, here is an image of a lute with a bowl made with shaded yew ribs showing the contrasting sap wood/
heartwood of each rib. It is a treble lute by Wendelin Tieffenbrucker, Padua, Italy late 16th C.
The yew wood that I have in stock that I may use for the liuto attiorbato project is not shaded but is only heartwood.
|
|
|
abusin
Oud Junkie
Posts: 442
Registered: 3-23-2006
Location: Manchester England
Member Is Offline
Mood: Ya Fuadi La Tasal
|
|
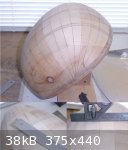
interesting looking oud on ebay UK
Hi JDownning,
Just saw this vintage looking lute on ebay, it looks like a carved one piece of wood if I am not mistaken.
this just in a bid to revive this interesting post.
best regards
Awad


|
|
|
jdowning
Oud Junkie
Posts: 3485
Registered: 8-2-2006
Location: Ontario, Canada
Member Is Offline
Mood: No Mood
|
|
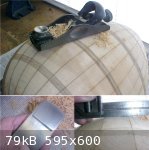
Thanks abusin - I have no idea what that instrument is or the country of origin. The bowl looks to me as though it has been made from strips of thin
veneer laid up on a mold - rather than carved from a solid block of wood - judging from the last image showing the end of the bowl?
By the way, this thread is far from needing revival - my last posting was only two days ago!
|
|
|
abusin
Oud Junkie
Posts: 442
Registered: 3-23-2006
Location: Manchester England
Member Is Offline
Mood: Ya Fuadi La Tasal
|
|
Thanks JD, I just got interested on lutes through your post's and probably by now I know many aspects about lute's I'd never known before and that due
to the detailed explanation on your post's which always gives me pleasure reading them. So when I saw this lute it somehow reminded me of your
experties and wanted to know something about it, and the shape was something I haven't seen before, so here you go now I learnt something new again
thanks to you.
Sorry about the reviving bit, what I meant to say is probably not finding the post on the todays posts list as I always follow the going on's daily,
so I had to go and fetch it from the oud project's folder.
Best regards and seasonal greetings,
Awad
|
|
|
jdowning
Oud Junkie
Posts: 3485
Registered: 8-2-2006
Location: Ontario, Canada
Member Is Offline
Mood: No Mood
|
|
No problem Awad - glad that you are finding the thread to be of interest and for sharing information about the instrument that you have discovered.
I am still puzzled by the 'lute' and wonder if it may have been originally made as a theatrical stage 'prop' - although it does look as though it was
meant to be played - with 8 double strings or courses, tied on gut frets, machine tuning heads, 'proper' soundboard etc.?
We will likely never know for sure.
Best regards and season's greeting to you too.
John
|
|
|
jdowning
Oud Junkie
Posts: 3485
Registered: 8-2-2006
Location: Ontario, Canada
Member Is Offline
Mood: No Mood
|
|
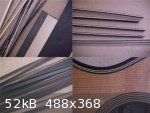
Each of the ribs of the bowl will be separated by a strip of contrasting material - in this case either black-white-black 'purfling' or just plain
black 'lines' Purfling or lines may be purchased from luthier suppliers but I make my own purfling from maple and dyed black maple veneer. Three
sheets of veneer (about three inches wide and of the required length) are glued together to make a veneer "sandwich" using plenty of glue (to avoid
glue starved joints), clamped between two flat pieces of wood. Modern knife cut veneer is quite thin and the glue can seep through the veneer under
clamping pressure so the clamping blocks need to be protected with plastic sheet to prevent the veneer composite sticking to the blocks. When the
veneer composite is dry, one edge is planed straight using a shooting block and hand jointer plane. I then use a bandsaw with a fine tooth blade to
cut a purfling strip of the required width from the veneer composite. I then plane the sawn edge of the composite straight again and then cut off the
next strip - and so on until all purfling strips have been cut from the veneer composite.
Solid wood 'lines' are made in the same fashion with veneer cut on the bandsaw and planed to the required thickness and then cut into lines of the
required width on the bandsaw. If I use lines for this lute they will be made from African ebony.
The image shows finished purfling on one of my 19th C guitar reproductions.
The purfling or lines have to be hot bent,like the ribs, and are quite fragile and brittle so I will run a few tests to ensure that what I have in
stock can be used.
|
|
|
jdowning
Oud Junkie
Posts: 3485
Registered: 8-2-2006
Location: Ontario, Canada
Member Is Offline
Mood: No Mood
|
|
My work on this and other instrument building projects has been temporarily delayed over the past couple of months while recovering from some routine
eye surgery.
Picking up the threads again today, some final adjustments were made to the mold to remove a few remaining high spots on the rib locations (which need
to be flat). A low angle, adjustable throat, block plane was found to be best for cutting the cross grain of the mold. To minimise grain tear out and
blade 'chatter', the plane was set with minimum throat gap and razor sharp blade - the plane being held at an angle to the grain of the wood using a
paring action. The planing was done with the neck block in position so that it matched exactly the contours of the mold.
The mold will next be given a coat of wood filler, smoothed with fine sandpaper and sealed with a few coats of shellac.
|
|
|
jdowning
Oud Junkie
Posts: 3485
Registered: 8-2-2006
Location: Ontario, Canada
Member Is Offline
Mood: No Mood
|
|
In order to shellac the mold, the neck block must be removed (it is held in place with two screws under the base plate of the mold).
With the neck block removed, the neck joint was cut to the required angle (it is a lot easier to do this now than after the bowl is complete). Some
judgement is necessary as allowance has to be made for the additional thickness of the ribs and neck veneers as well as the offset of the neck to the
bass side.
After checking the settings several times, the cut was carefully made on a band saw with the table set at 40 degrees and the guide offset by a few
degrees to give the required tapered cut for the neck offset. This should give a fingerboard width at the neck joint of 105 mm and a depth of 25 mm
(excluding the thickness of the fingerboard). However absolute precision is not necessary as adjustments can be made later as work proceeds with
fitting and shaping the neck.
A pilot hole was also drilled through the neck block for the screw that will retain the neck in place.
Now to prepare some fresh shellac to complete the mold.
|
|
|
Peyman
Oud Junkie
Posts: 496
Registered: 7-22-2005
Member Is Offline
Mood: Mahoor
|
|
It's good to see this project back on the track. I am curious about the renaissance guitars. Some have a sort of a semi bowl (a shallow one) instead
of the flat back plate we see on today's guitars. Were these constructed in a similar fashion as the lutes? I think you posted a picture of one you
made before.
|
|
|
jdowning
Oud Junkie
Posts: 3485
Registered: 8-2-2006
Location: Ontario, Canada
Member Is Offline
Mood: No Mood
|
|
The evidence from the few surviving instruments of the guitar family of the 16th C (two guitars and three vihuelas), as well as from engravings of the
period, indicate that a 'renaissance' guitar might have had either a flat back or a curved or vaulted back. Surviving guitars from the 17th C. are
also made this way. The flat back might be built from two plates like a modern guitar or from multiple strips.
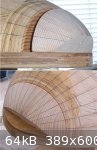
The vaulted back was constructed like the bowl of a lute from bent staves. The attached images show a vaulted back 'renaissance' guitar that I built
in 1974 for research purposes and the mold that I used. The mold was mounted on a flat construction board - blocked up to the required height - and
the guitar built 'Spanish style' i.e. with the sides slotted into the neck (which had an integral neck block). The neck was clamped to the
construction board - in effect forming part of the mold. The sides were then hot bent and shaped to the profile of the mold after which the ribs were
hot bent and fitted in place.
|
|
|
Peyman
Oud Junkie
Posts: 496
Registered: 7-22-2005
Member Is Offline
Mood: Mahoor
|
|
Thanks for the information. The instrument looks very neat. I am guessing that there is no back braces then. The reason I asked is because I have also
seen "lute guitars" with similar back configuration.
|
|
|
| Pages:
1
2
3
4
5 |


