| Pages:
1
2
3
4
5 |
jdowning
Oud Junkie

Posts: 3485
Registered: 8-2-2006
Location: Ontario, Canada
Member Is Offline
Mood: No Mood
|
|
Thats right - there are no back braces. The ribs are glued edge to edge - as on a lute or oud - and the joints reinforced on the inside with paper or
parchment strips. The vaulted back - although flatter in curvature than a lute or oud - is structurally strong so the instrument can be made lighter
in weight than a flat backed guitar by using thinner ribs.
The only 'lute guitars' that I am familiar with have a lute bowl with guitar neck, bridge etc. not the vaulted back configuration of early guitars.
|
|
|
jdowning
Oud Junkie
Posts: 3485
Registered: 8-2-2006
Location: Ontario, Canada
Member Is Offline
Mood: No Mood
|
|
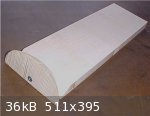
With the neck block detached I decided, at this stage, to cut and fit the neck blank to the neck block and instal the mounting screw - as it is easier
to do this now rather than later after the bowl is complete. The blank has been made well oversize to allow plenty of adjustment later when the neck
is trimmed, shaped and finally fitted. This will be done after the bowl is complete and the sound board temporarily fitted in place prior to gluing.
The angle of the joint was cut with the bandsaw table left at the same setting used to cut the neck block - in order to ensure correct neck block to
neck alignment
The wood for the neck is a piece of English sycamore (a kind of soft maple), cut 'on the quarter', i.e. with the end grain running vertically for
stability. I have several planks of this material that were bought as clearance stock from a wood yard in Northern England over thirty years ago. The
planks are so old that they were black on the surface when purchased but they clean up nicely with a couple of passes through a planer. I figure that
the wood, by now, will be stable enough for a lute neck!
|
|
|
jdowning
Oud Junkie
Posts: 3485
Registered: 8-2-2006
Location: Ontario, Canada
Member Is Offline
Mood: No Mood
|
|
The material for the bowl is now being prepared. The maple staves are finished to the required thickness of 1.3 mm (0.055 inch) - these are sequence
cut as a matched set.
The yew has been planed both sides but has yet to be finished to size as the best grain patterns have first to be selected and matched as closely as
possible from a fairly random set of oversized staves.
Each rib will be separated by a black-white-black purfling strip. These were made some years ago by gluing together a "sandwich" of maple veneer then
cut into strips about 0.80 inch wide on a bandsaw with a fine toothed blade.
The thickness is about 0.075 inch - a little too wide - so the width was reduced to about 0.065 inch using a simple, easily made tool. A series of
slots about 1/4 inch wide of varying depth was cut, with a router, in a small block of maple about 2 inches in width. Selecting an appropriate depth
of slot, the purfling is drawn through the slot while holding a small scraper blade, at the required cutting angle, on the block - repeating the
operation until no more shavings are removed.

|
|
|
jdowning
Oud Junkie
Posts: 3485
Registered: 8-2-2006
Location: Ontario, Canada
Member Is Offline
Mood: No Mood
|
|
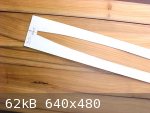
The yew selected for the bowl is cut into 13 strips measuring from 3 ft to over 4 ft in length and about 2 inches wide. Although the strips were cut
in sequence from a block, the grain patterns vary a lot between each strip and are quite widely spaced (for yew). A profile of the centre rib - traced
from the mold - was cut from a piece of card. By placing the card "window" over each strip it is possible to better visualise the grain pattern and
identify the best part of each strip from which to cut a stave so that all the finished staves will be a reasonable match and free of flaws. A total
of 8 staves are required so there is ample material for the job. The off cut material will be used to veneer the neck and pegbox to match the lute
bowl.
|
|
|
OudandTabla
Oud Maniac
Posts: 81
Registered: 2-21-2008
Location: Eugene, OR
Member Is Offline
Mood: Oud-a-licious
|
|
Great project! I love your binding thicknessing tool. Also, is yew a hardwood or softwood?
|
|
|
jdowning
Oud Junkie
Posts: 3485
Registered: 8-2-2006
Location: Ontario, Canada
Member Is Offline
Mood: No Mood
|
|
Yew is an 'evergreen' tree so is technically a softwood but it has a unique, closed pore, cellular structure. Not as dense as hard maple but pretty
close to sycamore that will be used for the alternate ribs of the bowl on this project.
Currently, I am running my entire stock of sycamore through a planer to remove the dirt of decades and reveal the underlying figuring of the wood
(something I should have done years ago). Maple/sycamore is one of my favourite woods. It is close grained, hard, 'non poisonous' and often has
spectacular figuring of the grain (which can be difficult to work). I have quite a few pieces to hand that are beautifully figured and which may be
selected for the extended neck/pegbox. Work on this component can proceed in parallel with making the bowl although the selected wood,after roughly
cutting to size, will be brought into the house to dry for a couple of weeks to final moisture content before use.
|
|
|
OudandTabla
Oud Maniac
Posts: 81
Registered: 2-21-2008
Location: Eugene, OR
Member Is Offline
Mood: Oud-a-licious
|
|
Sounds great... I heard something about Yew being more toxic to work with over on the MIMF forum, but I would still like to try it for the historical
significance. The exterior siding of my workshop is 4/4 by 6" mahogany, mostly knotty but some clear pieces. I have planed some of it up and made some
guitar necks out of it- some of it has beautiful figure to it as well, and it is really stable after air drying for a year.
|
|
|
jdowning
Oud Junkie
Posts: 3485
Registered: 8-2-2006
Location: Ontario, Canada
Member Is Offline
Mood: No Mood
|
|
Yew is a toxic plant - at least the berries and foliage are. I am not sure if the heartwood is - at least not as much as some of the oily tropical
hardwoods like Rosewood. With all woods it is best to avoid sanding as much as possible to minimise generation of fine dust which can lead to future
respiratory problems. Use a plane and cabinet scraper.
Mahogany siding! That really is a luxury but perhaps it is a readily available wood in your part of the continent - as maple, ash and pine etc are
around here? Of course, all wood is clear between the knots!
|
|
|
jdowning
Oud Junkie
Posts: 3485
Registered: 8-2-2006
Location: Ontario, Canada
Member Is Offline
Mood: No Mood
|
|
The upper pegbox is a complicated affair - difficult to visualise in three dimensions. There will be quite a bit of carving required to shape the
pegbox so it will be made in two pieces - joined along the centre-line. This will make the carving of inner part of the pegbox a bit easier but is
also necessary because I do not have any wood of sufficient dimensions to carve the pegbox from a single piece. Anyway, a 'built up' construction is
to be preferred to solid for better stability.
The plan for the pegbox extension is to make this from figured sycamore (a wood similar to maple) - rather than using engraved veneered panel overlays
like many original 'liuto attiorbati' - relying mostly on the beautiful natural figuring of the wood grain for decorative effect
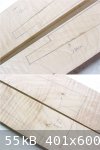
Not having wood of sufficient dimensions to cut 'book matched' blanks, it was necessary to carefully select blanks (cut from the same piece of wood)
having reasonably matching grain pattern. To check and assess the grain match, the outline of the pegbox - in plan and elevation - has been sketched
on the blanks.
The wood selected is of medium hardness and density for better wearing properties with boxwood pegs. The interlocking 'flame' figuring of the wood
grain also helps to improve wear properties.
I do not like the amount of 'waste' wood involved in making this style of pegbox but I guess that "you have to break eggs to make omelettes". In any
case, the off cuts will be saved and eventually used for other projects.
|
|
|
jdowning
Oud Junkie
Posts: 3485
Registered: 8-2-2006
Location: Ontario, Canada
Member Is Offline
Mood: No Mood
|
|
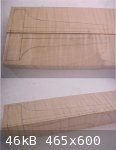
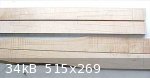
Continuing with wood selection for the pegbox extension, book matched blanks for the extension and the backing plate have been cut from figured
sycamore. The thickness of the extension blank is 15 mm and the backing plate just over 5 mm so there is very little excess material to work with.
|
|
|
jdowning
Oud Junkie
Posts: 3485
Registered: 8-2-2006
Location: Ontario, Canada
Member Is Offline
Mood: No Mood
|
|
"Book matching" is done by sawing a billet of wood down the middle and opening the two pieces "like a book" to create a symmetrical matching grain
pattern after they have been joined together. Usually some small lateral adjustment of the blanks is required to obtain an optimum match of the
grain.
Cutting a billet open often reveals hidden flaws in the wood that must be worked around or incorporated as part of the grain pattern. Maple and
sycamore are prone to staining during seasoning unless the drying process is carefully controlled. The staining - caused by bacterial action on the
sugars in the unseasoned wood - does not affect the strength of the wood. It is not a decay in the wood.
The wood selected for the extension has some staining at the upper pegbox end so the extension pieces will be cut to avoid the stain. The backing
plate has two symmetrically placed 'pin' knots at the lower pegbox end. There is sufficient material in the blanks to avoid the knots altogether or
they can be left as part of the grain pattern. This choice can be made at a later date.
|
|
|
jdowning
Oud Junkie
Posts: 3485
Registered: 8-2-2006
Location: Ontario, Canada
Member Is Offline
Mood: No Mood
|
|
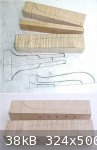
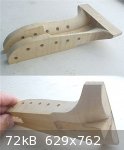
A change of plan.
The upper pegbox is now to be made in three parts - two side blocks and a central spine. This will facilitate carving and shaping of the pegbox
interior surfaces.
After squaring and fitting the three components, six pilot holes for the pegs have been drilled as it is easier to do this operation now than it would
be after shaping the curved exterior of the pegbox.
|
|
|
jdowning
Oud Junkie
Posts: 3485
Registered: 8-2-2006
Location: Ontario, Canada
Member Is Offline
Mood: No Mood
|
|
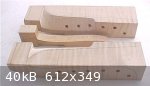
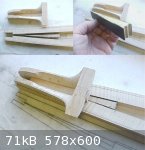
The internal components of the upper pegbox have been shaped prior to assembly. Rough carving was done with a sharp chisel, shaped with a small wood
rasp and then cleaned up with a file. The downside of working with highly figured wood is avoiding grain tear out.
|
|
|
OudandTabla
Oud Maniac
Posts: 81
Registered: 2-21-2008
Location: Eugene, OR
Member Is Offline
Mood: Oud-a-licious
|
|
Wow, that looks to be impressive! I like the way the curves are developing.
|
|
|
jdowning
Oud Junkie
Posts: 3485
Registered: 8-2-2006
Location: Ontario, Canada
Member Is Offline
Mood: No Mood
|
|
Making the upper pegbox is time consuming so will work on it bit by bit between other jobs.
The sides and top have been cut and finished close to the required profile leaving final finishing after gluing the sides and core which is the next
step. Shaping of the curved front and underside of the pegbox and trimming to length will take place after assembly. The final geometry is easier to
visualise at this stage.
Drill bits positioned in the pilot peg holes will ensure correct alignment of the sides while being clamped for gluing.
|
|
|
jdowning
Oud Junkie
Posts: 3485
Registered: 8-2-2006
Location: Ontario, Canada
Member Is Offline
Mood: No Mood
|
|
At noon today the relative humidity in the kitchen of our house hit a high of 80 per cent. This unseasonal - and possibly record breaking - weather
situation has put a stop to fine woodworking and music making. Hopefully it will all pass over in the next few days and conditions return to
'normal'.
In the meantime the upper peg box has been glued and carving complete - awaiting final finishing after fitting to the neck extension. The front and
top section of the pegbox will be veneered with African ebony to match the fingerboard and planned inlay of the neck extension. The back of the
fingerboard and neck extension will be veneered to match the alternating figured sycamore/yew ribs of the bowl.
Interestingly, the notes that came with the museum drawing of the original instrument state that "The carving in the upper pegbox is fairly crude"
Surprising, perhaps, in an instrument that, in its day, must have been a very fine, highly decorated, presentation instrument?
|
|
|
jdowning
Oud Junkie
Posts: 3485
Registered: 8-2-2006
Location: Ontario, Canada
Member Is Offline
Mood: No Mood
|
|
As the weather has continued to be very wet and humid, work has been restricted to cutting and shaping a few components. This morning humidity levels
dropped to 65 percent so I decided to move ahead with the first stage of the lower pegbox/neck extension assembly.
This a change of plan in that the lower pegbox/neck extension is now to be of 'built up' construction - made up of two side pieces, a tapered fillet
infill piece, a tapered end block and a back plate. The neck extension and lower pegbox on the original lute was carved from a solid piece with a
separate back plate.
As the assembly is intended to be permanent, it was decided to use epoxy glue - convenient to use and strong but irreversible once cured. There are
different formulations of epoxy glues commonly available from hardware stores so it is important to select a brand that will set hard and not remain
semi-hard in the cured state. The so called 5 minute epoxy glue varieties should not be used as they are lower strength and provide less setup time
needed for more complicated or critical assemblies. Always run a test on scrap material before using any glue to ensure it is satisfactory.
The first step was to prepare the two side pieces and the fillet infill piece. The fillet was cut and planed to the correct taper and two plates of
African ebony - about 2mm thick - were glued to each side. The ebony is to provide a decorative contrast between the natural figured grain of the side
pieces and the fillet.
The end of the fillet infill that will be exposed inside the lower pegbox was decoratively shaped as in the original lute. The shaping was done with
a file which gives a smooth finish on the end grain surface. The best files for this operation are those sold for sharpening chain saws - they are
round section parallel sided (not tapered), smooth cutting, good quality, readily available in various diameters and relatively inexpensive.
Prior to gluing, the components were 'dry' assembled to ensure correct fit and their relative positions marked in pencil on the side pieces as a
reference during assembly.
Here the fillet and side pieces will be assembled first and then followed by shaping and fitting the end block as a second, separate stage. This will
ensure exact relative positioning of the end block.
|
|
|
jdowning
Oud Junkie
Posts: 3485
Registered: 8-2-2006
Location: Ontario, Canada
Member Is Offline
Mood: No Mood
|
|
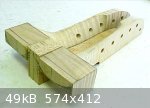
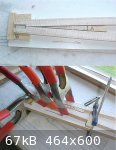
In order to glue a tapered assembly like this, a simple gluing jig is required to hold each component in its correct relative position until the glue
has set. The jig was made from a flat piece of particle board as a base with blocks B nailed to the board to locate the side pieces and block A to
hold the fillet piece in place. Without these blocks the fillet would simply slide in the direction of the arrow under a clamping force.
A piece of polythene sheet was placed on the jig surface to prevent the assembly being glued to the jig by any glue 'squeeze out'. Glue was applied to
each side of the fillet piece which was then clamped in place with spring clamps. Two clamps were also used to ensure that the assembly was held flat
on the base of the jig. After checking the assembly to ensure nothing had moved out of place, everything was left until the glue fully cures (in about
24 hours).
|
|
|
jdowning
Oud Junkie
Posts: 3485
Registered: 8-2-2006
Location: Ontario, Canada
Member Is Offline
Mood: No Mood
|
|
At last the humidity today dropped below 60 per cent. Still too high for more critical assembly work but there is other work that can proceed and I
need to finish this lute this year.
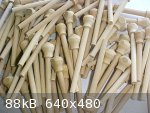
The peg blanks were turned as a batch a few years ago. About a hundred of this particular style were made using a profile cutter on a metal turning
lathe - so I have plenty in stock to choose from.
I need 19 pegs for this instrument - boring work - so will progress accordingly. This might take some time!
The pegs are made from a close grained hardwood - similar to boxwood - that I purchased many years ago, about 60 kilos, as small billets from a
warehouse clearance in the North of England. Described by the seller as 'South American Boxwood' it is likely that it was originally stock intended
for making spindles for the cloth weaving industry so may be a kind of dogwood or similar species. I have a couple of logs of genuine 'Persian
Boxwood' purchased from a British importer in the 1970's so I know it does not match the quality of that. Anyway it turns well and makes good pegs.
The image is the batch of peg blanks in their unfinished 'rough' state straight off the lathe.
|
|
|
carpenter
Oud Junkie
Posts: 248
Registered: 8-30-2005
Location: Eugene OR
Member Is Offline
Mood: brimming with hope
|
|
<< At last the humidity today dropped below 60 per cent. >>
Whew! You lucky pup! It's been 75 - 80% here in Oregon for months now; working on deferred house maintenance instead of instruments ...
I'm following this project closely; lots of good information and Points to Ponder, ideas to snatch. Thanks so much for the updates.
And that's some pile of pegs! Can't beat boxwood.
|
|
|
jdowning
Oud Junkie
Posts: 3485
Registered: 8-2-2006
Location: Ontario, Canada
Member Is Offline
Mood: No Mood
|
|
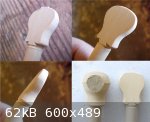
Completion of the pegs is done in two basic stages - shaping and finishing the peg head and cutting the tapered shank. Preliminary shaping of the
peghead assists in the cutting of the tapered shank by providing a positive grip - so this operation is to be done first.
Early lute pegheads were generally made with flat faces - not with a curved profile like modern violin pegs. Preliminary shaping is done by slicing
away all surplus material with a woodworking chisel followed by finishing with fine sandpaper. Each completed peg will later be 'fine finished' by
burnishing and polishing. At this stage, the objective is to remove most of the machining marks left by the lathe cutter.
The original pegs were made from ivory and had an ebony finial or ball in the peghead. An ebony finial might be the way to go to finish these pegs as
well.
More work to contemplate - but, hopefully, all worth it in the end! One peghead done only 18 more to go - yawn!
|
|
|
jdowning
Oud Junkie
Posts: 3485
Registered: 8-2-2006
Location: Ontario, Canada
Member Is Offline
Mood: No Mood
|
|
There seems to be a problem with uploading the last image so will log off and try again with another posting. to see if that works.
Finding it difficult to do the other essential non instrument work around the property with these high humidity levels Jim. How do you manage? Even
the 100 year+ varnished woodwork in our old house feels sticky to the touch. Ah well, no alternative but to just sit on the porch with a cooling beer
and enjoy the sights, sounds and beauty of nature until it all passes over- as it most certainly will a few short months from now - guaranteed - as
temperatures hit minus 40 C with relative humidity levels below 40 per cent.
|
|
|
jdowning
Oud Junkie
Posts: 3485
Registered: 8-2-2006
Location: Ontario, Canada
Member Is Offline
Mood: No Mood
|
|
OK - now it has worked.
|
|
|
carpenter
Oud Junkie
Posts: 248
Registered: 8-30-2005
Location: Eugene OR
Member Is Offline
Mood: brimming with hope
|
|
<< Jim. How do you manage? >>
I pretend it's reasonable, and I add cold beer to taste until the discomfort passes, then add another, to taste ... repeat.
I sold the Irish Doggies oud to a guy in Boston - thank Goodness the humidity's about the same, being a watery place.
But yeah, the instruments sound like junk when the wood's this damp; Winter's no clambake either - aka the "Rainy Season." Hmmm. Maybe they never
sound their best.
I don't recall seeing anything under 50% or so here, and I have a humidity gauge in the living room by the instruments, just to keep me concerned
daily, and on my toes.
So far, I haven't sold anything to New Mexico. That'd just be asking for it.
|
|
|
Jameel
Oud Junkie
Posts: 1672
Registered: 12-5-2002
Member Is Offline
Mood: No Mood
|
|
Nice work John.
You have no idea what humidity is. Today it rained and afterwards it was so humid that the pavement was steaming and our whole valley was shrouded in
a thick hot fog. I walked from the shop to my house and I was completely soaked in sweat in less than a minute. Making ouds now is tricky. I dont do
anything critical like work on tops or necks.
|
|
|
| Pages:
1
2
3
4
5 |


